Atmospheric photography. Atmospheric photos. Try to shoot with a high aperture
We will show and tell you how, by going beyond the "limits" of the classic studio portrait, you can create "atmospheric" photographs. Capture the environment - the spirit - of a place in its inextricable connection with people, the relationship between them and their daily work.
Try to create "others", add freshness and innovation to them. Take a fresh look at the world, leaving the walls of your usual studio and plunging into its wide embrace. Atmospheric photography is a style for creating portraits. Its idea is to show people who are in their familiar surroundings. Where they live, work and play.
Typically, atmospheric photography is in demand in the magazine and newspaper press. Pictures that include details of someone's "environment" can "tell" more about her than classic portraits.
Creating a photo story in the style of atmospheric photography is perfect both for fulfilling a commercial order (filming a business process in an institution, at an enterprise), and for creative experiments in order to "open up a second wind" in shooting portraits.
A serious advantage of reporting in this style is the relaxed state of the characters. After all, they are in their everyday environment. As a result, they will be easier to capture in natural poses. To create spectacular “atmospheric” shots, you need your DSLR with a standard lens and a little patience. We'll show you how to take advantage of all of this to shoot a reportage in the style of atmospheric photography.
We headed to the Society Café in Bath to take pictures of the staff at work. The location is ideal for training. It is constantly "boiling" with life, and the surrounding environment is attractive in details and creates a context for the photo story.
The secret of good atmospheric photography lies in finding the "golden mean" between the hero and his surroundings. Remember that the person is the center of your shot. The environment around him hints, "revealing", to his individuality and peculiarities of life.
Check out our guide on how to apply props, various shooting situations in which you can get great portraits. Learn how to add variety to your shots with wide angle lens (approx. translator - you can learn more about the types and parameters of lenses in the second part of the series) and the effects of black and white photography. And also, what camera settings to choose to create high-quality images in each shooting situation.
- Find out more: "10 Common Mistakes in Portrait Photography"

“Warm up” by capturing several spontaneous scenes. Shoot what the characters do every day. For example, in the photo above, barista Ash is making coffee. Stay slightly aloof. The less you impose on your heroes, the more relaxed they are. It takes a few minutes for people to overcome the awkwardness that comes with the knowledge that they are being photographed.

Additional accessories can emphasize the personality of the hero and "take hands", create conditions for a more comfortable posing. An example is a photo of Katie with a cake. Props help make a photo meaningful when the background is boring. The products on sale, tools, even parts of a uniform such as a chef's hat, instantly awaken interest in what is happening in the image, providing it with detail.

To enhance the "documentary" feeling of the photo, transform it into black and white at the processing stage. Black and white photography is always relevant. In addition, discoloration "relieves", makes it easier for perception, a picture replete with actors. An example is the photo above.
- Find out more: "10 Common Posing Mistakes"

When several spontaneous scenes are "captured" on the memory card, ask the heroes to pose for you.
Place the model in the semantic center of the frame, in focus, against the background of what is happening around. Maintain a conversation with the hero while taking pictures. This will keep the subject's face relaxed and the emotions alive. If the background is “cluttered” with events, decrease the aperture value, for example, to 3.5 to “blur” the background more.
- Find out more: "17 Tips for Shooting Models in the Body"

For a “different angle” view of what is happening, make sure you have a wide-angle lens, such as the Sigma 10-20mm, in your camera bag. Include more details from your surroundings. Wide-angle shooting is especially useful when you need to capture several people crowding next to each other in one shot.

If you are photographing indoors, as we are, ask the model to stand near a natural light source. We asked barista Alistair to stand next to the window to make the final image lighter. In low light conditions, a reflector such as a "gold" one can help. Ask a friend to hold the reflector in such a way as to direct more light onto the subject's face.
Camera settings
Switch to aperture-priority ("A") shooting mode

You have to take pictures "handheld" in a rapidly changing environment, so shooting in manual mode(“M”) may not be the best choice for capturing high quality pictures. By switching to aperture-priority (“A”) shooting mode, you control the aperture value. The rest of the settings will be taken over by the camera.
Increase sensitivity

If you are shooting indoors, then you will need to raise the sensitivity, for example up to ISO 1600, to compensate for the lack of light intensity. The resulting images will show "grains". But the "price" is justified by the freedom of movement and the ability to get sharp pictures in any shooting situation.
Try to shoot with a high aperture

It is only natural in portrait photography if you aim for shallow depth of field ( approx. translator - you can learn more about the depth of field in the third part of the series). However, when you are shooting “atmospheric” photos, try to avoid a strong “blur” of the background. If you are shooting with the lens that comes with your camera, set the aperture to a large enough value, for example equal to 8. Then most of the environment will remain "clear" and saturate your photo history with details.
The drains are gradually moving away from an overly postcard look. Premium stocks, like Stocksy, Offset, are replete with images that we are talking about “ atmospheric”. Moreover, shutterstock calls atmospheric photos one of the trends of 2016.
In atmospheric scenes, the light is dim, hazy, dramatic and even gloomy. There “a cloud covers the sky with darkness” - and this is very popular with premium buyers who are ready to pay decent sums for such scenes (from $ 200 and more).

This article provides you with 10 tips for creating atmospheric photos (as well as photos that you want to look at because of their atmosphere).
1. Shoot in low light during the day
Light is always a key parameter in good photography. And now in
dear stockIn photography, light can be described with the phrase: "The less, the better."Do not be saddened by the absence of the sun outside the window. Go out and shoot - you will still end up with a spectacular photo that will have high commercial potential. Moreover, it is not a fact that the potential will be higher with the sun. In general, the residents of St. Petersburg and the British are incredibly lucky: with their foggy weather - they have all the cards in their hands.

If you are committed to sunny postcards, and for you the transition to fogs is a strong way out of your comfort zone, then the first step to new photos in your portfolio might be this: shooting in the early morning, when it is already light, but the sun is still below the horizon. Then you can catch the first rays of the sun. which delicately and selectively illuminate the scene. And thus, with one click of the shutter, you will slap two birds with one stone: you will have both the sun in the frame and the atmosphere.

In the same way, you can shoot in the late evening, when the sun is almost gone. Just remember that in the evening you are catching up with the sun, and not it with you - you can quickly miss a beautiful moment.
2. Fog
For the most atmospheric of atmospheric shots, fog is best. A couple of years ago, it was impossible to imagine that foggy photographs would be in demand. But times are changing, fog is becoming a trend and a squeak of fashion. Therefore, it is important to seize the moment. And it is joyful to run out into the street with a camera down, when it is foggy and damp - these have recently been the most favorable conditions for a stock photographer!

But instead of relying on chance, your chances of capturing atmospheric photos will increase if you take additional work... No matter how trite it may sound, but choosing the right time for shooting helps viewing weather reports and simply observing the weather in the area where you live. Nebulae often congregate in the same places at the same time - patterns of this weather behavior are easy enough to track.

Investigate the habitats of the fog, devote time to it. Because the fog usually does not last long - and it is very important not to waste time to catch it “red-handed” in its best possible way. Favorite places fog are: valleys among mountains and hills, forest, near water bodies, meadows.
3. Clouds, curly frowning clouds
Heavy clouds add atmosphere to the pictures, and how! They seem to emphasize the power of the elements and the helplessness of the environment - this drama will make even the most fearless heart tremble.
Dark skies create a stunning background for subjects in a landscape shot. It makes the frame more “meaty” and fuller. Yes, even in the classic stock photos "a lonely derefo in a field against the sky", those images with clouds in the sky win.

Try to shoot a lonely tree, a traveler, or some kind of architectural structure against the background of a dark sky. Or you can capture the beauty of the clouds by shooting them without any objects in the foreground - you will also get an interesting shot.
4. Get lost in the woods
A deep forest is great for atmospheric photos. Trees can be used to create volume and depth in the frame. You can find unusual objects: crooked trees against the background of straight lines, ditches, fallen trees, etc.
The forest (like any other subject) takes on a completely different look if you change the angle of the survey. For example, you can shoot close to trees from bottom to top - and this will give a sense of height.
Don't forget about exposure when the sky is in the frame. The sky, even behind the clouds, is a much more contrasting object than trees. This can cause trees to be underexposed. If you need silhouettes of trees, then expose in the sky, but if you need details in trees, then you have to sacrifice details in the sky.
5. Lonely trees are a stock inspector's nightmare
Once lonely trees were so sore that they were even mentioned by the stock inspector in his biography. But it’s beautiful! And lonely trees are returning with triumph to atmospheric shots!
Shoot from a low angle so that only a lone tree looms on the horizon and nothing else. And if there is fog in the scene, then it will further contribute to hiding annoying objects from the field of view. Bonus: A low point of view will also help add more detail to the foreground.
Get in the habit of taking a few shots as you approach a lonely tree. And you can get completely different frames (of course!) The next two pictures were taken just as we approached the tree. The first photo includes the road leading to the tree:
In the second frame, the tree is the dominant object:
6. Add people to the frame
When you include people in a landscape shot, you better emphasize both the scale of the scene and ... the atmosphere.
You can use the subject's body language to emphasize the mood of the shot. People with their heads down, people pensively looking into the distance, people leaning on a lonely tree - these are all different moods and different stories. Silhouettes also work well in atmospheric shots as they give the scene a mystical effect.
In order to shoot a silhouette in atmospheric weather, you need to shoot against that weak light source that is still present in the frame (although it is often not enough to get a silhouette). Since naturalness is in fashion, people in the frame should not pose (at least not too explicitly). If they are running, jumping, then you can use burst shooting to choose the most successful shot. If you really need to ask someone to pose in the frame, then make sure that the pose expresses a certain story, carries a certain message to the viewer.
7. Add the entry point to the foreground
The entry points in the foreground of the large stage also create atmosphere and mood. The entry point can be dry plants, spider webs, feathers, etc.
If you focus on a close subject, then a small depth of field will be created, that is, background objects will be beautifully blurred, adding an additional effect of mysticism to your pictures.

8. Look for interesting structures
Do good shot requires work. At the very least, you need to be able to stop in a familiar place and take a good look around you. People overlook a lot when it comes to familiar locations (say, not far from home). For example: electric poles lined up beautifully along the field, abandoned buildings, remnants of old fences.

All of these objects add a strong point of interest to your shot. They also help tell a more interesting story about the landscape you are shooting. It is the familiar objects, competently included in the frame, that give the mood result.
9. Tone
As a result, we get a picture in monochrome style (see trends of 2015). remember that monochrome is not black and white and its toning. There can be different colors in the image - it is important that they are in harmony with each other.
In post-processing, also make sure that the key objects of the composition (for example, in the foreground) are "highlighted" to create the effect of depth (the further into the forest, the thicker partisans are darker)
Pay attention to the exposure and the parts of the frame that you want to fill in with details - expose for them. And don't forget to emphasize the atmosphere with post-processing: color grading, tone correction and texturing are your main tools.
Whatever scene you photograph, if you add atmospheric light and mood to it, it will become much more interesting. This is what will make your images stand out.Artem Kashkanov, 2012
Probably not everyone knows what "atmospheric photography" is. In general, it is difficult to give a clear definition of the concept of "atmospheric". In general, it is a set of visual aids that immerse the viewer in the atmosphere of a painting, photography, film, or computer game. Sometimes images and photographs made in this style have very little to do with reality, but at the same time they do not lose their exceptional emotionality and attractiveness.
The first thing that comes to mind when looking at these photos is "wow !!!", or "well, it's obviously not without Photoshop!" As for the second statement, I'm ready to argue for anything, but to get most of these images, Photoshop is not needed. The maximum that is required from software is a RAW converter that has a basic set of tools for image correction - adjusting white balance, levels, saturation and other basic settings.
There are two main approaches to taking "surreal" photographs:
1. Take a photo of an ordinary landscape in Photoshop (or another similar editor) make the picture surreal when processed by computer... It falls under the same category.
2. Force the camera see the picture the way we want it to be thanks to the use of some assistive devices.
Both approaches have their advantages and disadvantages. In the first approach, the biggest disadvantage is that you must master Photoshop, be able to notice the flaws that come out during processing and correct them correctly. The matter is complicated by the fact that one has to be content with the characteristics of the camera - photographic latitude (dynamic range), a set of sensitivity settings, shutter speeds, apertures. No matter how perfect the technique is, such frames still regularly appear that cannot be captured in 1 shutter actuation - you have to turn on bracketing, and then combine the resulting images into one, using special and not always free software. Often, it is long and not always creative work... As far as the level of Photoshop proficiency is concerned, it must be exceptional. Unfortunately, most amateur photographers do not have such a store of knowledge (I am no exception!) That would allow turning ordinary photographs into masterpieces of surrealism, while maintaining impeccable image quality.
The second method is convenient because you yourself, by controlling the depth of field, light filters, reflectors and other "gadgets" already at the entrance to the lens, form such a picture that will not need further processing (or, it will be enough to limit yourself to basic operations - brightness, contrast , BB). The disadvantage is that you need to have in your arsenal a whole set of additional accessories, sometimes not cheap - firstly, and secondly - to be able to use it. This article will discuss exactly this approach in relation to landscape photography. The photographs taken by me during a recent morning "expedition" with a camera to the floodplain of the Oka River (near the town of Pavlovo, Nizhny Novgorod Region) will be taken as visual material.
What equipment did I take with me on the set?
- Camera Canon EOS 5D... Let beginners not be confused by the class of technology, amateur DSLRs are also quite capable of such things.
- Lens Canon EF 24-105mm 1: 4L IS USM... For cropped cameras, I recommend an equivalent wide-angle, such as the Canon EFS 15-85mm.
- Polarizing filter HOYA HD CIR-PL (77 mm)- I recently bought it in the Softmarket online store for 3,790 rubles, now it has risen in price there, but it still costs much cheaper than in stores.
- Gradient filter - sometimes it helps a lot, sometimes it spoils - until I finally tried it :)
- Tripod- not useful, and lain in the trunk.
Before going to the shooting ...
You need to do two things - decide on the time of the photo session and its place. The most valuable time- from the moment the sun rises until it has risen high. Typically, this is about two hours. The sunrise time in your region can be viewed on the Internet - a lot of sites contain such information, for example, this one - travel.org.ua/sunrise. There are similar programs for mobile phones and tablets, very convenient!
The best weather for filming is in the morning in clear, calm weather. Morning weather can be predicted by a number of simple signs - abundant dew on the grass in the evening, a clear horizon at sunset. If the wind rises at sunset - this is a bad sign, even if it does not blow up clouds, it will disperse the fog - this can greatly spoil the results of the photo expedition. Check the weather - an hour before dawn. If the sky is clear, with light cirrus clouds, and there is no wind, then you can safely go. If the sky is covered with a veil of clouds or the wind has risen, you can safely sleep on.
When choosing a location for shooting, it is better to give preference to those places where there is a thick fog in the morning. Basically, these are flooded meadows with small lakes and sparsely growing trees. Such a landscape is often found in river floodplains. There is nothing to do in the forest (as well as on forest lakes) - all the delights of morning nature - fog, huge drops of dew on the grass in the forest are difficult to find. The most that you can see is a light fog creeping from the shores of forest lakes.

Nice, of course, but on a clear summer morning you can find more interesting landscapes!
Oddly enough, at dawn, beautiful landscapes can be found where during the day we are used to seeing a very dull landscape. As I said, we are going to the flooded meadows. Naturally, there is no more water on them - since the end of spring, tall grass has grown on them. So, let's take a look at typical scenes from the "dawn over the meadow" category and see how best to photograph them.
Sun in the frame
How is it usually? Here is a typical example from Yandex photos - though not dawn, but sunset. I was looking for sunrises - a continuous "triumph of Photoshop", but I was interested in "raw frames".

"" On Yandex.Photos
A familiar situation, right? Whitewashed sky, the sun was smeared into a huge pancake, the ground is almost black. The dynamic range is sorely lacking. This nuisance can be circumvented in two ways:
1. Tripod, bracketing, HDR- long, dreary and a good result is not guaranteed. Here's a good example, but the picture looks a little fake nonetheless. Nevertheless, in my opinion, a lot of time was spent on processing.

Sergey Stepanenko "Field lamps"
2. Gradient filter... An example of use is below ...

Almost the same, but without any dancing with a tambourine. EXIF data: shutter speed 1/80 sec, aperture 8, focal length 28mm, ISO100 - as you can see, nothing special, these parameters can be set on any device, even a soap dish! Naturally, you can continue to process the image in Photoshop, but I decided that it is quite possible to stop at what has been achieved when shooting.
Morning sky
In the early morning on a sunny day, there are often very light cirrus clouds in the sky, forming interesting swirls. Unfortunately, they are very poorly visible to the naked eye, since the fog surrounds us and practically hides the sky. To see him will help us polarizing filter... Let me remind you that the main property of a polarizer is to "muffle" the reflected light. The polarizer makes the fog transparent, but it makes it very interesting - the fog lying above the ground remains dense, but a "window" appears above us, through which cirrus clouds are visible.

I think this example is enough to understand how to use the polarizer when shooting in the fog in the morning. The polarizer works best when the sun is at our side.
"Other planet"
The photos below are the result of an experiment - using a polarizing filter and a gradient filter together.

The results of the filters overlapped each other - the polarizer "pierced" the fog layer and allowed to see the blue sky (though there were no clouds), the gradient filter made this sky darker and helped to lighten the ground a little. The photo created a mystical and, I would even say, unearthly atmosphere - another sky, another grass, another air!
As stated earlier, a circular gradient filter is a thing that can help or hurt. Here is an example, when the gradient filter works "on the brink of foul" - the top of the tree also "got hit" and turned out to be darkened.

There are two more features of using two filters together. First, vignetting. With a focal length of 24mm, black corners are visible at the edges of the frame. To get rid of them, you need to extend the zoom to at least 35 mm.

The second feature - do not screw the filters tightly to each other! It will be more difficult to separate them later than to connect them :)
"Hedgehog in the Fog"
This famous cartoon has received several awards for "Best Animated Film", including foreign ones. And it's not just that ...
On the morning shoot, you find yourself in about the same atmosphere! For example, when I was climbing along the shore of a lake, I slipped and almost threw myself into the water with my camera :) It's funny, but every joke has some truth.
Being in dense fog, the photographer gets a wonderful opportunity to build very harmonious and balanced compositions literally "out of the blue". The fog hides all the photo debris, making it possible to focus the viewer's attention on the desired object or combinations thereof.
In the fog, many principles of classical photocomposition break down and completely different principles come into force - those on which compositions are built in the style minimalism... The main object does not have to be 100% visible. If an understatement remains in photography, it can be compensated for by the richness of associations that a photographic work can evoke in the viewer.

Misty rainbow
This time I saw this interesting phenomenon for the first time in my life. It arose 1.5 hours after sunrise, when I was on my way home. Unfortunately, the road ran through an open field, so it was not possible to build some more or less complete composition, nevertheless, I am attaching a photo.

On this optimistic note, I think the theory can be finished and started to practice. I wish you all successful experiments!
An idea is important in every photo. The atmosphere of the photo is primarily the emotions of the model, but the environment is also important. It is she who fills the picture with meaning.
If you do not prepare for the shoot and do not think over all the details, then the photo shoot can be terrible, since it is very difficult to improvise without the ability to change anything. You always need to think over a shooting plan in advance, describe everything point by point and draw light schemes and frame construction on paper.

It is equally important to find mutual language with the model. Each person has his own vision of the picture and it does not always coincide with yours. You need to learn how to tune the models to your principle and pace of work, but you yourself need to be flexible and adapt to the models. Try to work only with those models that interest you. If a person has pleasant facial expressions, an interesting type, style of clothing and behavior, then this can be used in your creative projects.

If it comes to commercial photography, then you have to look for the best and most interesting features of their appearance, plasticity of movements, figures in their models. Most portraits are shot at dusk or dawn. This time is called the golden hour. The shadows are soft and pleasant. The dynamic range of images is as wide as possible. The colors are pleasant and warm.
Often photographers tell their models what pose to take. You have to work with beginners, but if the model is experienced, then she needs to set the mood and direction of movement. Then it remains only to catch the moments. You can just chat and take shots at certain moments. They can turn out to be very lively and vibrant.

Post-processing of photos is also important. When processing images, it is necessary to carefully work out the color and lighting. Everything should be harmoniously combined. All colors in the image must match. Even if a detail that gets out of the general picture crept in, you will have to remove or repaint it.
There are many sites and articles on the Internet that will provide you with comprehensive information on color matching. One of the best color matching services is colorscheme.ru. important role than idea, processing and preparation. Using natural or architectural lines, you can achieve depth, make the viewer follow the gaze from one object to another.

Several primary colors can be distinguished in the photograph. It is they who will decide the general gamut of the photograph. You can find a number of complimentary colors and decorate everything in these colors.

In order to understand how to use certain principles of creating images, working with perspective and color, you need to analyze the work of professional photographers and try to imitate them, or just use the rules in your work and, of course, be attentive to details.
 Examples of funny, cool and cheerful New Year's scenes for holidays and corporate events
 Barn owl reproduction - barn owl photo
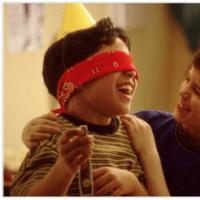 Birthday contests for adults and children
 Photo on avu for guys, no face, the most beautiful and coolest
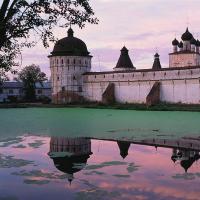 Contemporary masters of photography: Vadim Gippenreiter Vadim Gippenreiter biography
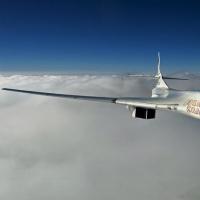 Airplane "White Swan": technical characteristics and photos of Tu 160 m2 characteristics maximum speed
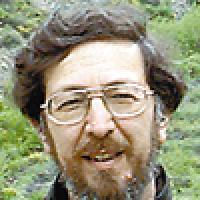 Banner work without wages