The ancient art of glass blowing. How to blow glass How to blow glass
A strongman in a circus inflates a hot water bottle, a dad inflates balloons for a child's birthday, an alcoholic blows vodka, and a baby just blows his pants. But there are people who decided to devote their lives to making very beautiful products from the most fragile material - glass. These are glass blowers. Most likely, this profession cannot do without a bit of magic. How else can you explain the fact that real works of art can be made from a handful of nondescript sand? Want to know how it's done?
Pantry glass
In the Tavastia region, in the Finnish town of Riihimaki, there is one place - an old glass factory.

One of its premises today houses a glassblowing workshop and a gallery for artists Maria Hepo-aho and Kari Alakoski. Maria and Kari are well-known and recognized glass artists in Finland. They produce everything from jewelry to vases and tableware.

Anyone can come into the workshop and touch the magic of glass, make beads for themselves and buy their favorite products and souvenirs. And most importantly, Masha is from Russia, and you will have absolutely no translation difficulties. :)

The spacious workshop has several work stations. For example, here Masha makes glass birds, looking at a book about the birds of Finland.


It's hard to imagine until you see how these colored glass rods turn into owls, cockerels, storks and sparrows. Masha studied this craft at the university for 6 years!

You won’t find any kind of intricate crafts here: balls, beads, vases, glasses, decanters, candlesticks - all this is then sold to shops and glass exhibitions.


Thousands of colors and shades, shapes and shadows!


Ice styling, designer finds, glasses-candlesticks - you name it!


There's even an old one cash machine, which Masha found with difficulty and bought. This is the First Lady of the workshop. It still works great, and instead of ringing silver in the cash drawer there are modern euros.

But one thing attracts attention more than the rest. How did bubbles appear in this glass mortar? Laser technology? Magic?

Masters reveal secrets
It didn’t take much convincing - Maria herself offered to make the same mortar with magic bubbles before our eyes. As prosaic as it may seem, everything in our world begins with dust. Masha scooped out a handful of glass raw materials from the bag, which they buy in Sweden. These balls will then end up in the oven, where 1200 degrees Celsius will turn them into a thick, viscous mass.

It is this mass that Kari is now wrapping around the end of a long metal tube.

This little piece of light will have to go through fire, water and copper pipes on the way to its final and perfect state.

First of all, the glass needs to be shaped and the surface of the workpiece must be slightly cooled. Technology has not changed much since glass blowing began in Finland (almost later than anyone else in Europe). For this, Kari uses special water-soaked wooden spoons, in which he constantly rotates the workpiece. Wet wood allows you to lower the temperature very smoothly glass mass without letting it crack.

At the same time, Kari shapes the future mortar using metal tongs, making a thinning at her throat. All this time he rolls the tube with the workpiece on a special chair - the main workplace of the glass blower. If this is not done, the viscous workpiece will flow down under its own weight.

At the right moment, Masha joins the process.

With the help of such a mechanism, more like a medieval instrument of torture, the workpiece is clamped and corrugations are created on its surface.

This is what our piece of glass looks like now. Doesn't it look a lot like a glowing light bulb? This corrugation is the whole secret of the magic bubbles.

Now Kari is heating the workpiece again in the oven, which is called the Glory Hole. After this, he again collects fresh glass melt in the first furnace, wrapping the workpiece with a second layer of glass.

Then Masha begins to play the main role. Using old wet newspapers folded in several layers, she again cools the workpiece to the desired temperature and viscosity. Wet paper absorbs heat very well and smoothly, preventing the workpiece from cracking. Layer by layer the paper burns, taking away excess heat and giving the required form future mortar.

The second layer of glass seals the pits of the first layer, and Kari inflates the workpiece from the inside.

This is how bubbles are created.


After this, it’s time to work on the neck of the mortar. To do this, you need to change the place where the workpiece is attached to the tool. To do this, Kari takes a second tube, wraps a small piece of glass around it and glues it to the bottom of the mortar. When the mass sets, you can remove the first tube by breaking it off from the throat.

Masha cuts off everything unnecessary with scissors, forming the future neck of the mortar.

Kari smoothly expands it with tongs...
...and we get an almost finished mortar.

A few final touches...

And the mortar is ready! But not really...

After breaking off the tube from the bottom, sharp pieces of glass remain on the surface, which must be smoothed with a special burner.

And even after this, the process does not end - the mortar will need to rest for a day in the third oven, where 500 degrees Celsius will remove all internal stress from it. This must be done so that the mortar does not one day shatter into pieces even from a weak blow. This process is called tempering, as in metallurgy.
This mortar will be sold to lovers of all things elegant and handmade for 30 euros. You can grind seasonings in it, prepare medicines, or simply decorate a room with it.

Let there be color!
Do you want to know how these colored vases are made?

The highlight of the process is the addition of pieces of colored glass at the initial stage.

During the blowing process it dissolves thin layer inside the main mass, giving the product a unique color.

But what will happen if you do not smoothly cool the workpiece with wet newspapers, but abruptly place it completely in a bucket of water. The surface is covered with small cracks, which create a texture pleasant to the touch.

Masha and Kari are gods of glass in their workshop. They can even take a photo as a souvenir. Over the years, they have accumulated hundreds of different techniques that are beyond the reach of many of their competitors in Finland.

For a small fee, they are ready to give you a tour, a master class, and even give you the opportunity to blow something yourself. They are often approached by people who would like to turn their artistic ideas into reality - to make an exclusive set of dishes, decorations, corporate souvenirs and much more.
At first glance, it may seem that glass production requires very complex compounds. chemical substances obtained the hard way. But in reality, glass is produced quite in a simple way using the most ordinary components.
Glass is an alloy of certain materials, cooled in such a way that the atoms in its structure group together in a chaotic manner. An interesting fact is that 95% of the Earth's minerals can be used in the glass production process. The most important of these are (silicon dioxide), soda, limestone, borax, boric acid, magnesium oxide and lead oxide.

It is noteworthy that the first glass was created by nature itself. About 450 million years ago, molten rock from the Earth's interior rushed to the surface and, with the help of volcanoes, pierced the earth's crust. When hot lava contained silica and quickly solidified, it formed glass that was as hard as rock. There is an entire mountain in California covered in volcanic glass.

Volcanic glass is called obsidian. This extremely hard and durable mineral is widely used in industry, and especially beautiful examples are used to make jewelry. Due to its high hardness, obsidian belongs to.

Man has been making glass since ancient times. The Egyptians knew how to make colored glass more than five thousand years ago. They covered stone products, dishes with this material in the form of glaze, and sometimes made beautiful beads and other jewelry. Perfume and ointment bottles made from glass were already used in Egypt over 3,500 years ago.

The period of the Roman Empire (1st century BC to 5th century AD) was one of the greatest periods in the history of glass. It was at this time that man mastered how to blow glass and how to give objects a certain shape and at the same time make them the right size.

Glass blowing.
The process of glass blowing is one of the oldest human skills. But since modern mechanisms have been developed and the need for glass products has increased significantly, manual glass manufacturing technology has become very rare.
When the glass is in a molten state, it can be processed different ways. For example, it can be pressed, blown, painted or rolled. For centuries, the main method of glass processing was blowing, which helped to make the most different variants glass products.
The glassblower collected a ball of molten glass at the end of a straw and blew into it. Using his skills, he gave the glass the desired shape and brought it to the desired thickness. He constantly heated the glass to keep it in working condition for as long as possible. Then the master finished the processing with special tools.

Many types of glass objects were created in this way. Glass can also be molded into a desired shape. Surprisingly enough, window glass used to be made by blowing a long cylinder, which was then cut and rolled to form sheets of glass. Of course, the size of these sheets was limited by the strength of the glassblower's lungs.
Today, a similar process for producing glass, which is called handmade, is increasingly used in the production of special scientific equipment or expensive, magnificent glass products. Today, the manual labor of a glassblower is highly valued, and to work in this industry a person requires significant professional skills.

Manufacturing of glass bottles.
Over time, the need for glassware such as bottles became so great that every effort was made to create a glass blowing machine, which was invented in 1903.
The machine uses a vacuum to blow enough glass for one bottle. First, the neck of the bottle is formed. Then served compressed air, and the entire bottle is blown out.
After this, the resulting product is automatically fired and hardened, and then a slow cooling process occurs, which makes it durable. Such a machine is capable of producing more bottles in one hour of work than six manual glass blowers in a whole day.

Later, another machine was created to automatically blow out light bulbs, which allowed for wider use of electric light. The majority of all standard bottles, jars, jugs, glasses and other glass containers are machine-made.

Today, of course, there are many new ways to make glass, but this is the basic process. The raw materials for glass production arrive at the glass factory and are stored in huge tanks. The required amount of substances is measured, dosed, and then mixed in the correct proportion.

Broken glass, similar to that produced and called "glass scrap", is added to the mixtures to speed up the melting process. The resulting mixture is automatically fed into the oven. The molten glass then flows out of the furnace to cool.

It then goes through numerous processing processes, such as blowing, pressing, rolling, casting and painting - depending on the type of glass to be obtained. Thus, it is possible to produce both simple window glass and patterned glass, characterized by high decorative qualities.

Instructions
To manually blow any shape, you need to attach the prepared shape to the end of the tube. Into which you need to blow glass. You need to do this quickly enough, otherwise the glass will harden and nothing will work. Therefore, during so-called manual blowing, many people use units that constantly maintain the glass in liquid state, that is, they heat it up. In general, this is the method of blowing that is used when you need to get a thin material rather than a thick one. Because only a person can correctly adjust the exhalation force so that the product turns out thin and perfectly transparent.

To make a figurine from different parts connected to each other, you need to blow them all in turn. And then, when the glass has slightly hardened, solder them together with a heated torch.
If you want to apply a pattern to the glass you are blowing, then you need to take care of additional tools. These can be scissors (regular and diamond-shaped), tweezers, forceps and much more. Using scissors, you can apply edges to glass and cut out a specific pattern. Using tweezers, you can twist the product so that it becomes original and unusual. The main thing is to have time to do all this while the glass is still straightened and amenable to alterations. Now all that remains is to paint it, and the original souvenirs are ready.

A strongman in a circus inflates a hot water bottle, a dad inflates balloons for a child's birthday, an alcoholic blows vodka, and a baby just blows his pants. But there are people who decided to devote their lives to making very beautiful products from the most fragile material - glass. These are glass blowers. Most likely, this profession cannot do without a bit of magic. How else can you explain that a handful of nondescript sand turns into real works of art? Want to know how it's done?

Pantry glass
In the Tavastia region, in the Finnish town of Riihimaki, there is - old glass factory.
In one of its premises today there is glassblowing workshop and a gallery by artists Maria Hepo-aho and Kari Alakoski. Maria and Kari are well-known and recognized glass artists in Finland. They produce everything from jewelry to vases and tableware.
Anyone can come into the workshop and touch the magic of glass, make beads for themselves and buy their favorite products and souvenirs. And most importantly, Masha is from Russia, and you will have absolutely no translation difficulties. :)
The spacious workshop has several work stations. For example, here Masha makes glass birds, looking at a book about the birds of Finland.
It's hard to imagine until you see how these colored glass rods turn into owls, cockerels, storks and sparrows. Masha studied this craft at the university for 6 years!
You won’t find any kind of intricate crafts here: balls, beads, vases, glasses, decanters, candlesticks - all this is then sold to shops and glass exhibitions.
Thousands of colors and shades, shapes and shadows!
Ice styling, designer finds, glasses-candlesticks - you name it!
There is even an old cash register, which Masha found with difficulty and bought. This is the First Lady of the workshop. It still works great, and instead of ringing silver in the cash drawer there are modern euros.
But one thing attracts attention more than the rest. How did bubbles appear in this glass mortar? Laser technology? Magic?
Masters reveal secrets
It didn’t take much convincing - Maria herself offered to make the same mortar with magic bubbles before our eyes. As prosaic as it may seem, everything in our world begins with dust. Masha scooped out a handful of glass raw materials from the bag, which they buy in Sweden. These balls will then end up in the oven, where 1200 degrees Celsius will turn them into a thick, viscous mass.
It is this mass that Kari is now wrapping around the end of a long metal tube.
This little piece of light will have to go through fire, water and copper pipes on the way to its final and perfect state.
First of all, the glass needs to be shaped and the surface of the workpiece must be slightly cooled. Technology has not changed much since glass blowing began in Finland (almost later than anyone else in Europe). To do this, Kari uses special wooden spoons soaked in water, in which he constantly rotates the workpiece. Wet wood allows you to very smoothly lower the temperature of the glass mass, preventing it from cracking.
At the same time, Kari shapes the future mortar using metal tongs, making a thinning at her throat. All this time he rolls the tube with the workpiece on a special chair - the main workplace of the glass blower. If this is not done, the viscous workpiece will flow down under its own weight.
At the right moment, Masha joins the process.
With the help of such a mechanism, more like a medieval instrument of torture, the workpiece is clamped and corrugations are created on its surface.
This is what our piece of glass looks like now. Doesn't it look a lot like a glowing light bulb? This corrugation is the whole secret of the magic bubbles.
Now Kari is heating the workpiece again in the oven, which is called the Glory Hole. After this, he again collects fresh glass melt in the first furnace, wrapping the workpiece with a second layer of glass.
Then Masha begins to play the main role. Using old wet newspapers folded in several layers, she again cools the workpiece to the desired temperature and viscosity. Wet paper absorbs heat very well and smoothly, preventing the workpiece from cracking. Layer by layer the paper burns, taking away excess heat and giving the desired shape to the future mortar.
The second layer of glass seals the pits of the first layer, and Kari inflates the workpiece from the inside.
This is how bubbles are created.
After this, it’s time to work on the neck of the mortar. To do this, you need to change the place where the workpiece is attached to the tool. To do this, Kari takes a second tube, wraps a small piece of glass around it and glues it to the bottom of the mortar. When the mass sets, you can remove the first tube by breaking it off from the throat.
Masha cuts off everything unnecessary with scissors, forming the future neck of the mortar.
Kari smoothly expands it with tongs...
And we get an almost finished mortar.
A few final touches...
And the mortar is ready! But not really...
After breaking off the tube from the bottom, sharp pieces of glass remain on the surface, which must be smoothed with a special burner.
And even after this, the process does not end - the mortar will need to rest for a day in the third oven, where 500 degrees Celsius will remove all internal stress from it. This must be done so that the mortar does not one day shatter into pieces even from a weak blow. This process is called tempering, as in metallurgy.
This mortar will be sold to lovers of all things elegant and handmade for 30 euros. You can grind seasonings in it, prepare medicines, or simply decorate a room with it.
Let there be color!
Do you want to know how these colored vases are made?
The highlight of the process is the addition of pieces of colored glass at the initial stage.
During the blowing process, it dissolves in a thin layer inside the main mass, giving the product a unique color.
But what will happen if you do not smoothly cool the workpiece with wet newspapers, but abruptly place it completely in a bucket of water. The surface is covered with small cracks, which create a texture pleasant to the touch.
Masha and Kari are gods of glass in their workshop. They can even take a photo as a souvenir. Over the years, they have accumulated hundreds of different techniques that are beyond the reach of many of their competitors in Finland.
For a small fee, they are ready to give you a tour, a master class, and even give you the opportunity to blow something yourself. They are often approached by people who would like to turn their artistic ideas into reality - to make an exclusive set of dishes, decorations, corporate souvenirs and much more.
Yes, and they can blow out a light bulb too :) What would you like to make for yourself out of glass?
At the beginning of December, glassblower and owner of the Steklou workshop, Egor Komarovsky, invited everyone who was interested and interested to his master class. The workshop is located on the ground floor of the House of Sculptors of the Union of Artists at the address: St. Petersburg, Zanevsky Prospekt 26, building 2. Egor said that artistic glassblowing is now not as popular and widespread in Russia as in European countries. He mastered the craft on his own, studying literature on English language and watching video lessons from foreign masters, he is now open to cooperation, ready to teach and surprise.
All the stoves, and there are four of them, were assembled by Yegor himself in the workshop. An induction crucible furnace can be seen in the center of the photo. It got its name from the Crucible - a container for heating, drying, burning, roasting or melting various materials, in this case it contained molten glass.

In Russia there are about 8 colors of glass on the market, in American markets there are 120, the difference in quantity is quite noticeable. Examples of glasses and their colors.

Let's start the process of making a vase by heating the blowing tube. This is a hollow metal stick 1 - 1.5 m long with a mouthpiece at the end. We were shown the free blowing technique, which involves freely molding a product. Glass objects, made by free blowing, is also called free-blown glass (from the German hutte - gut, glass-blowing workshop).

Let's scoop up molten glass from the crucible furnace and start blowing it through the tube.

During the cooling process, the craftsman rolls out the cooling glass, correcting its shape.

Let's add more glass from the oven.

The glass ball is getting bigger and bigger.

The sequence at the initial stage is simple: dip, twist and shape, heat, blow...

In addition to free blowing, it is possible to use other techniques: Hand blowing into molds allows you to create products that are similar to one another. For example, laboratory flasks. The glassblower places molten glass on the tip of a glass blowing tube, blows a bubble and begins to shape it, constantly rotating the tube and molding the glass into wooden or metal molds.
Press blowing. The future product is first molded in a mold, and then hot - with air. The products are thicker and less transparent. But this method allows you to create relief decorations on them.

For heating, Yegor uses a “cuckoo” stove. It is heated to operating temperatures from +1100 to +1200 °C. The doors of this oven open if necessary, allowing you to place the product in the oven, rotate it in it, or place the product partially and without contact with the walls.

Gravity helps shape the glass.

A little more time and the ball turns into a drop.

The glass heats up, and during heating the tube rotates constantly.

Let's take glass plates of several colors combined into one element, attach it on top of the product and heat it.

After heating, the plate gradually bends and turns around, forming the shape we need when rolled out.

We form the product.

Roll it out again.

And heat the workpiece.

At each stage of work, constant quality and size control is required. When the work is carried out according to the drawn up project, the first version is initially made, which is broken down to accurately measure the wall thicknesses; after making adjustments and amendments, the final version of the product is made.

We heat it up again and blow it out little by little.

After blowing, roll it out into the desired shape.

We create a decorative pattern, pay attention to it on the finished product.

We form the ideal shape by gradually rotating and cooling the product. Cooling is done using wet newspaper.

As it cools, the color of the workpiece changes.

Let’s add volume, blow it a little more...

Let's add transparent glass on top of colored glass. The new layer will be the third, we will get it from the crucible furnace.

Gradually heating and blowing we get a rather large figure of the future vase.

We check the quality.

We form the bottom and secure the product to it.

Create the shape of the neck of the vase.

Last steps...


Annealing is heating to 530–580°C followed by slow cooling. With rapid and uneven cooling after molding, residual stresses arise in the glass, which over time will lead to the product breaking by itself, for no apparent reason. Annealing reduces these residual stresses and makes the glass durable.

After annealing is completed, the vase is polished and can be used for its intended purpose. The annealing oven in the workshop is electric, and when the power is turned off and the glass cools quickly, it becomes fragile and short-lived.

There are many different glass products in the workshop, all of them are made by hand.

If you want to create something yourself, for example, a ball for a Christmas tree, a glass or a vase, or vice versa, you want to learn how to work with glass, then Egor Komarovsky is happy to conduct individual lessons, excursions, and master classes for various age groups.
All details and contacts in the group
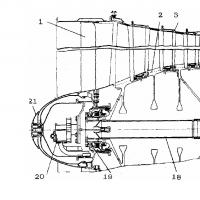 Purpose: basic technical data of the AL 31F engine
 What is severance pay?
 How to number the decisions of the sole founder of an LLC?
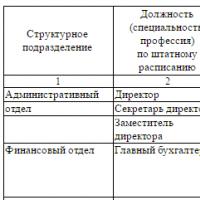 How to fill out a vacation schedule?
 Traffic light concepts, history, purpose Food discounter traffic light
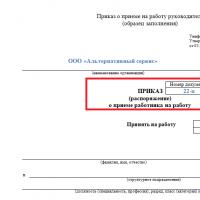 Order for the appointment of the General Director: sample filling, download form
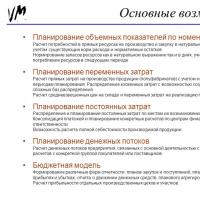 Master of Finance Master of Finance Analysis and Planning