When you turn on the printer, a test page prints. How to start printing a test page on the printer and what to do if it is printed incorrectly? Why is the printer not printing?
This usually happens at the most inopportune time - when you urgently need to print an important document. Yesterday, a printer that was working properly suddenly refuses to perform its duties: instead of a document, it throws out clean sheets paper or stupidly blinking light bulbs, as if not understanding what you want from him.
Almost everyone who uses a printer regularly faces printing problems. The most extensive group of such problems is various defects in the printed image, in second place is the complete absence of printing. There are many reasons why the printer does not print at all or prints poorly, from incorrect settings in the operating system to a malfunction of the device itself.
Why is the printer not printing?
All the reasons that lead to failures and complete failure of the printing system are conventionally divided into 3 big groups:
- Problems with installing and configuring the printer in the operating system. Other types of software problems.
- Problems with cartridges or the continuous ink supply system (CISS).
- Problems in the hardware of the printer itself.
The first group is the easiest to diagnose and eliminate by the user himself. It is possible to cope with it in about 90% of cases. A group of problems associated with cartridges is not always amenable to solution at home, but if funds allow, it is enough to simply buy a new cartridge. The third group is solved only in case of simple and typical problems, such as a paper jam, a broken connecting cable, etc. Problems associated with a malfunction of the device require a service call.
Printer Installation and Printing System Issues in Windows
Fortunately, the bulk of software-related printing system problems can be fixed very simply. These include:
- The printer driver is missing from the operating system, or the driver is malfunctioning.
- Disable the print service.
- Incorrect selection of the default printing device.
- Pausing printing by the user.
- Switching the printer offline.
- Problems with the document in the print queue (too large, not recognized, etc.). The printer still prints, but very slowly. Or, instead of text, it displays something similar to hieroglyphs.
- Prohibition of access to the printing system by security policies.
More complex cases are damage to OS components, driver conflicts, and virus infections. With them, unlike the previous ones, it is not always possible to cope with a couple of mouse clicks.
Reasons why a network printer does not print:
- The printer port on the remote computer is blocked.
- The network path to the printer is incorrect.
- The sharing settings are set incorrectly.
To separate the problem with the printer itself from problems with the computer, try printing the document from another PC or mobile device. If it (the printer) is connected via USB, connect it via USB if possible. wireless communication and vice versa. Your task is to find out if the print function works at least somewhere.
After making sure that the source of the failure is not in the printing device, but is connected with the computer, look in the device manager (the printer must be connected to the computer and turned on). The absence of the Printers group in the list of devices and the presence of unknown equipment marked with an exclamation or question mark indicates that the system does not have the necessary driver. To solve the problem, just download it from the website of the device manufacturer (for example, HP, Epson, Samsung, Canon, Brother) and install it.

If the PC sees the printer, but it still does not print, take a look at the Services application (it is most convenient to open it through the Task Manager tab of the same name).

Find "Print Manager" in the list of services and make sure it is running. If not, right click on its properties. In the "Startup type" drop-down list, select "Automatic", then click the "Run" button below.

Issue not resolved? Move on. Launch the system application "Settings", go to the section "Devices" - "Printers and Scanners" (this and further instructions are discussed using Windows 10 as an example). The right half of the window displays a list of all installed printers, among which there should be one that has problems. If it is not there, check the physical connection of the device to the PC. If yes, click "Open Queue".

- Whether the default printer is being used (if not, perhaps a virtual printer is set as the default printing device, which, instead of printing, for example, converts the file to another format).
- Is there a checkmark next to the items "Pause printing" and "Work offline". If the printer goes offline on its own, it indicates a poor connection to the computer, a power problem, or a malfunction.
- If there are documents in the print queue, click Clear Queue and try to print a test page.

If the printer does not print only over the network, click "Sharing" and check if it is allowed to this device.

Next, take a look at the "Security" tab and make sure that your account is not prohibited from using the print function.

The reason that the printer is not queuing files could be one of the following:
- Paper is out or jammed.
- The toner or ink has run out.
- A non-original cartridge is installed in the device.
- The print count has reached the limit - printing is blocked.
- The user account does not have permission to print files.
- The device is defective.
- An error has occurred in the operating system.
Devices from different manufacturers block printing in different situations. So, when a cartridge runs out of ink, one device stops processing documents and resets the print queue, while the other simply spits out empty sheets. The same is true in other situations. About what problems lead to blocking is usually written in the instructions for the printer.
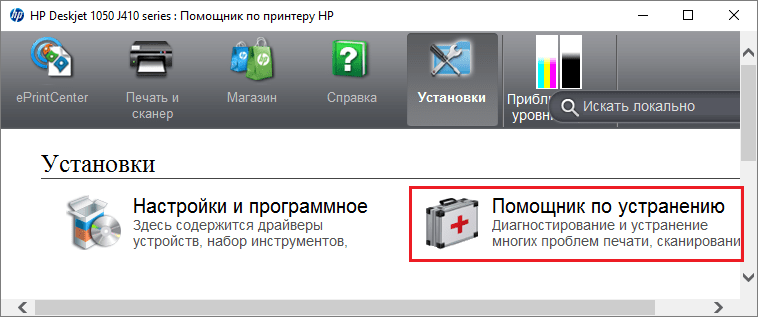
Many printer problems are well recognized by their self-diagnosis system. If the device is equipped with a display, the cause of the failure is most often displayed on it. Diagnostics of simpler devices is carried out using their proprietary application. It, as a rule, is present on the disk that came with the device, as well as on the manufacturer's website.
The following is an example of the troubleshooting feature in the proprietary HP Deskjet 1050 printer application.
Stopping when sending a specific document for printing is most often associated with the document itself. So, if the printer does not print the pdf file, the author may have protected it from printing (pdf supports such functions). In such cases, the easiest way is to take screenshots of the pages of the problematic file, paste them, for example, into word document and easily print as pictures.
If hieroglyphs, “crazy” or spaces instead of text appear on the printed print, try replacing the font in the document with one of the preinstalled in Windows (all printers recognize them).
Problems with cartridges, dye, CISS
Any dye - toner or ink - ends sooner or later. But it doesn't happen all of a sudden. The idea that there is little paint left is prompted by a decrease in the quality of the print - pale colors, whitish streaks, partial non-printing. It happens that the printer stops printing even with a normal ink level. This is due to:
- Drying of a drop of ink in the print head or clogging of its airlock.
- Incorrect installation of the cartridge (for example, when the protective films are not removed, the cover is not completely closed).
- Dirty air ducts of cartridges.
- Clamping or blockage of the CISS ink loop.
- Non-original cartridge blocking.
- Reaching the limit on the number of printouts.
- Cartridge failure.
Head clogging due to dried ink is common when an inkjet printer is not used for a long time. If the plug is relatively small, cleaning the nozzles (outlets) helps to solve the problem. This is also done using the proprietary printer utility, and each manufacturer calls this function differently:
- HP has cleaning cartridges.

- Epson has a print head cleaning.
- Canon has cleaning and deep cleaning (the second is an enhanced version when the first does not help), etc.
During cleaning, a special pump installed inside the printer drives a little ink under high pressure through the nozzles. From this, a clot of paint or an air lock comes out.
The most budget printer models are not equipped with a pump, and the nozzle cleaning function does not work on them (despite the driver supporting it). In the event of a blockage, the printheads of such devices must be soaked and rinsed in cleaning fluid.
On modern Epson inkjet printers, the print head is not built into the cartridges, but into the device itself, and it is quite expensive. Its failure is equivalent to the failure of the entire printer, which in such cases can only be thrown away. To prevent the ink from drying out, owners Epson printers it is important to clean the nozzles at least once every 2 weeks if the device is idle.
If you have removed cartridges from the printer, make sure they are properly installed and their air ducts are not blocked.
When using CISS, first of all, you should also check whether the ink plume is passable and whether the air holes of the tanks are free.
Spots and streaks (sometimes almost black sheets) when printing on a laser or LED printer are the result of cartridge leaks (toner spills out), waste hopper overflow, foreign small objects getting inside the device, damage, improper installation or wear of cartridge parts.
Problems after refueling when:
- the printer prints in only one shade, for example, red;
- the print looks too pale when the cartridge is full;
- instead of the image - multi-colored spots, etc.,
As a rule, they arise due to contamination, improper installation of the cartridge in place or a violation of the refilling technology.
The complete absence of an image (white sheets) or printing defects after replacing the original cartridge or dye with conditionally suitable ones is just the result of the incompatibility of the latter with your printer model. In some cases, it is solved by flashing the cartridges or the device, in others - only by purchasing original components and consumables.
Printer problems
A failure of a printing device does not always manifest itself as a complete failure, when the device does not turn on or does not perform its functions at all. In some cases it looks like this:
- The printer does not print in one of the colors, for example, black. At the same time, the cartridge is serviceable, compatible, there is paint. Replacing the cartridge and toner does not help.
- Only part of the document is printed.
- The toner does not adhere to the paper.
- Paper is not picked up from the tray.
- The printer does not print or incorrectly transfer the text of any documents to paper, does not reproduce typical frequently used fonts.
- The print is not positioned correctly on the sheet.
- Multiple documents are printed instead of one and vice versa.
At home, without special training, most of these problems cannot be solved. The user can independently see if the device has chewed the paper; if so, try to extract it; check if the cartridge is installed correctly; remove foreign objects that have entered the device, if they are easily accessible; remove visible dirt. In other cases, it remains to contact the service or buy new apparatus if it is from a series of disposables that are very cheap.
Your local printer is not printing.
Why is the local printer not printing? The reasons for this can be very different, and now we will try to analyze most of them. And also answer the question of what to do if the printer stops printing. Although until recently everything was working fine.
Why did the printer stop printing and what should I do?
So let's start with one important point. It doesn't matter what brand your printer is, whether it's HP (Hewlett-Packard), Canon (Canon), Samsung (Samsung), Epson (Epson), Ricoh (Rikosh), Lexmark (Lexmark) or any other brand. Printing technology can be inkjet or laser, there is no fundamental difference - we will try to talk about common malfunctions. That is why this publication can be useful to you in solving your problem. Let's start with Windows errors, and continue with problems with the printer driver and print service. Now we will talk only about software errors and let's hope that your printer does not have mechanical breakdowns.
The printer does not print from the computer
It also does not matter which version of the Windows operating system you have installed, the procedure for checking the operation of the printer is universal. When a printing error occurs, when you send a document to print, a printer icon with a question mark appears in the system tray. And also a message pops up: "Could not print this document"
First of all, you need to check the operation of the printer itself. Check the presence of paper, whether it is fully inserted in some printers, there is a paper presence sensor, and if it does not work, then printing does not start. Is it on, is the error indicator flashing on it? Print a test page with the button on the printer (if the problem does not print, then it is in the printer itself). Printing a test page is activated differently for different printers. To do this, you need to press two buttons on the printer (as a rule, these are the buttons to continue and cancel or cancel and the power button, mainly on inkjet printers) and hold for a few seconds for 3-5 seconds and release the buttons. This should start printing a test page. An example of a test page printed by the HP LaserJet 2200 printer.
Remove and replace the cartridge, turn off and then turn on the printer.
After turning it on, it should work a little to pass an internal test (make some noise). If all is well, the ready light (usually green) should be on all the time. If these steps do not help and the printer does not print a test page, or does not respond to any actions at all, you should check the power cord, its connection to the printer. If possible, test the power cord on another device to rule out a problem with the cord.
If it prints a test page, then the printer itself is good. But does not print documents sent from the computer, you need to the following actions to get the printer working again:
- Check if USB is working for you (for example, a flash drive in the system is detected normally and allows you to work with it). If there are problems, then you need to reinstall the motherboard chipset driver.
- Verify USB cable, could move away from the printer or the computer system unit, or just gnawed through the beloved cat. Therefore, it is better to test the USB cable on another device. For example, connect a scanner or try connecting another USB cable. HP printers are very picky about the length of the USB cable, you can try a shorter cable.
- Check to which printer documents are sent for printing from the program. If more than one printer is installed on the system and you are sending to another printer that is not connected. Select the default printer that you want to print to at the moment. And pay attention to which printer you send to print from the program.
Check if the "Pause Printing" or "Work Offline" checkbox is checked.
Cancellation of paused printing is done as follows.
Start → Devices and Printers (In Windows 7), and in Windows XP Start → Printers and Faxes
If you have one printer icon, not several. Right-click on the printer on which you want to print, go to the "Printer" menu and uncheck (uncheck) "Suspend Printing", if it is.
If the print job contains any required documents, you need to clear the print queue.
Printer → "Clear print queue"
If clearing the print queue did not help or does not remove, you should delete the contents in the folder where the print jobs are located.
To do this, open the folder C:\Windows\System32\spool\PRINTERS and delete the contents. After that, restart the Print Manager.
How to do it: On "My Computer" right-click and select "Manage" from the menu that opens.
After that, in the window that opens, click on "Services and Applications". Then on "Services" and find the service "Print Manager". We select it and restart it (if it was not running for you, then this was the reason that the printer did not print from the computer).
Then in the Printers and Faxes window, refresh the window, press the F5 button on your keyboard. After that, the print queue will be cleared.
The local printer does not print anyway.
Let's move on to more drastic measures. Delete the printer through the menu. We right-click on the printer icon and select "Delete" or "Remove device" depending on the version of Windows and delete the printer. Disconnect the USB cable from the system unit and restart the computer. After booting the computer, connect the USB cable to another USB port. The installation wizard should appear. If it does not appear, then open the menu:
Start → Settings → Printers and Faxes
And check if the printer is installed automatically. If not, then install it manually using the setup wizard. To do this, on the "Printers and Faxes" tab, click "Add a printer" → "Add a local printer",
select the interface through which your printer is connected, most often it is “USB001 (Virtual printer port for USB)”, click “Next”,
In the next window, select the driver for our printer. On the left side of the window, select the printer manufacturer, and on the right side, select the printer model and click next.
On the next window, you can change the name of the printer, for example, to "My Printer", but you can leave it as it is and click Next.
The driver is being installed.
In the next final window, you can print a test page. And it remains only to click "Finish".
After that, your printer should print. I wish you no more words from me .
Often, printer users have to resort to a procedure such as printing a test page. Thanks to it, you can make sure that the basic settings of the device for printing are correct. In addition, the test page displays all information about the printer model and driver version. All this information can be very useful and necessary when troubleshooting various problems.
How to print a test page?
But often users of office equipment have the following question: how to print a test page? So, in order to perform such a procedure as a test print, you first need to select the "Control Panel" menu from the list of services. Next, in the section where the entire list of printers is displayed, find the device model that interests you.
 Right-click on the printer icon, and then select the “properties” command from the context menu that appears. In the window that opens, go to the "general" tab, and then click on the command, which involves starting a test print. Please note that if the device is started for the first time or has not been used for a long period of time, it will take longer than usual to print the sheet. The fact is that the printer in this case will first need to collect all the necessary information about the system, and this may take about one minute. The test page settings in any printer are usually set to "default". Therefore, when printing a test page, it tests absolutely the entire list of parameters.
Then you may have a question about what to do next. Next, you need to carefully evaluate the test page - it should have samples of all colors, as well as text and graphics. If such printing was carried out using an inkjet model device, then make sure that there are no ink streaks on the page. If the test you made suits you, then you can click on the command that implies saving the default print settings. Otherwise, customize them to suit your needs. For example, if necessary, you can only check the nozzle test. Thanks to this, you can immediately know which colors print normally and which print with various problems. In addition, a nozzle test is necessary to make sure that the ink enters the print head in the correct order.
Possible problems

But sometimes the following problem occurs: the test page did not print correctly. In this regard, the question arises of what to do in this case and how to still print this page?
So, if the test page does not print correctly, then one of the possible problems lies in old or "broken" drivers. To solve it, you need to download and install their updated version. But what if this action did not help and the problem associated with the fact that the printer does not print is still relevant? In this case, give full rights to "Everyone" for "C:\Windows\System32\spool\PRINTERS", then delete the desired printing device on the registry branch "HKEY_USERS\.DEFAULT\Printers". Also, give ordinary user the rights that the administrator has and install a new driver under his name. After that, you can withdraw the previously granted rights from him. You should also disable UAC. If the steps taken do not help, then you should run the Process Explorer utility and, during printing, pay attention to what rights are missing.
If until recently a normally printing printer still prints a test page not as it should, then you can use the Procmon utility from Sysinternals. Run it and set the "denied" filter on the line Result - contains. Next, print a test page, after which this utility will show which folder you did not have full rights to. For example, it could be the "TEMP" folder.
It is also worth adding that there is still such a procedure as a stop test, which is used for. To use this type of test while printing a page, you must turn off the power, and then look at the copy that has not yet completely exited the device. Thanks to this procedure, you can determine the cause of poor printing, which may be in the cartridge, transferring the image to paper, and the thermal unit.
In addition, sometimes the printer disconnected from the PC does not even print a test page. The cause of this problem may be missing or jammed paper, or an incorrectly installed cartridge. or by connecting the device to a computer and reading the corresponding decryption in the driver. In general, almost any breakdown during the operation of the printer can be done independently, but if you do not know the reason, it is better to use the services of a service center.
Each user after purchase new technology, seeks to test it in action as soon as possible. Of course, this also applies to printers. The only sure way to test a printer is to print a solid page. This procedure will ensure that all basic settings devices were set correctly, it will be additionally possible to make sure that the color is transmitted in full accordance with the desired result.
In addition to the information listed, printing a test page on an HP printer will let you know the exact version of the drivers and the model of the device you are using. All the information provided may well be useful in case there are any problems or additional questions.
Test print on an HP printer
Press the left mouse button on the “Start” button in the taskbar and from the list of services select “Control Panel.
Move the mouse cursor over the selected printer and press the right button. The printer context menu will appear. From the context menu, select the "properties" command and click on it with the left mouse button.
In the Properties menu, open the General tab and left-click on the Test Print command. If the printer is being used for the first time or has not been used for a long time, you may need to wait a few seconds (15 to 30) before printing starts. It's just that the printer driver needs time to collect all the information about the system. In the future, the print processing speed will be faster. The test page parameters of any printer are defined by default and absolutely all printer parameters are tested during printing. The test page on different models may differ.

When printing is finished, evaluate the test page. It should contain graphics, text, samples of absolutely all colors. There should be no distortion or unevenness. If the print was made with an inkjet printer, then there should be no ink streaks.
When the printer finishes printing the page, you will be prompted to save the print settings. If all the test page settings suit you, you can simply click on the command “save print settings by default.
How to print an HP test page without a computer?
To begin, load plain white paper of the appropriate size into the input tray.

A test print page for inkjet printers is printed as follows: turn off the device with the button, press the Sheet button without releasing it, press the ON button, release it, continue to hold the Sheet for about 10 seconds.
What problems can arise?
But sometimes the following problem occurs: the test page did not print correctly. In this regard, the question arises of what to do in this case and how to still print this page? So, if the test page does not print correctly, then one possible problem is old or “broken” drivers.

To solve it, you need to download and install their updated version. But what if this action did not help and the problem associated with the fact that the printer does not print is still relevant? In this case, give full rights to "Everyone for" C:\Windows\System32\spool\PRINTERS, then delete the desired printing device in the registry branch "HKEY_USERS\.DEFAULT\Printers.
In addition, give the normal user the rights that the administrator has and install a new driver under his name. After that, you can withdraw the previously granted rights from him. You should also disable UAC. If the steps taken do not help, then you should run the Process Explorer utility and, during printing, pay attention to what rights are missing.
 Ferrous metallurgy Presentation on the topic of metallurgy geography of ferrous metallurgy
 "the basics of proper nutrition for a younger student" presentation for a lesson on healthy lifestyle on the topic
 Presentation on cognitive development: "What is an artist?
 Presentation on ecology on the topic "Main environmental problems of the modern world" free download
 Russian and Soviet scientist - geneticist, botanist - presentation
 Presentation on the topic "Thales of Miles" Download presentation on the topic of Thales
 Making clichés for embossing at home How to make your own clichés for embossing