Photo gun or about an unusual hunt. The wisdom of photo hunting How to use a camera and lens during a photo hunt
Even 20 years ago, there was no real alternative to silver in photographic process there was no such thing, and gloomy predictions were being made that all silver reserves would soon end up on exposed photographic paper and film. And it won’t be enough for new photographs. The rise of color photography and mass centralized darkrooms has alleviated the problem slightly, since there is no silver remaining in the final print, and all the silver can be collected and reused to produce new photographic materials. Now the monopoly of silver has been thoroughly undermined. Electronic films - matrices - in terms of the number of recorded details per unit area are practically not inferior to mass films (400 sensitive elements per mm). And there is very little left to reach the theoretical limit associated with the wavelength. Therefore, one cannot expect a significant increase in the number of parts per unit area. Thus, the issue with electronic film can be considered virtually resolved - the revolution that has been dreamed of for the last 100 years has come true, there is a replacement for silver. The production of matrices, of course, is much more complicated than the production of silver-containing photographic materials, since the latter, with some desire, can be made at home. However, over the past 100 years, few photographers have been making their own photographic materials, and it can be assumed that there is some standard recording material that is widely available. And you can concentrate on designing devices that use it. In the history of photography, there were significantly more different structures that were used for shooting than there were types of photographic materials. Successful devices were made both by huge companies and by individual artisans, given that the camera itself has a significantly longer history than silver photography and originates from the camera obscura. The first camera obscura with a lens was probably made by Giloramo Cardano in the 16th century. Developers of digital cameras should take a closer look at the stages of the centuries-old journey. Many successful solutions may have already been encountered, and then were rejected not because of their inconsistency, but for subjective reasons related, for example, to the fashion for compact cameras, and also with the fact that the quality of the pictures often exceeded the needs and was not the determining criterion when choosing a camera. In my opinion, there are now a lot of myths about which decisions when designing devices are correct and which are not. It seems that many modern designers are trying to reinvent the wheel when an engineering solution from 10 or even 100 years ago can be used. Often new standards are proposed while the existing ones still work great and have not exhausted themselves. I will also note that, from my point of view, the situation is aggravated by the perverted authorship registration system. Today's patent system often does not record the names of the authors of inventions for history, does not facilitate their rapid implementation, and diverts significant human resources to circumvent the declared invention claims. Today it turns out that 1 engineer feeds 2 patent specialists and 4 lawyers, and, unlike authors, copyright holders are often interested in creating obstacles to production. The dream of most authors has always been to see their idea brought to life, but today there is a high probability that the invention will be shelved, and insurmountable obstacles will be created for other designers who independently came to the same results in the implementation of their ideas. Big earnings those who come up with new devices really don’t get the chance either. Excess profits are received by copyright holders. In general, the history of registration of inventions shines with such blatant examples that even a blind person can probably notice. As one typical example, we can consider the official history of radio. Let's take a obviously neutral source - the French encyclopedia Larousse: "Chronological table of Science and Technology, section Technology. 1893. Radio antenna, Popov (Russia). 1896, radio communications, Marconi (Italy)" - i.e. the cart is before the horse.
Device design
In this chapter I will try to refute some persistent stereotypes modern photography, and also talk about well-known technical solutions that, in my opinion, can be used in digital photography. From the very beginning, the camera was a kind of block constructor, and everyone could assemble what suited him best, so the issue of standardization and interchangeability of parts was always very pressing. The device can roughly be divided into the following main blocks. Photosensitive material. Lens. The system of mutual movement of the lens and photosensitive material, i.e. focusing system. A shutter that provides a specified exposure time.
The last straw that motivated me to create my own camera was the announcement of the Four Thirds standard. This standard clearly defines the frame size, but at the time of writing I was unable to find either the size of the base section or mount drawings on the Internet. Any standard implies that there is documentation from which compatible devices can be created. I have not found such documentation for mounting lenses in equipment compatible with the 4/3 standard. In my opinion, this standard combines two independent things. Lens mount is not necessarily related to the image field or frame size.
Photosensitive material
There is another problem that arises when using a large area sensor with lenses that have a short back focus. These are significant angles of incidence of rays on the edge of the frame. In front of most matrices there is a filter that cuts off the ultraviolet and infrared regions of the spectrum. This filter is a plane-parallel glass plate several millimeters thick and is capable of significantly shifting and reflecting a significant portion of the edge rays. Perhaps these cameras should ditch the filter in front of the sensor and, like the first Kodak DCS cameras, use a filter in front of the lens. However, its area should be significantly larger and, accordingly, its cost may be significant.
Lens mounts
When designing any device, the question of how it will interact with previously created ones is always considered. About a hundred years ago, a curious device like an iris diaphragm was proposed, which made it possible to mount a lens with any thread. At the same time, the idea with one large hole and a mass of lowering adapter rings was used with might and main.
Drawing from the book "Pocket Guide to Photography," E. Vogel, 1928
In my opinion, there is no point in reinventing the wheel when you can use existing standards. The thread standards M39 with a base length of 28.8 mm, M42 with a base length of 45.5 mm (GOST 10332-72), bayonet connections K (GOST 24692) and, more recently, M (patent validity period for it ended). The shorter the base length, the greater the number of lenses that can be installed on the camera through appropriate adapters. The thread-to-thread adapter is very easy to manufacture (for manufacturing you only need lathe), the thread-bayonet adapter is simpler than the bayonet-bayonet adapter, so I suggest returning to the M39 standard. Lenses from cinema cameras with a smaller base length can also most likely be installed through a glass-shaped adapter, since the diameter of the frame of these lenses is usually less than 30 mm.
Of course, the bayonet connection (bayonet mount) allows you to connect the lens faster, but, firstly, it is assumed that most lenses will be attached through adapters, and I hope that, given the long history of the M39, there is less chance of drowning in litigation, such as the story with the K adapter M42 (for more details see and). The moral is simple: if you want your device to be on the archive shelf with a high probability, patent it; In 99 cases out of 100, this will not add money to you, but the image of a dog in the manger will shine brightly in the minds of all those who create a similar device on their own. An invention is not a gold mine, alas, and the fact that you are the first to reach the finish line does not mean that others are prohibited from reaching it. If you want a medal and a name on the honor board, please publish it; the modern patent system does not remember the names of inventors, only the name of the company above the window where salaries are issued. There is also no point in restricting the consumer, a sales agreement is not a lease agreement, and if I bought a microscope for hammering nails, then this is my right, and my right to redo it so as not to get my fingers crossed in the process. On this topic, we recently had a news report about an interesting trial in Italy.
Modern lenses are interfaced with the camera not only mechanically, but also electrically.
Contacts for transmitting information can be made on the camera in the form of sockets for plugs; they are, perhaps, no easier to patent than a wheel, although who knows, so I hasten to publish the idea. Signals on pins 0 and 1 (with enough load current that they can also be used for analogue control if desired); contacts: move the lens forward, move the lens back, open the shutter, close the shutter (there is redundancy here, but if necessary, you can use only one contact), flash synchronization, close the aperture, aperture value - 4 contacts (16 values should be enough, but you can set and 5th pin), changing the focal length - 2 pins, pins for transmitting information back from the lens to the camera: focal length, distance (you should probably use a 3-wire serial port for this). Those. in the simplest case, if we use lenses with a jumping aperture, then we set the aperture on the lens and adjust the exposure corresponding to the closing steps of the aperture. Focusing and exposure metering occurs with the lens fully open; when the shutter is pressed, a signal is sent to the adapter ring, the core is pulled into the solenoid and pushes the lens aperture drive rod (for an explanation, see the block diagram at the end of the article).
Focusing
Focusing consists not only of movement, but also of skew of the lens relative to the sensitive material. The first cameras used this everywhere. Subsequently, this was practically abandoned. In particular, due to the fact that visual guidance on frosted glass did not provide efficiency, and rangefinder cameras only allowed focusing on one point. In many cases, better focusing is achieved by an accurate distance scale on the barrel of a well-adjusted lens, and the most accurate way to measure the distance to an object is with a tape measure. The advantage of SLR cameras was that with precise alignment of the film channel and ground glass, there was no need to think about the accuracy of manufacturing the base section of a particular lens. If the image is sharp on ground glass, it will be sharp on film.
However, SLR digital cameras, in my opinion, are structurally illogical. There is no point in focusing on additional frosted glass when we can focus on the image on the LCD screen. The quality of today's LCD screens is quite comparable to coarse-grained frosted glass, and today's technology allows us to create LCD screens that are not inferior in performance to the best frosted screens.

Then autofocus appeared. Usually it was implemented by a separate motor in each lens or, less often, by a camera motor that moved the lens, as in Pentax cameras. The most interesting autofocus camera that allowed you to work with conventional lenses was and remains (1996?). in which virtually the entire contents of the camera moves relative to the lens. Below is a diagram from the advertising brochure.
What was done and how In order not to be unfounded, let's consider the manufacture of a modular digital camera on the knee at home. I warn you right away that if you have a problem disassembling a working camera and assembling it while maintaining functionality, then the success of the conversion event is very problematic. It’s not the gods who burn pots, and everyone can master disassembling chambers, but the number of damaged cameras during the training process depends on the individual
The camera was taken as a basis: Casio QV 3000. You can see what this camera looks like disassembled.


The assembly that combines the lens, matrix and viewfinder looks like this:
Canon is on the left, Casio is on the right. For clarity during layout, the image is enlarged 2 times.
The letter D indicates the diameter of the circle of confusion in pixels. Inside this circle, it is not possible to distinguish adjacent strokes. They are either absent or heavily distorted by moire.
| Given: lens focal length 58 mm. Mira contains 90 black radial strokes. | Matrix size |
7.20 x 5.35 mm |
| 23.4 x 15.6 mm | Frame size |
2088 x 1550 pixels |
| 3008 x 2000 pixels | ||
| Sensor size | ||
| Diaphragm Linear resolution limit in µm |
||
| (See more details about the calculation.) |
||
| Lines per pixel resolution (black + white lines = 2 lines) | ||
| Sensor size | ||
| Resolution of line pairs per mm | ||
| Diameter of circle of confusion in pixels | ||
| Line resolution per pixel | ||
| Lines per pixel resolution (black + white lines = 2 lines) | ||
| Sensor size | ||
| Diameter of circle of confusion in mm | ||
| Resolution of line pairs per mm | ||
| Diameter of circle of confusion in pixels | ||
| Line resolution per pixel | ||
| Lines per pixel resolution (black + white lines = 2 lines) | ||
Linear resolution limit in µm
Since with an aperture of F/8 the resolution in lines per pixel is the same for pixels of different sizes, then in this case the lens resolution exceeds the capabilities of both matrices. At F/16 and F/2, the resolution for the ICX 252 is determined by the lens, and for the Canon-Helios system the influence of the lens is noticeable, but insignificant.

Let's take a closer look at the dependence of the resolution of the Helios 44 - ICX 252 system:
Maximum contrast and resolution in the area of F/8-F/11; at aperture F/2 aberrations are clearly noticeable, at F/16 there is a drop in contrast and resolution.
What happened?
Interchangeable lenses are not only an opportunity to install different lenses. This is also the ability to extend the lens a lot when shooting macro; tilt the lens, which will allow you to get a sharp image of a plane not perpendicular to the optical axis; move the lens, which will correct perspective distortions; Finally, instead of a lens, connect the camera to the microscope. The small matrix, compared to a 35 mm frame, allows us to shift and tilt the lens without significant loss of quality. First of all, the resulting camera is intended for special types


shooting. With the lens you can get a clear image of the Moon the size of an entire 3MP frame. And if you also use the TK-2 teleconverter, then the entire frame will occupy only part of the lunar surface.
The maximum size image can be seen by clicking on the thumbnail with the mouse.
|
|


With the Pentacon 135 lens, you get a luxurious photo gun, and for ease of work it is recommended to use a shaft with a magnifying glass in front of the LCD screen and a monopod resting on the photographer’s belt (for more details, see). In terms of a 35 mm camera, we have a focal length of approximately 650 mm. And I note that focusing on the LCD screen in this case is by no means more difficult than in a SLR camera with a lens equivalent in angle of view.

|
|


Jupiter-3, focal length 50 mm.

|
|


Due to its outstanding aperture ratio - 1:1.5, I wanted to try it as a portrait lens with the aperture fully open, and this is what happened:

Since Jupiter-3 is the only lens with an M39 thread, I’ll give another landscape photography. Here .
If you tilt the lens, you will have to look closely at the LCD screen.
But it becomes possible to get a sharp image of a computer keyboard, for example, from such an unusual angle:

Or show in detail the elements of the brooch frame, which would be covered with stones when photographed head-on.

The image clearly shows that the background plane is not perpendicular to the optical axis, but is in focus throughout.
With a microscope, the system showed excellent results, not inferior in magnification to digital SLR cameras. Focusing on the image on the monitor screen turned out to be much more convenient than focusing on frosted glass.
|
|
Miniature |
|
|
|
Fragment. The distance between strokes is 10 µm. |


Fragment of a filament from the cyanobacterium Anabaena sp.
Is the resulting camera a new camera or just an upgrade to an existing one? The question is controversial. If we draw an analogy with the difference between FED and Zenith, then there are even more structural elements that have undergone changes. And we can say that a new camera has been created on the basis of the existing device.
What I wanted to do
If you have a boxed processor for your computer, then you would like to have both a boxed matrix and a motherboard for the camera. Everything else is optional. Today's devices often have a 3-wire serial port, you can connect a computer and control the camera through it, you can connect a remote control remote control and keep it on a wire or built into your camera body; There is a TV output for image output, and USB for data transfer and communication with a computer. For advanced designs, you can provide for connecting a card reader and an LCD display, although for many tasks this is unnecessary.
Both the TV output and the serial port are largely a nod to the past. You can limit yourself to one USB and in the future this will be enough to control the camera, transfer the image for viewing on the screen of a computer or PDA during the process of aiming and focusing, and, finally, save the captured frames. The use of a PDA as a universal remote control and viewfinder was implemented in the Leaf Valeo 11 digital back and is described in the article.
Since the focusing points can be moved and there are several of them, the matrix must be mounted on a platform moved by three motors with a worm gear, for example, such as in a disassembled Casio. You just need to install three identical motor control units on the motherboard and connect them to three focusing points. Then, like a hundred years ago, we will be able to focus not only on planes perpendicular to the optical axis. Since many lenses have a field much larger than the size of the matrix, it would be nice to provide for a shift, and, from modern achievements, use a matrix stabilization system, as in the Minolta A1.
I summarized all my thoughts into an animated interactive flowchart:
Install Flash Player
The green button turns on autofocus and in its functions corresponds to half-pressing the shutter button of modern cameras, the orange button starts the shutter, if the camera is not focused, then when you press it, it first focuses and then releases the shutter. Small buttons are responsible for controlling the presentation: the top one starts the movie from the very beginning, the bottom one stops viewing in the position corresponding to focusing on infinity.
About prospects
The camera described here was first introduced on the Internet on February 17. On March 11, Epson announced its Rangefinder Digital Camera R-D1. Although, of course, it’s hard to call it Epson. This is the spitting image of Bessa from Cosina, however, Epson’s cooperation with Cosina is indicated in the press release. This is a classic rangefinder camera, with a Leica M mount, and an adapter ring Leica M – Leica L, i.e. M39. The camera has a 6MP APS format matrix.
I think there is a lot of promise in using the old threaded standard for rangefinder and scale cameras in the camera. It gives us the opportunity to use not only all the optics for rangefinder cameras, but also those developed for SLRs. Also, taking into account the difference in the basic segments, it is possible to make adapters equipped with electronics, allowing the use of autofocus lenses and lenses with automatically controlled aperture and built-in shutter. For these adapters to function, you only need to output a number of signals to the camera body in the form of arbitrary plug connectors. It would be nice to provide the user with the ability to program signals for a contact. In general, the idea of allowing the user to program the camera seems very interesting, and it is a pity that Kodak’s initiatives, implemented in cameras like the DC265, were not developed.
On the other hand, I don't think rangefinder cameras have a future. In my opinion, it is much more logical to make a scale camera, in which the distance to the subject is set according to the lens scale. If desired, the rangefinder can be installed separately; at one time there were a lot of them, for example, Blik. Of course, having a rangefinder paired with a lens is convenient, but it only works with certain lenses. Making it adaptable to almost any lens is, of course, possible, but, in my opinion, it is not necessary. It is much more logical to make an autofocus system in the image and likeness of Contax AX. Indeed, in this case we don’t even need to move film with cassettes, but just a light matrix. Modern systems Autofocus has the ability to focus on multiple points. However, if you do not distort the matrix, you can focus accurately on only one of them. Therefore, in my opinion, it is logical to use three identical motors with a worm gear, similar to those used to move the lens in the Casio QV 3000 camera. In this case, if we control the motors synchronously, they ensure focusing on a plane perpendicular to the optical axis. If all three motors operate independently, you can achieve autofocus capabilities comparable to manual focusing on studio cameras.
What a stupid thing this has become. I ran after her for half a day to photograph her.
- This is still not enough. Now you will run after him for half a day.
- Why so?
- And to give away the photo.
When I watched the wonderful cartoon “Vacations in Prostokvashino” as a child, I could not even think that The photo gun for Sharik is not a figment of the imagination of Eduard Uspensky, but has a real prototype. A few years later I not only learned about the existence "photosnipers", but also became the proud owner of a photo kit FS-12 (PHOTOSNIPER-12). The whole set fits in this suitcase:

The first thing that caught my eye was the huge Tair-3S lens with focal length 300 mm. It is not difficult to calculate that for a film SLR this gave a very decent magnification for those times, about 6 times! Today this figure does not look so impressive, but the device still impresses with its appearance:

It is made robustly, reliably and impressively, and yet is easy to operate. Everything seems to be in its place. You adjust with your left hand, and pull the trigger with your right. It is thanks to the trigger and butt that you really feel like a hunter or a sniper. The set cannot be called ladies', it weighs 3 kg in working order, and 5.5 kg together with the suitcase, so your hands begin to get tired after a while.
By the way, as for the name, initially these cameras were produced specifically for military use and were called “hand-held apparatus for photo reconnaissance” (the first “Photosniper” was produced in a small batch in 1937 by the State Optical Institute based on the FED rangefinder). Then a similar model called FS-2 began to be produced at the Krasnogorsk Mechanical Plant (KMZ). The Photosniper FS-3 model and subsequent ones used Zenit SLR cameras, which were intended for the consumer market.
By the way, foreign companies did not produce such kits. Sometimes special stocks were produced, but mass production In fact, no one except the Krasnogorsk Mechanical Plant was engaged in photographic guns.
The value of the FS-12 is also that we disconnect the camera body from the butt and, by screwing on the Helios-44M-4 lens (which is included in the kit), we get a regular camera for everyday photography. You don’t always go around scaring people :-)

Any amateur photographer is not only a photographer, but also often a craftsman who can easily set up his darkroom with his own hands.
For example, it is easy to make a photo gun with your own hands from available simple materials and ready-made parts in a short time.
This photo gun is called "Crossbow" - due to some external similarity.
A “crossbow” is a very simple mechanism and it is very easy to make such a photo gun with your own hands.
But the main thing is that all the initial parts are very cheap, and the photo gun itself is very easy to manufacture.
The most expensive part of it is the “Tourist-4” spotting scope. This tube provides 10x magnification with very good image sharpness. But this is identical to a telephoto lens with a focal length of 500 mm, such as the MTO-500 telephoto lens.
But a telephoto lens doesn’t cost much more, especially in today’s times.
The base of the photo gun is a steel tube with a diameter of 20 mm and a length of 350 mm. Two ears are welded to it for attaching clamps - the stock of the telescope. They are also steel, made of 2 mm thick strip.
Below, to the base, two washers for the butt joint are welded.
A plate (steel, thickness 2 mm) is welded on the right side of the base - the camera bracket. The butt itself is curved from steel wire with a diameter of 6 mm. An elastic retaining plate is welded between the branches of the butt. When the stock is folded into the working position, it firmly connects it to the base.

And finally, two clamps curved from a strip of stainless steel 1 mm thick: thanks to this configuration, they spring well and reliably hold the telescope.
And in order not to scratch it, the inside of the clamps is covered with suede.
Preparing for shooting
We tilt the butt into the working position. We install the camera in the bracket and fix it with a tripod nut. Set the camera lens to “infinity”. Then we bring the telescope eyepiece close to the lens and “press” it into the clamps.
Focusing through the viewfinder of a SLR camera is accomplished by rotating the thickened part of the telescope. The camera eyepiece is stationary at this time.
If your camera is not a SLR, then we focus it by eye.
First, before installing it in the photo gun, we point the spotting scope at the object and achieve sharpness. Having determined the distance to the object, we set the distance on the lens to be 10 times smaller.
After this, we connect the “spotting scope - camera” system and take pictures.
Of course, this design is not without its drawbacks. But the Crossbow suits me quite well.
Here are the photos: one taken just with a camera, and the other with a Photo Gun.

Semyon comments:
The photos suck. I did something similar but with a digital camera, my photos turned out much better
Troll comments:
Why such tricks? Now for 60-90 tr. you can buy an awesome DSLR with a telephoto lens and shoot normally with high quality.
In such a makeshift project there will still be no electronic image stabilization.
Komar comments:
What's stopping you from putting the Konica Minolta on a photo gun? There will be both quality and electronic stabilization.
Mikhail comments:
Not only the cheapness is dubious, but also the project itself: in the 50s the Tair-3 was made, and after that the same photo gun. And FR 300 was considered for a reason: it is very difficult to shoot handheld with a longer focal length. So, already 400 mm in more than half of the cases produces blur, and if we talk about 500 mm, then you can’t do without a tripod in 80% of cases, even in good lighting...
I solved the problem for myself this way: I bought FS and got Pentax instead of Zenith. And the stabilizer works, and the lens, although simple, allows it to work at the level of expensive branded ones.
For reference: the full set of FS cost 4 tr, and I also overpaid))
Hunting with a camera is a fascinating area of photography that helps many amateur photographers take a fresh look at amazing world animals and plants. The hunter sees that everything created by nature is beautiful and perfect, be it a flower, a bird or a frog. And, realizing this, he becomes better and kinder.
“Is it possible for schoolchildren to engage in photo hunting?” - our readers ask us. Of course you can. But for this you need to make a photo gun.
The model of the photo gun, which we will talk about today, was developed at the Higher Art and Industrial School (formerly Stroganov) by third-year student V. Kuznetsov.
By design and appearance Our photo guns are significantly different from factory-made photo guns. Instead of a traditional heavy butt, there is a light, “butt” truss. The light weight and telescopic support make the photo gun convenient for young photo snipers, and, perhaps, for experienced photo hunters. It’s easy to shoot with a photo gun: you hold the handle with your left hand and at the same time focus the lens, and with your right hand you support the gun and press the camera’s trigger. The telescopic support rests comfortably on the elbow joint, and the soft rubber eyecup accurately fixes the amateur photographer's eye in the center of the camera's eyepiece. In this position, you can spend hours in full “combat readiness” observing the object of photo hunting.
The design of the truss of our photo gun is designed for small-format reflex camera"Zenit" type ("Zenit E", "Zenit V" or "Zenit M") and a composite telephoto lens (standard "Jupiter-11" lens with a negative component).
home si her
Long-focus lenses “Jupiter-11” are produced in frames for the “Kyiv” camera (bayonet mount) and for the “Zenit” camera (threaded). Unfortunately, lenses in Zenit frames are very rarely on sale; it is much easier to purchase a Jupiter-11 in a bayonet version. It is easy to replace the bayonet mount with a threaded one, and then the Jupnter-11 will become universal: it can be used; And How component telephoto lens in our photo gun, and as an independent lens for regular photography with Zenit and Kiev cameras (replacing the threaded mount with a bayonet mount). The figure (see node 16) shows the dimensions of the converted lens shank.
To install a standard Jupiter-11 lens in a Zenit camera frame on our photo gun, you need to change (adjust to the lens) the dimensions of the table - the diameters of the frame and clamp. But you won’t be able to get by with just the Jupiter-11 lens; for the photo gun you will also need to make a negative component (set-top box).
The negative component is a 20 diopter negative biconcave lens in a tube. Composite telephoto lens mounted on a movable table, allowing<ет снимать в очень широком
Ask any hunter what is the most interesting thing about hunting for him? The process itself? Hunting trophy? Tanning skins (you can read more about how to tan the skins of killed animals using the “tube” method)? Most hunters will answer that the end result is important to them, but the hunting process itself attracts them no less. And, now imagine that you will hunt with... a photo gun? It is the latter that we want to tell you about in our new publication...
Hunting with a photo gun
 Hunting with a photo gun equipped with long-focus optics is a difficult, but quite exciting activity. Such hunting knows no restrictions or prohibitions. Thus, throughout the year, the hunter has the opportunity to monitor the life of animals and birds, and record moments from their lives on information media. Such photo-hunting trophies can be stored for years and are of great value.
In Soviet times, photo hunting was carried out using long-focus lenses Tair-3, MTO-500 and MTO-1000, however, the use of such lenses also required the use of a special device - lens mounts.
At one time, experts had the opportunity to inspect and test a number of models of photo guns of different designs, and today we would like to invite you to familiarize yourself with their drawings. Who knows, maybe you can find such a photo gun in the attic and use it to save money on purchasing modern photography equipment.
The following device options have advantages when shooting with a Zenit camera, and some have advantages when shooting with a Start camera. In one case, the lens structures are attached to the butt, and the camera is in a freely suspended state; in another case, one can observe the simultaneous mounting of both the lens and the camera. Unfortunately, not all of these photo guns have the ability to quickly and conveniently switch from shooting horizontal frames to shooting in vertical mode - this is not modern technology. Some also have the disadvantage of not being able to quickly focus moving subjects so that they can be constantly in focus and the shutter will fire at the right moment.
The presence of such shortcomings at one time prompted a number of amateur photographers and professionals to start working on improving the designs of photo guns and prompted them to create their own versions of such guns. True, such achievements remained little known, and factories producing long-focus optics were not interested in them. But, we suggest that you still consider their discoveries, as well as the structure and rules for using a photo gun during hunting...
Rules for using photo guns on photo hunts
 So,
So,
If you want to take photographs with long-focus optics, it will be useful for you to know that of the older models, only SLR cameras such as Zenit, Crystal and Start, as well as others equipped with a trigger, are suitable for this purpose. At the same time, they do not require any additional adjustment steps.
The longer the focal length of the lens you use for shooting, the more difficult it is to shoot without a stop. Also, it is worth remembering that using a tripod while photographing animals and birds is not convenient and impossible.
Having a hood for long-focus optics is a must. At the same time, in order to achieve a stable camera position while shooting moving objects and running photography, cameras with a butt, which are called photo guns, are used.
How to use a camera and lens during a photo hunt
 In order for you to prepare the camera for shooting, you need to unscrew the standard lens and replace it with one of the long-focus lenses - Tair-3, MTO-500, MTO-1000.
In order to unscrew the long-focus lens of the Start camera, you should use a special adapter ring.
For photo guns shown in Figures 1,2,3,5,6, the camera and lens are attached to the stock using a special threaded hole located on the lens and a special “lamb” that is permanently attached to the stock of the photo gun. Mounting the camera to the stock in this way allows for good balancing of the installation and provides easy access to the camera. In this case, the camera is in a freely suspended state. For some designs (in particular, for Zenit cameras), the release cable should be lengthened by making 2 standard cables, which you fasten together using an adapter sleeve - see photo 2. The best cable, which is attached to the front of the camera gun handle, will be of course, a standard cable from a Start camera. For the photo gun, which is shown in photo 4, the camera and lens are mounted at 2 points, that is, both the camera and the lens are attached. But with this mount there is no possibility of replacing the camera.
To shoot with a photo gun, you should rest the back of the butt firmly on your shoulder, and grab the lens with your left hand and focus. The shutter speed is set depending on the shooting circumstances and the lens, and the aperture is set on the required depth of field and lighting conditions. However, it is worth remembering that working with a long lens when shooting will require setting additional high shutter speeds.
A distinctive feature of long-focus optics is that the depth of field of these lenses is insignificant and therefore focusing must be done more carefully, and the aperture should be set (if the lighting allows it) in such a way as to maximize the depth of field. To photograph moving objects and running photography, the lens must be set on a scale based on the distance of the subject to be approximately 30-40 meters and the aperture must be aperture accordingly in advance. This will enable the hunter to take a photo faster if his subject unexpectedly appears. Shooting can be done while tracking a moving object at the required shutter speed.
One of the rather interesting devices - it is shown in Figure 2 - is a special lightweight tube made on your own from aluminum or duralumin with an I-51 lens built into it with a large aperture and focal length and an aperture ratio of 1 in 4.5 or an I-13 lens with an even larger focal length and the same aperture ratio. These lenses are used for studio cameras with frame sizes of 18 by 24 centimeters and larger. They are well suited for small format SLR cameras such as Zenit, Start, Crystal and can even replace a set of Yu-8, Yu-9, Yu-135 and Tair-3 lenses. Their resolution is in no way inferior to the indicated interchangeable lenses and makes it possible to shoot from a distance of 0.5 meters and further. In other words,
you can photograph a butterfly sitting on a flower in the entire frame of 24 by 36 millimeters and also capture a bird or animal well and take a good photo, regardless of the distance at which the shooting is carried out.
But, it should be noted that the Start type camera, in addition to focusing on frosted glass, also has a wedge aiming, which is a bit of a hindrance when photographing birds and animals in motion. We would recommend that you get rid of it.
 We track customer loyalty
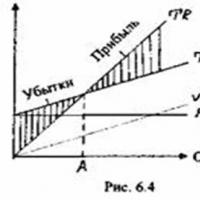 What is the profitability threshold?
 Where to work with a sociologist's education
 Rituals to get your enemy fired from work How to get your boss fired
 301 83 unified technological system
 License for passenger transportation
 Offers are of the following types