Do-it-yourself painting of decorative plates. Painting dishes with your own hands. Tips for performing point to point
Plate painting is one of the oldest activities that has survived to this day. Previously, such items were used to decorate shelves in sideboards and walls. They were passed down from generation to generation. Also relevant today. They will be an excellent piece of kitchen or dining room decor, and you can involve your children in the process of creating a masterpiece.
Features of the technology
Painting a plate is not such a simple matter. To obtain a real masterpiece, professionals take special courses where all the subtleties of this skill are revealed. But absolutely everyone can know it. You just need to take into account some of the nuances regarding such a process as plate painting.
Drawing technique involves the correct selection of tools and materials. The most important item here is the decorative plates. Painting can be used to decorate items made of ceramics, porcelain, glass, and wood. The main thing is that they should not have a factory design.
You can create a pattern using the following tools:
- water, acrylic. The latter are the most popular, as they are the most common, and even a child can work with them.
- Felt-tip pens (special indelible ones).
Thin brushes are most often used. But it all depends on the drawing. Sometimes you need several types of brushes - from the thinnest to the most magnificent.
In case your drawing doesn’t work out, you should have a paint remover on hand.
Types of painting

Painting a plate is an art! There are a great many types of techniques:
- Tiffany - allows you to achieve the effect of a three-dimensional pattern.
- Khokhloma is a fairly famous painting. The patterns are made in black, red and gold colors.
- Dotted - a drawing is created using dots.
- Gzhel - simple lines, drops, meshes, flowers. Everything is done in blue tones on a white background.
- Captions are simply words, phrases, lines, and so on.
- Geometric patterns are designs consisting of various lines and shapes.
- Whole composition (landscape, still life).
Of course, that's not all. There are also other types of painting, most of which come from ancient times. But we have listed the most popular ones.
Operating procedure

Regardless of the degree of complexity of the drawing, there is a generally accepted sequence of actions:
- The plate to be painted is degreased using alcohol or window cleaner.
- A primer is applied to help the paint adhere better to the surface.
- A sketch of the drawing is prepared on plain paper.
- The design is transferred to the surface of the plate. How this happens depends on the application technique and image style.
- Attention is paid to the elaboration of details (for example, the outline is completed).
- The plate is dried for 24 hours in the open air or in the oven for 40 to 60 minutes.
Simple geometric pattern
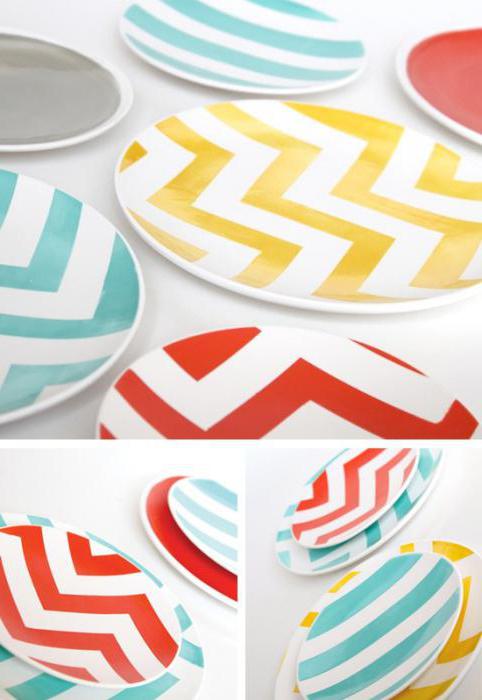
Perhaps the easiest and fastest way to paint a plate is to use paints and masking tape. Thanks to simple manipulations you can get a bright decor.
So, prepare the plate for painting (clean it and degrease it). Then take masking tape and stick the strips onto the surface. Where we have tape, the plate will not be painted, keep this in mind. The pattern can be varied. This is usually how zigzags are created.
Now paint the entire plate with bright paint. For this work you will need to take a fluffy brush, as it will cope with the task faster. Let the paint dry a little and then remove the tape. Now you can dry the plate.
Finger painting with children

It's a great idea to paint a plate with your children. To do this, you don’t need to look for and come up with special pictures. You can simply immortalize your child's fingerprints.
First, prepare the surface of the plate. Then take brown paint and paint the trunk and branches of the tree. Then take a regular sponge and coat its surface with some paint. Now gently touch the washcloth with your fingertips and then leave an imprint on the plates. The fingerprints will serve as leaves.
By the way, in this way you can collect prints of friends and relatives at the wedding as a keepsake.
Silhouette and ornament

Painting the plate will help you decorate your dishes simply and tastefully. You can do this as follows:
- Prepare your plate for use.
- Take a thin brush and draw the silhouette of an animal below (for example, a hare, a bear, a dog, etc.). Do not make the outline clear; to do this, dilute the paint a little with water on the palette.
- Then take the thinnest brush and draw a couple of arcs from the silhouette. Draw leaves and flowers on them using lines or dots. Choose contrasting colors for plants.
- Dry your work.
So in a simple way you can create a whole series: on one plate there will be an image of a hare, on another - a fox, on the third - a wolf, and so on. The whole essence of the work lies in the simplicity of the lines and the play on contrasts. With the help of small bright details, a playful mood is created, and the overall palette does not strain the eyes.
Careless thoughtfulness

This type of work looks like it took at most five minutes to complete and is the result of someone's negligence. In fact, the presented painting of plates with paints is also the fruit of the efforts and imagination. To work, you will need liquid paints, a brush, an old toothbrush and rubber gloves.
Dip the brush into the paint container and bring it to the plate. Start placing chaotic drops on the prepared surface. There is no need to build a clear sequence - first smooth and small, then large with wavy edges. Let all the drops be uneven and different in size. Place them in different places. It’s worth mentioning here that the paint should drip from the brush on its own, so pick it up without sparing it.
Then dip your finger in the paint. Run it around the edges of the plate, making a border. An old toothbrush will help you finish the pattern. Dip it lightly into the paint, and then run your finger along the bristles, pointing your “tool” at the plate. Dry the pattern.
Bitmap without pattern

Dot drawings are quite a fun activity. And at the same time - long and painstaking work. But the result is always worth the effort.
Plates with acrylic paints can be made using a template or without it. Let's look at the second option first. It is used for simple patterns, and the first one is used for more complex and intricate ones.
Bitmap drawing assumes that the picture will be drawn not using lines, but with dots that are located next to each other. This type of painting can be done either with paints and a brush with a pointed end, or with markers.
First, as always, you need to prepare the surface of the plate. Then the future drawing is thought out. You can take any picture as a basis, but it’s easier to use this technique. Then the paint is applied to a palette or piece of paper. The material is taken onto the brush very carefully. Excess paint must be removed.
Then the magic begins. Use a brush to gently touch the surface of the plate. If this is not done, smears will result. But the drawing consists of dots. You need to work slowly, trying to ensure that the drops are the same in size. This is how the entire pattern is applied. By the way, you need to work from top to bottom so as not to accidentally blur the drawing.
Depending on the design, the dots can be of different colors and diameters. But the picture should be clear. Therefore, lines relating to one element (for example, the core of a flower) are made in the same shade and with dots of the same diameter.
Bitmap by template

At first glance, it may seem that painting according to a template is very simple. Actually this is not true. First you need to prepare this very template. To do this, you can use ready-made pictures or make an illustration yourself. Since a bitmap does not involve painting, the template on paper is made only in outline (for example, a flower will be depicted only with the help of petals). By the way, in the case of a paper model, you can only decorate a transparent plate.
So, prepare the surface for work. Then cut out the template along the extreme outline. Now glue the paper to the back of the plate using electrical tape. Prepare your paints and brushes. Now you can start drawing. Place dots along the top of the outline. Start working, as in the previous case, from the top so that the drawing does not become smeared.
When the work is ready, let the plate dry a little. Then carefully remove the template. If desired, the reverse side can be painted over, thereby giving a background to your pattern.
A few more ideas

Painting plates with your own hands is a fascinating activity. In the process of creating one craft, an idea for the next one often arises.
Here is just a small part of the possible plate design:
- With the help of thin wavy lines you can make not just patterns, but entire drawings. Just sketch the inside of the silhouette not with solid strokes, but with curls.
- You can collect words from plates. Each saucer is one letter. It must be placed in the center. The space around the letter can be decorated with small patterns (for example, floral).
- Original painting - face. You just need to draw the eyes, nose, mouth and cheeks. The remaining part can be covered with some kind of continuous pattern.
- Plant motifs are always relevant. Flowers and plants can be drawn different ways: filling the entire space of the plate or just the outline, with strokes, dots, solid color, strokes, and so on.
- You can also make a special painting for each holiday. So, for example, plates with snowmen, Christmas trees and Santa Claus would be appropriate for the New Year, pumpkins for Halloween, painted eggs and Easter cakes for Easter, and a mimosa branch for March 8th.
Plate painting is one of the ancient arts, which enjoys enormous success in modern society. In the days of our ancestors, painted plates were the main component of residential decor. They decorated the shelves, hung on the walls. Many of us can remember such products in the homes of our beloved grandmothers. They loved to display painted dishes in cupboards and kitchen cabinets.
Similar chic decorative items can still be found today. At the same time, you can buy ready-made painted dishes, or you can paint the plates yourself.
 DIY tableware painting can't be called an easy task. It is not enough to take a couple of online lessons to learn how to decorate plates well and draw pictures on them.
To do this, you need to study in special courses, which can last quite a long time. But it is worth noting the fact that anyone can learn the art of painting.
In this matter, it is necessary to take into account all the subtleties that are described in detail during the master classes. The painting technique directly depends on the correct selection of materials and tools for the job. You can decorate wooden dishes, porcelain, glass and ceramics. The main condition is the complete absence of any original drawings.
Tools for creating patterns:
- Paints. They can be water-based, acrylic or silicate. The most popular are acrylic paints, since working with them is quite simple and even a child can cope with it.
- Markers. Nowadays, the market provides a huge selection of special waterproof felt-tip pens, working with which will bring real pleasure.
- Tassels. In most cases, painting dishes requires several types of brushes. Their thickness depends on the pattern, but in patterns they are often present as the finest details, and quite voluminous.
- Paint remover. It is extremely necessary for beginners, since at the learning stage not everything will work out right away.
Gallery: plate painting (25 photos)


Types of painting
There are several basic techniques for applying patterns that craftsmen have been using for many years:

Sequence of actions when painting
Regardless of the degree of complexity of the drawing, there is a certain algorithm for drawing images:

Painting ceramic plates
 Ceramics is the most common material for printing images. But to paint ceramic dishes skills are required, since working with ceramics is quite difficult. As a rule, drawing on this material requires long-term training, during which specialists give master classes with detailed description procedures.
Any paint that is resistant to hot and cold water is suitable for working with ceramic products, but enamel is the most ideal. It is this that adheres well to clay and allows the product to remain attractive for quite a long time. Ceramics are also often painted using acrylic paints. They are ideal for beginners.
To begin with, the surface of the ceramic product is prepared as described above, and after that you can safely begin to work. You can draw pictures using stencils or thin brushes. In addition, special markers are used for drawing on ceramics. The patterns can be anything, it all depends on the imagination of the master, how he wants to paint a mug or plate. Beginners are most often advised to use templates, but later, when increasing the level professional excellence, it will be possible to draw directly on the surface of the dishes without the use of stencils and blanks.
How to paint a plate with acrylic
 Thanks to acrylic paints you can give new life white porcelain saucers and plates. Blue paint will look especially beautiful on a white background. But she is no exception. Bright, saturated colors combined into three-dimensional designs look quite good. Blue predominates in Gzhel painting. Waves, flowers, geometric shapes or abstract designs can be offered as patterns.
The most common is Gzhel painting. To perform this, special stencils are used. Thanks to this technique, any nondescript saucer will become a real decoration of your interior. There is a huge selection of Gzhel stencils with images of birds and flowers.
To work you will need:
- white dishes made of ceramics or porcelain;
- a simple pencil;
- stencil with the desired design;
- acetone;
- acrylic paint of blue and cyan colors;
- brushes of different thicknesses.
We degrease the dishes and use a simple pencil to apply a design using a stencil. Next, we begin to paint over the contours of the drawing with strokes, having previously practiced on a piece of paper. It is necessary to combine blue and blue tones to obtain a contrasting image. Carefully wipe away any mistakes using acetone, being careful not to touch the successful areas. At first, beginners use templates with the desired color scheme.
 You can safely introduce children to the art of painting. A child may not have artistic talent, but this is not a hindrance for drawing on dishes. From a very early age, children can draw simple images using your fingers, the pads of which are dipped in paint. These can be dots, lines or simple strokes. Children often really enjoy this activity, and many of them later become interested in artistic painting more seriously.
In addition to the finger technique, there is also painting using special stamps. In shops children's creativity You can purchase sets with a wide variety of images. These can be animals, flowers, geometric shapes and much more. Applying stamps requires ceramic or porcelain dishes, acrylic paints and brushes. Older children can combine stamping and painting with brushes.
Painting plates is a useful and exciting activity. Possibility to give unique and beautiful view the faceless plate is captivating, and the result is touching. Decorating plates yourself is a painstaking task that requires perseverance and patience, but also calms and relaxes. You can do plate painting with your children on cold winter evenings.
How did the plates get on the wall?
Until the middle of the 18th century, Chinese porcelain could only be found in royal palaces; it was common in European everyday life. wooden and pewter utensils. Together with the solution to the secret of Chinese potters, the era of ceramic tableware began in Europe.
Simple clay plates became available to many, but beautiful porcelain products were still considered a symbol of luxury and were found only in the homes of wealthy aristocrats. Fine porcelain sets were considered as decorative elements of the interior: they decorated furniture shelves and walls.
The tradition of rewarding those who have distinguished themselves public service subjects with porcelain plates became the reason for collecting and hanging them on the wall for everyone to see. It was not accepted to eat from a plate received from the sovereign's hands. A high state award was given a place of honor on the wall. The number of award plates on the “honor board” testified to the merits and rank of the owner of the house.

Painting plates - a commercial move and the beginning of a “plate interior”
Commercial flair helped the French company Lalique to sense consumer interest in beautiful porcelain products as decorative items. In the middle of the 19th century, the first copies appeared on the European market. collection plates distinguished by grace and beauty. The original products amazed with the high quality of the finest porcelain and filigree decoration.
Decorative plates decorated with carefully drawn miniatures, landscapes, pastoral pictures, and portraits. Plates from Lalique in the interior replaced the award plates that had become a thing of the past. For almost two centuries, decorative plates in the interior have been a symbol of refined taste. In modern applied arts Fantasy genres, surreal motifs and marine art are often used.

Ways to place plates in the interior
Collectible plates decorated the walls of the living room, dining room, and kitchen. For reliable mounting on the wall, special hanging hooks were used. Hooks - the most common way attaching plates to the wall. If the collection is quite extensive, then it is better to use a special display. Today, placing dishes in displays is considered the most reliable way. An expensive collectible plate is firmly fixed to the wall, which prevents it from falling.
For kitchen interior it is recommended to use cantilever shelves. A wall console, which is a wooden panel with holder slats, is a traditional attribute of the interior of a Western European kitchen. Ceramic plates with painting are appropriate in the interior dining room-kitchen in Provence style.
Painted plates can be placed on the fireplace, in a niche, in a cabinet with glass doors, on a chest of drawers or a windowsill. In such cases, the plate is installed in a vertical position using a tabletop stand-holder. There are several ways to make fasteners for plates with my own hands: using paper clips, tin rings, epoxy glue. But it's better to use fasteners industrial production– an expensive collectible or favorite painted plate should be firmly attached to the wall.

DIY plate painting
DIY plate painting- This is a popular and beloved activity by many. Any creativity brings pleasure, painting also brings a lot of pleasant emotions. The whole process, starting with thinking through the design and decorative elements, directly painting, firing, varnishing, as well as the result of the work and the emotions of loved ones who received exclusive gift, will bring you great joy.
Painting plates with acrylic paints: the process is not as scary as it is painted
Universal and environmentally friendly acrylic paint is great for painting plates. Acrylic paint consists of pigment, water and a binder, this ensures its high adhesion (an indicator of the adhesion of paint to the surface). IN construction stores presented a wide range of acrylic paints various colors and shades. Paints like gold, silver, copper, bronze allow you to decorate plates and give them various effects: shine, shimmer and shimmer.
Sequence of painting work plates with acrylic paints as follows:
- Careful degreasing the surface of the plate using alcohol or acetone.
- Drawing. Fantasy and exclusivity are welcome. Acrylic paint dries within 4 hours. If gold paint was used in the painting, drying may take a week.
- Coating the image with acrylic varnish. The varnish is applied in several layers, with each new layer only after the previous one has dried. Applying varnish with a brush can smear the design, so it is recommended to use a spray varnish.
- Firing the plate in the oven or microwave oven. The plate should be placed in a cold oven, preheated to 170°, left for 30 minutes and removed from the oven after cooling.

Point-to-Point – dot painting of plates
Spot painting is suitable for those who are not good at drawing and think that they can only decorate a plate with a “blue border”. Don't be discouraged, technology dot painting It’s just a combination of many multi-colored borders!
The plate for dot painting is degreased, but before applying outline drawing The surface of the dishes is primed with black acrylic paint and, after drying, covered with matte varnish. The decoration of the plate should be carried out in two stages: first the center is decorated, then the rim part. The outline of the main design is applied in the central part of the plate, and decorative lines are applied along the border.
Bitmap – string of small beads from paint - applied using an acrylic outline. A special tube with a thin tip allows you to squeeze out the right amount of paint and carefully place a dot on the surface of the plate. Excess paint must be removed and the drawing adjusted. From clear lines, alternating colors and dot sizes, amazingly beautiful drawings are obtained, and the plate itself turns into a real piece of art.
Children's creativity in the children's room
Special tools will help to introduce your child to the basics of arts and crafts and at the same time decorate the interior of the children’s room with painted plates. kits for artistic creativity . The kit includes something convenient for coloring: a white plate, acrylic paints, brushes, sponge, templates, contour paints, a felt-tip pen - intended for painting and designed for a child’s hand.
The template-drawing is placed on the plate and filled in using a sponge. bright colors, felt-tip pen or brush, the drawing is drawn up with a contour line. At the final stage, adults can help the child and make the necessary adjustments to the painting. Double-sided tape is glued to the painted plate and a special hook is attached. It is not necessary to paint a plate according to the proposed stencil; unique examples of painted plates are created by a child’s wild imagination.
The technique of applying images with the palm and fingers allows you to obtain original drawings and at the same time capture children's hands as a memory. The wall of a children's room, decorated with several plates, looks original, bright and unusual. The best gift for grandparents - painted by children's hands souvenir plate
Today it is very popular to decorate your homes with cute handmade items. Some types of such creativity are accessible only to experienced needlewomen, while others can be done even by a child. Such an accessible type is plate painting. There are many techniques for its implementation, and the result of the process will be a wonderful decorative item for decorating the kitchen or dining room.
Plates made of ceramics, glass, wood, and porcelain are suitable for painting. These can be either special products for decoration or ordinary, plain ones. The main thing is that there are no factory designs on the dishes.
Before you start work, it’s worth deciding on the technique, since there are several types:

You can draw with paints (acrylic, silicate, water-based) or permanent markers. Regardless of the complexity of the pattern on the plates, the order of work is usually the same:

Pique technique
 You can paint a plate with your own hands using the pique technique. In this case, the pattern will be created by applying dots along a given contour. This technique allows you to achieve the effect of beadwork, embossing or even inlay with stasis or precious stones.
For work, it is best to take durable contour acrylic paints. When choosing them, it is worth checking that they are the right consistency - not too liquid and not too thick. They should be easy to squeeze out, but do not spread into a puddle.
If the selected paints are not in tubes, but in jars, then you can apply the dots with a thin brush, toothpick or needle.
After carrying out the preparatory work (degreasing, priming), you can immediately begin applying the dot pattern. If such work is being carried out for the first time, it is better to first complete a stencil, sketch or marking, and also think about it in advance color scheme future painting. Very convenient to use template, which is attached to the back of the plate.

To paint ceramic plates I got the piqué technique right the first time, it’s worth practicing on paper - applying dots of the same size with equal spaces between them.
Tips for performing point to point:

Gzhel painting
 Gzhel painting is a traditional elegant Russian painting in blue tones on products made of snow-white clay. To paint a plate in this style, you need to prepare blue acrylic paints of different tones and brushes of different thicknesses. In addition, the plate itself must be pure white.
Before you start painting, you can practice on paper. To begin, depict the simplest elements inherent in this style: dots, lines, strokes, grids, arcs, simple ornaments, borders, droplets.

An interesting technique - “brushstroke with shadow”, found in many products painted in the Gzhel style. To perform this you will need a wide brush (No. 10−12). To achieve the desired effect, you should correctly distribute the paint on the brush - there should be more paint on one side than on the other. Thanks to this, the stroke will be darker on one edge and lighter on the other.
To make painting easier, you can use a stencil, a drawing plate template, or make markings. From simple elements (dots, lines, droplets) you can create characteristic patterns in floral motifs (flowers, blades of grass).
Ideas for drawing with children
 Creating a painted plate can serve as an excellent occasion for joint creativity with your child. The simplest, yet most effective and fun method is finger painting.
For example, you can depict a tree in this way. After degreasing the surface, you need to paint the trunk and branches of the tree with acrylic paint using a brush. Then coat the sponge with green (or any other) paint. Next, you need to touch the sponge with your fingertips and leave an imprint on the plate - each such imprint will represent a leaf.
Simple (child friendly) and sufficient quick way decorate the plate - apply a geometric pattern. To work, you will need masking tape, which must be glued to the surface, creating a simple geometric pattern (for example, a zigzag line).
Painting plates is an ancient activity. Seeing such beauty and grace, one cannot believe that this is the creation of human hands. You too can feel like an artist who creates unique examples of tableware. I'm not suggesting that you start creating highly artistic ones. But it's up to you to personalize your kitchenware, create a creative gift for someone's birthday, or simply spend time with your loved one doing something fun.

For painting plates, there are special water-based ceramic paints. After drying and firing in an ordinary oven, the dishes can be used in everyday use. Sets of paints can be purchased even at an ordinary stationery store, and at a low cost (from 150 rubles). You don't need many flowers, just 5-6. Even if the set does not contain black, you can use brown to draw the outline if necessary.
Smooth white plates without decorations or designs are ideal for painting. Their cost depends on the quality of ceramics or earthenware. The cheapest options (from 20 rubles) are suitable for our creativity. More expensive ones are used only when there is enough experience.

The drawings applied can vary in style and complexity. But for beginners, simplicity is the main criterion. It’s not for nothing that simple lines become classics (although simplicity can be deceiving). You can use pictures from children's coloring books or find options on the Internet. If the plate is intended for a child, you can use ready-made stencils of animals and various objects, which are sold where paints are sold. Having artistic experience, you can come up with something yourself. Even any abstraction of geometric shapes or various hieroglyphs will do. It's a matter of taste. If you want to use the dishes for their intended purpose in the future, then it is better to start painting the plates with your own hands from the edges of the dishes.
Before applying the sketch, the surface of the plate should be cleaned with an alcohol-containing liquid.

If you do not have a pencil, you can use ordinary copy paper.

Choose the colors that you like, not forgetting, of course, the style of the drawing itself. You can apply water-based paints not only with a brush, but also with your fingers. This application technique will be very interesting for children.

The result will be very interesting. This does not apply to other types of dyes that may damage leather.
After finishing painting, you must leave the plate to dry completely for 24 hours.

The next day you need to bake the finished product. Place the plate in an oven preheated to 150 degrees for 15 minutes. After turning off the heating, the product is left to cool completely inside the oven. You can read more precise instructions on the packaging of the paints you choose for your creativity.

Painting can be done not only with water-based paints. If you are not going to use the dishes for their intended purpose, but will use them as a decorative element, then acrylic paints are also suitable for painting.
Glassware is also used for painting.

It is better to apply acrylic paints from below, then the plates can be used for their intended purpose. If you want to make, then a couple of plates would be an excellent choice. The only condition is that the theme, style and color scheme of the drawing applied to them have something in common. To maintain a unified image of your kitchen, you can paint in the same style not only the plates, but also other glass and ceramic dishes.
I think now not only do I consider painting plates with my own hands a wonderful hobby, but others will agree with this.
And you will learn how to make souvenir plates using the decoupage technique.
Now watch this helpful video:
 Business Analyst - IT1410: Software Requirements Development - Business Informatics
 Assessment of the efficiency of use of fixed capital Analysis and assessment of the efficiency of use of fixed capital
 The motive for learning activity refers to all the factors that determine the manifestation of learning activity: needs
 Job Description for Seller of Non-Food Products of Category I
 The severity and intensity of labor: classification, indicators, factors. The criteria for the severity of labor under dynamic load are
 OKVED “tourism activities” - decoding New OKVED tourism activities
 What kind of profession is a laboratory assistant for chemical and bacteriological analysis?