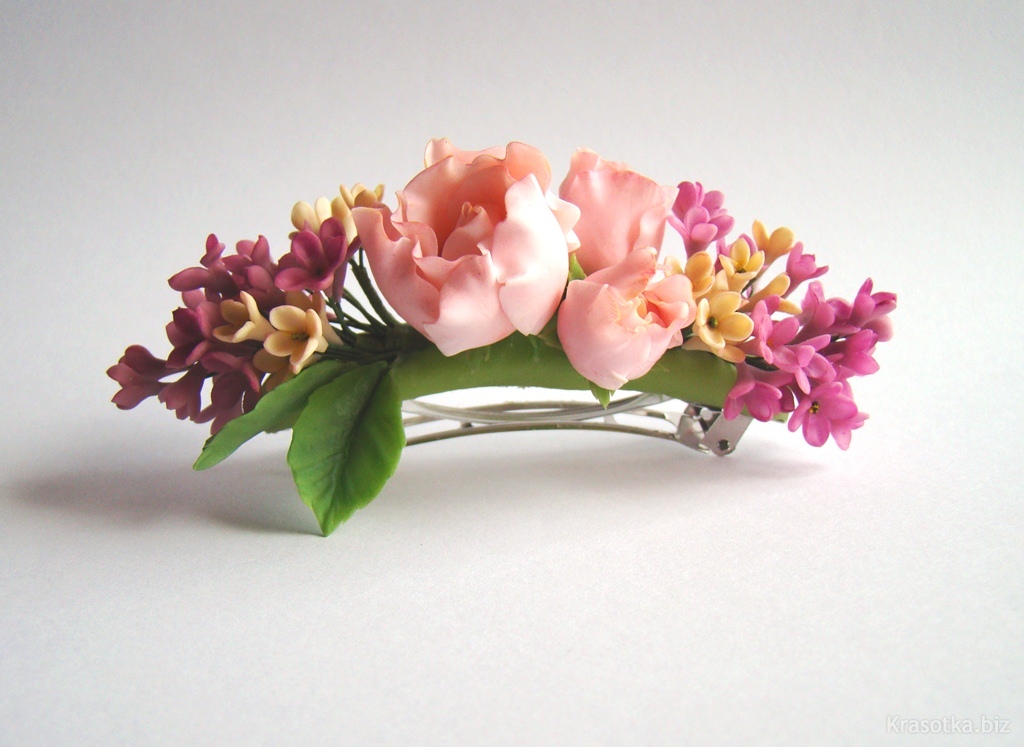
Clay hairpins. Flowers made of polymer clay. To make the hole in the beads even and neat, it should be made on both sides, and not right through
This master class will help you recycle leftovers polymer clay.
For work we will need:
- polymer clay of any shade of brown or any leftovers;
- toothpicks;
- extruder ( for a long time I managed without it, rolling the sausages with my fingers);
- wet wipes;
- Perlex (I have bronze) or glitter eyeshadow;
- soft brush;
- a mold or template for cutting out the shape;
- varnish for polymer clay;
- pasta machine or acrylic roller for rolling.
You may need:
- gold polymer clay;
- sandpaper for wet sanding. 
Knead the clay (may the ceramists forgive me! Polymer makers will understand!) until it has a uniform color, roll it out on maximum using a paste machine or with a roller to a thickness of 3-4 mm, cut it according to the mold

Lately I've had a lot of work thrown out because of bubbles. So I prick both sides with a needle. I smooth the front side, level it with a damp cloth (with my finger wrapped in it), smooth the edges.
Squeeze the noodles out of the extruder. The nozzle has many small holes.

The main elements of the future design are made from pieces of sausages. Roll out the edges with your finger. Then we bend it with a toothpick and a finger (it’s easier with nails). In addition, you will need dots (many dots!), rolled between your fingers from 2-3 mm segments. Fat droplets are large dots rolled on one edge with your finger.


On the base, squeeze out a small inlet hole for the stick using the top of a ballpoint pen. We press the outer bevel diagonally for better fit of the stick. On the opposite edge of the workpiece, cut out an outlet hole of any shape. To roughly represent the drawing, we make a sketch on the template. For the first time, the more precise the better (mine is very approximate).


To transfer the element to the base, we place a knife flat under it. Carefully remove in the right place, helping with your fingers. We correct the position on the spot with a toothpick, if necessary. The main thing is not to leave fingerprints or scratches on the elements.


Let's start laying out the drawing. I try to decorate the edges as much as possible.


The base of the “droplets” does not look very neat. I always cover them with dots. Before doing this, I press the desired area with a toothpick. Lightly pressing the point against the toothpick, I move it into place. Close-up!

For better adhesion of the pattern to the surface, carefully press the elements with a finger wrapped in a napkin.

And we continue to post the drawing. You can't do without tea breaks!


The most tedious thing, of course, is the dotting. During this time, you can think about pressing issues.
Finally, I consider the drawing complete. Do you think the hardest part is over? But no. Now let's invoice the base. Although, if you don’t pierce it with a needle initially, you can just leave it flat. But I'm afraid of bubbles and I like the embossed effect it will give. We find a dull toothpick (or blunt it with a knife), level the tip on the table (we need a circle at the end of the toothpick about a millimeter in diameter) and knock everything out free space. My nerves can only withstand this in three or four doses.


And the long-awaited reward - Perlex coating. I love this moment of magical transformation. Please note that I added more dots and shaded the hole and free barrels with a toothpick.
We put a little powder on the tip of the brush and gradually cover the hairpin. Don't forget the sides!
This is where I usually leave my work, and then go up to the table several times and admire it.


Now let's make a stick. I'll only show you a photo, detailed description You can watch it in the above master class.
Since the hairpin itself is quite impressive, the wand can be made laconic. You can decorate the outer end. To your taste. I'll show you the different options at the end.
To make the stick fit the pin, I add gold clay. 


We bake the hairpin on an iron or glass curved base (I have a mug).

We coat the hairpin with varnish so that the perlex does not wear off during further manipulations, and wait for it to dry completely (several hours). It’s better to use a semi-hard brush, thoroughly rubbing the varnish into all the spots and curves.
We check whether the stick fits. Usually you have to cut diagonally around the inside edge of the small hole on the back of the clip. If necessary (it turned out sloppy), sand the back side with wet sandpaper from a car dealership.

Admire the work, try it on. The hairpin is multifunctional. For hair, shawls, stoles, scarves and scarves, cardigans. On the beach for a pareo.


Hair jewelry is great way decorate your hair and give it a festive, complete look. Such a fashionable accessory will add mystery and flirtatiousness to your image, and if the decorations contain large flowers, then your image will be complemented with femininity and charm. Well-groomed hair is the main feminine advantage that needs to be properly framed and done easily with the help of hair decorations in the form of hairpins, headbands, hairpins and other accessories. In this master class I want to tell and clearly illustrate how you can create with your own hands using polymer clay. original accessory for hair in the form of a crocodile clip.
Materials and tools needed for sculpting:
1. Polymer clay in red, white, green and black;
2. Blade or stationery knife;
3. Rolling pin or pasta machine;
4. Rectangular cutter;
5. Weiner double-sided universal sheet;
6. Mold with the texture of petal veins;
7. Yellow acrylic paint and brush;
8. Needles or toothpick;
9. Floral stamens are brown or black;
10. Metal base for hairpin - crocodile;
11. Cutting a plastic carved leaf;
12. Wire with a diameter of 0.5 mm and round nose pliers;
13. Stack with a ball;
14. Plastic card;
15. Quick-drying glue;
16. Varnish for polymer clay.

So, let's start sculpting:
1. Using a pasta machine, roll out the plastic red and white maximum thickness. Using a rectangular cutter, cut 5 identical figures from a layer of white clay, and two figures from a red clay layer. Stack rectangular layers on top of each other as follows: two white – two red – three white.

2. Edge plastic card(credit) you need to push layers of clay every 4-5 mm straight to the very bottom layer. It is important here that the edge used to press the layers is wide, i.e. This effect cannot be achieved with a blade.

3. Turn the rectangular cane over and again push all layers of plastic in a different direction.

4. The resulting rectangular cane needs to be stretched out and given an oblong shape with straight sides.

5. Cut the resulting rectangular cane crosswise into two equal parts. Place them together with the side parts facing each other, following the pattern.


6. Now the cane needs to be given the usual rounded shape and rolled out to a diameter of 1.5 cm. On the side where the white layer was, you need to pinch the cane with your fingers and cut into petals. By the way, the thicker the sections, the larger the petals will be and vice versa, and to create one flower we will need five wide and five thin sections.

7. Using your fingers, slightly flatten the petals, place them on the surface of the mold with the texture of the petal veins and give each petal a veiny structure.


8. The first, bottom row of the flower should be made up of five large petals, which are connected in the center, and with a stack and a ball, make a small depression in the center, at the places where they are connected.

9. Place the second row of smaller petals on top of the larger petals, lift the edges of the petals and give them slight bends. We make a depression in the center of the flower with a stack.

10. To create a bud, we will need a drop of red or white plastic and a wire with a diameter of 0.5-0.6 mm and a length of 5-6 cm, at the end of which there will be a loop on one side. We pass the wire loops inside the droplet and fix it tightly there.


11. Cut thin sections from the main white-red cane, place the petal in the middle of the left palm and stretch out the edges of the petal with a stack and a ball.

12. Detach the petal and use a stack with a ball to give it a boat shape, making a small notch in the center of the petal.

13. Wrap five or six petals in a boat shape around the droplet on the wire to form buds.

14. Roll out green clay on a pasta machine and use curly cuttings in the shape of leaves of two different sizes to cut out blanks from plastic.

15. Using a double-sided weiner, give the leaves a veined texture and slightly bend or bend the edges of the leaves.

16. Place a metal blank for a crocodile-shaped clip on the rolled out layer of green clay and cut out a strip of clay according to its area.

17. Attach leaves in random order to a strip of green clay on a metal base.

18. For the sepals that need to be added to the buds. You need to roll out a layer of green clay 2.5 mm thick and use a leaf-shaped cutter with carved edges to cut out two leaves.

19. Place the leaves on the surface of the mold with the texture of the petal veins and give the leaves a veiny texture.

20. Wrap two sepals around the bud and wrap the wire thin layer green plastic.

21. Now, in any order (to your taste), place the leaves and buds on the surface of the base for the hairpin.


22. Add a large flower to the surface of the workpiece and use a stack with a ball to make a depression in the center of the flower.


23. Roll out the black plastic into a very thin layer 5 cm long and no more than 7 mm wide. Place brown or black floral stamens on the surface of the black strip.

24. Form a small droplet from black plastic and wrap a strip of stamens around it in two turns.


25. Place the black core with stamens in the recess of the flower and loosen the surface of the core with a needle. Place the workpiece along with the metal base for firing in the oven.

26. After firing, you need to slightly tint the edges of the leaves with yellow acrylic paint. Apply paint with an almost dry brush. Then you need to detach the plastic from the metal base and glue it with quick-drying glue. All elements of the plastic hairpin will need to be coated with water-based varnish.

A hair clip with a large, snow-white flower that will add romance and freshness to your look - ready!


This master class is intended for middle and older children school age, teachers and parents.
Girls really like jewelry, and handmade jewelry is individual and captivates with its beauty.
You can make this decoration for yourself or as a gift.
Progress:
We will need: any white polymer clay, paints (preferably oil paints, colors can be chosen), hairpin, glue, pin.
We take clay and mix the color for the base and main leaves.
.jpg)
.jpg)
Making leaves: Roll a drop and make a sheet out of it, rolling the drop with your fingers, making veins with a pin.
.jpg)
.jpg)
.jpg)
.jpg)
From a different color we make roses of different sizes.
.jpg)
.jpg)
We make more leaves from the same color.
.jpg)
.jpg)
We leave it all to dry. Now let's get down to the basics. We make a base for the hairpin from the main color and attach it, having first coated the hairpin with glue.
.jpg)
Glue one leaf at a time onto the base, aligning the leaves to the shape of the hairpin.
.jpg)
Gradually glue leaves of a different color and roses.
.jpg)
Now all you have to do is wait until everything is dry and ready to wear.
.jpg)
Good luck with your new creations!
We bring to your attention a master class on making hair clips from polymer clay in the form autumn leaves with your own hands. This hair clip is amazing! Moreover, it is not at all difficult to make it, but step-by-step instruction with a photo they will tell you how to do it correctly.
Tools and materials Time: 2 hours Difficulty: 7/10
- polymer clay of various brown shades;
- plunger cutter in the form of a leaf with three veins (used in the manufacture of mastic and cake decorations);
- paste machine or round roller;
- film with a ribbed surface;
- hairpin base;
- awl;
- varnish for polymer clay.
Decorate your hair with a chic hair clip self made in the form of autumn leaves, made of polymer clay! Also, such a hair clip made of polymer clay is a luxurious gift for relatives and colleagues for birthdays and other holidays!

Step-by-step instructions with photos
So, let's begin the creative process.
Step 1: knead the clay
Knead well all available shades of polymer clay.
Using a paste machine or a round roller, roll the material into a sheet about 2 mm thick.
Place the sheet on the ribbed film and roll it out a little more: this will provide a nice texture for the underside of the leaves.

Step 2: Cut out the leaves
Using a plunger cutter in the shape of a leaf with veins, carefully cut out the required number of figures. Carefully remove the leaves from the cutter. They are quite fragile!


Plunger cutters are commonly used to make sugar figures or cake decorations. But they are also ideal for polymer clay.


Step 3: preparing the hairpin
- To make the barrette, apply a thin layer of brown polymer clay to the top of the barrette base. Glue the leaves beautifully to this layer.
- If you want to make a necklace, bracelet or pendant from the leaves, make small holes in them with an awl before baking.

Step 4: Bake the Clay
- Bake the leaves or hairpin in the oven according to the instructions for the polymer clay you are using. Instructions are usually indicated on the label.
- Coat the finished hairpin with polymer clay varnish in several layers. Make sure the previous layer is dry before applying the next coat.
Every day more and more fashionistas give their preference to homemade jewelry. After all, a situation very often occurs when there is nothing suitable for an outfit in the store, but the image of the desired product has already been drawn in your head. What to do? Stock up on modeling materials and start bringing your ideas to life. Who knows, maybe this hobby will become a source additional income. In addition, handmade jewelry is an excellent gift for friends and loved ones.

First, let's talk about the basic rules and secrets of working with polymer clay. After all, quality depends on their compliance. finished work, and the process will become much more enjoyable.

1. Clean work surface. The table at which you work must be absolutely clean. Otherwise, any speck or speck of dust will ruin all your work. Or you will just have to cut off the whole layer when sanding. Therefore, it is very important to put things in order before starting work.

2. If you are working with different colors of clay, work on the white one first. If you take on bright shades, then be prepared for the fact that the material remaining on your hands may in the future spoil the whiteness of the light-colored parts when kneading. More good advice- Wipe your hands with damp, lint-free wipes every time you change the color of the clay you are using.

3. If the clay sticks too much to your hands, squeeze it between regular landscape sheets. The paper will absorb excess plasticizer and your work will become easier.

4. To make the hole in the beads even and neat, it should be made on both sides, and not right through.
5. To bake beads, you can make a special “dryer”. Take a piece of foil and make a ball out of it. Insert toothpicks into the resulting ball and carefully string beads onto them.

6. And the most important thing! Don't be afraid of experiments and everything new!

These simple rules are easy to follow. All that remains is to find suitable ideas and begin to implement them. We have put together several interesting master classes on making cute hairpins and other jewelry from polymer clay.
Remember that it is not at all necessary to follow from and to. You can always bring something of your own. What’s also very interesting: both a hairpin and a blank for a brooch can serve as the basis for your masterpiece. That is, a product molded according to a master class can be made in the form of absolutely any decoration.
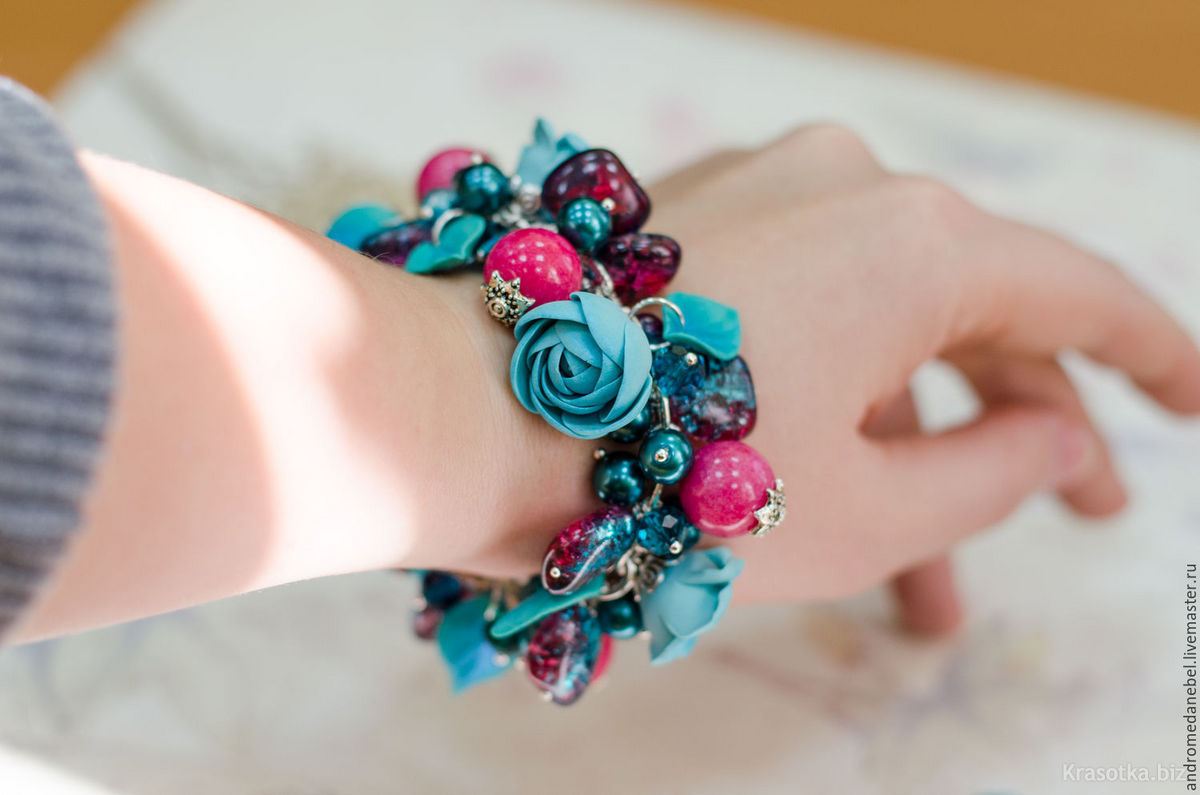
Simple but very bright bracelet
A bracelet made using this technique is very fashionable, since the gradient has not left the covers of magazines and Instagram photos for many seasons now. It is very easy to achieve a smooth color transition in polymer clay. Then you can always use this technique when creating new masterpieces.
The basis of the bracelet is made up of bright beads and small medallions. This bracelet will appeal to both a young girl and a little princess. If desired, you can complement the bracelet with bright beads to match.
So, you will need:
- Polymer clay of two different colors (more if you wish);
- Stationery knife;
- Talcum powder (baby powder is fine);
- Coarse table salt;
- Toothpicks;
- Brushes and glue;
- Lace and metal rings.
1 Step. Take two colors of polymer clay that go well together. For example, an excellent combination of white with any other, and the gradient will be interesting, and the risk of error is minimal. By the way, as an experiment, try taking three colors; when you mix them, you will get an unusual transition from the first color, through the second to the third.
Cut two identical pieces (rectangular shapes) of clay of different colors. As a rule, clay bars sold in stores have special notches along which you can safely cut off the required amount. Cut the resulting rectangles diagonally, and then align the two triangles of each color with each other. You now have two two-color rectangles.
Step 2 Cut the rectangles into small equal pieces. There should be exactly as many beads as you planned to make. Depending on the ratio of the colors, the color of the beads will change. Each cut piece should be thoroughly mixed so that all the colors are well mixed.
3 Step. Dip each bead in salt and carefully roll it between your palms so that the grains of salt are imprinted into the clay. This needs to be done with each bead three times.
4 Step. We make holes in each bead with a toothpick. Remember that it is better to do this from each side, and not all the way through.
5 Step. Now we are making small pendant pendants, which for your convenience should not be too many on the bracelet. Roll out a thin piece of the desired plastic. For greater beauty, you can add some texture to your future pendant by pressing the rolled piece onto corrugated paper, for example, or a special plastic blank, which can be bought at a specialty store. Then take your favorite shape and stamp it onto the rolled out piece. This will be your pendant. The basis can be your favorite metal pendant, an unusual textured button, etc.
6 Step. When all the parts are ready, safely send them to the oven and keep them there for exactly as long as indicated on the clay packaging. Then take it out and let it cool. The beads also need to be rinsed with water so that all the salt is washed off from the surface. The result is unusual, rough beads.
7 Step. String the beads on a rubber thread (the main thing is that it is strong). And also attach the pendants to the bracelet using metal rings at the very end.
Such unusual beads can be assembled into various compositions and attached both to the base for earrings and for hairpins.
Real owl

This decoration in the form of a flying owl can be made in the form of a cute hairpin, an extraordinary brooch or a beautiful pendant.
To create it you will need:
- The clay is white and ivory;
- Acrylic paints are predominantly brown and gray shades;
- Stationery knife;
- Small beads (shiny, no more than 3 mm in diameter - these are the future eyes of the owl).
1 Step. Make a ball out of a small piece of beige clay and then turn it into a blunt-ended blob. This is the body of a bird. Depending on what size you want the product, choose the size of the ball. The sharp side of the droplet should be flatter. Where the head will be, you need to make a small indentation using a handy tool, for example, a pen cap or marker. Place a pre-prepared “cake” made of white plastic into this resulting cup.
Step 2 On the white cake of the bird's face, use the round edge of the pen to make two indentations for the eyes. You need to insert the beads into them at a slight angle. In place of the beak, draw two stripes with a needle or thin awl so that you get a triangle imitating the beak and two points (nostrils). Two small tiny pieces of white clay need to be rolled into sausages and made into eyelids, placing them around the beads. Use a needle to outline the eyes. You also need to use a needle to draw lines from the center of the face to the edges, imitating feathers. Just don't touch the beak.
3 Step. Wings. To make it you will need a standard rectangular piece (cut along the grooves) of beige plastic. We cut the rectangle diagonally and from the resulting triangles we sculpt two bases for the wings. Later we will attach feathers to them, so don’t worry about the perfect shape. It is important that the wings are reliable.


 Traffic light concepts, history, purpose Food discounter traffic light
 Order for the appointment of the General Director: sample filling, download form
 Master of Finance Master of Finance Analysis and Planning
 Learning tricks - How to quickly learn a text Charskaya Lidiya Alekseevna
 Returning household appliances Is it possible to return money to appliances?
 New blog of Oleg Lurie What to do if they want to squeeze out the project
 Participation in tenders: step-by-step instructions, necessary documents, conditions Participation of individual entrepreneurs in tenders