Connecting photos online. Combining images in Photoshop with a stroke and blurry borders. How long have you been using a computer
Hello dear readers. As you already know, I But now it's not about that. In order to somehow dilute the news feed and please you with useful material on the GIMP editor, today I am publishing a simple lesson from which you will learn how to combine two pictures into one.
I’ll make a reservation right away that I didn’t invent anything new, but I took this foreign lesson as a basis and slightly supplemented it.
Merge two pictures into one in the GIMP editor
Step 3 On the toolbar, make sure that the Foreground Color is set to Black and the Background Color is set to White. This is how it should be.

Select the Gradient Tool with default settings and apply it to the top layer mask. At the same time, we move from right to left like this.

The end result should be something like this.

Step 4 At this stage, we merge the layers. To do this, right-click in the layers area and select "Flatten Image" from the menu.

Step 5 Save the final version through the menu "File - Export As.." by selecting the desired image format (usually JPG) in the bottom area of the screen.

That's basically all there is to it. It turned out such a simple GIMP lesson on combining (reducing) two pictures into one.
Thank you for your attention. Leave your comments below, vote for the article and to stay up to date with the latest GIMP tutorials.
Sincerely, Anton Lapshin!
When creating products from photographs, the skill of how to connect 2 photos is often required. Previously, it could be studied only by downloading an expensive program to a computer. Then spend more time on mastering an obscure textbook, and translating the utility, because all of them were originally only in English.
The photo editor "Home Photo Studio" is fully Russified, has a friendly and understandable user interface, and combining photos into one image is carried out in it in a few simple steps:
Step 1. Download Home Photo Studio Photo Editor
To download the utility, use the special button on the page of our website. The weight of the distribution is 52 MB. The program contains more than a hundred colorful photo effects, and allows you to master professional image editing skills in a short time.

Step 3. Remove Defects and Add Effects
Before you connect the photo, you need to remove the defects and add effects. Select the "Image" tab and then "Remove Defects". Here you can rid the photo of excessive brightness and shading, eliminate red-eye defect, add clarity and restore color balance. To apply special effects for images, type in the search bar of the main menu "Catalogue of effects", then go to the specified value.

Step 4. Save the photo
Click on the blue floppy disk icon at the top of the menu, enter a name for the image and format, save it to your computer's memory as a regular file.
Step 5. Add a new photo
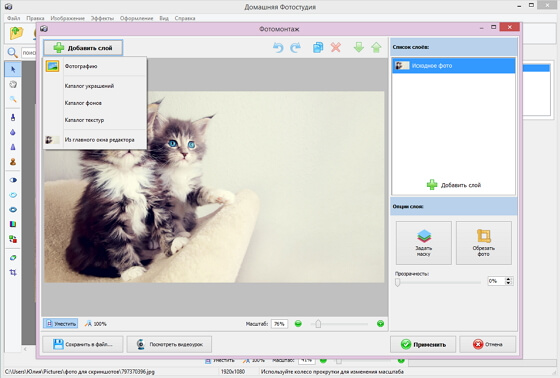
Step 6 Merge Two Photos Into One
Click the "Add layer" button on the right side of the window. The utility will offer several options - a photo, a catalog of jewelry, a catalog of textures, a catalog of backgrounds, from the main editor window. Choose a photo. Next, find the desired image (in this case, the one that was edited earlier) and click "Open". A new picture with a dotted border will appear on the photo. It can be moved to any place and resized. Click Apply.
The photo editor "Home Photo Studio" will process and the two photos connected together will open in the main menu. Saving is carried out in the same way as for a simple photo, including: clicking on the blue floppy disk image, selecting the "Save" function on the "File" tab, or using the keyboard shortcut Ctrl + S.
In the same way, the operation is carried out, how to combine several photos into one. When composing multiple images, we recommend that you use the shape cropping function available in the photo montage window. You can apply not only square, but also round, as well as star-shaped photo cropping.
Of great interest to a creative person is a collection of masks, which is also available in the photomontage window. Click on the "Set mask" icon, and choose from a variety of options. From the combined images, you can make a beautiful postcard and send it to a friend on social networks, read the article:. Chat and share beautiful photos.
If you own a computer, even at the level of a novice user, it will not be difficult for you to combine 2 photos into one. Some people prefer to do it in Photoshop, others use dedicated programs, but they all basically do the same thing that can be done with simple and straightforward Paint.
How to work in Paint
The Paint program is an elementary graphics editor that allows you to work with pixel images, making the necessary changes to them. With it, you can reduce the picture, make an inscription in it, create your own drawing or combine two photos into one.
The main difference between this graphic editor and the rest is that it is built into the operating system, that is, it does not need to be downloaded and installed, like Photoshop or Corel Draw. An elementary set of functions, although it allows you to perform a minimum of manipulations with the image, it does it quickly and accurately.
How to merge 2 photos into 1
There are several ways to combine 2 photos into one, so some of them will be presented here so that you can choose and use the one that you find the most suitable and convenient.
Method one:
- Right-click on the image, select "Open with ..." and click on the word Paint. Repeat the same action with the second image.

- Enlarge the area of one of the photos by dragging the handle on the side.

- Go to the program window with the second image you want to merge. Click on the "Select" button and select "Select All". After clicking on it, a dotted selection will appear around the entire image. Click the "Copy" button on the toolbar or the keyboard shortcut Ctrl+C.

- Go to the window with the first image and click the "Insert" button on the toolbar or the keyboard shortcut Ctrl + V. After that, a second photo will appear on top of the image. Move the mouse cursor over it so that a cross-shaped arrow appears, hold down the left button and move the picture to an empty field so that the images do not overlap each other.

- Resize the image to the desired size by dragging the side handle to the border of the photo and save the result.
In the same way, you can place a photo from below, as well as combine more images, superimposing them on top of each other in the form of a collage or placing them around. This is just one of the most visual ways to combine two photos into one in Paint. Perhaps over time you will develop your own faster strategy.
The second way how to glue two photos into one
There is an alternative way to use Paint to create one image from two. It is demonstrated in detail in the video "How to combine 2 photos into one in Paint":
The elementary nature of the Paint graphic editor seems to many to be too primitive and of little interest, but, nevertheless, this program is still supplied with the latest versions of Windows. There can be only one reason for this - this is the easiest and fastest way to make adjustments to the image, including combining 2 photos into one.
How long have you been using a computer?
(images) into one using elementary commands and graphics editor tools.
For example, very often when scanning, you get several different images of one whole fragment (drawing, page, large format drawing). And from them you need to get a digital analogue of this sketch entirely in one file.
To glue (assemble) different parts of a photo into one, we need to use the free graphic editor GIMP.
Step 1. Opening the images like layers, through the menu "File-Open as layers" and select our images one by one with the Ctrl key pressed.
Step 2 For freedom of action, we need to increase the working area, i.e. set new canvas size options. Thus, the images can freely fit unfolded on the "canvas".
To do this, call the menu "Image - Canvas Size" and enter new height and width parameters. 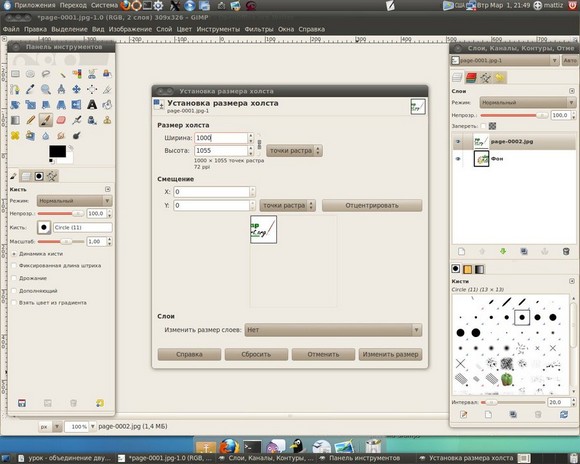
Then with the help of the move tool we spread our layers apart on the canvas 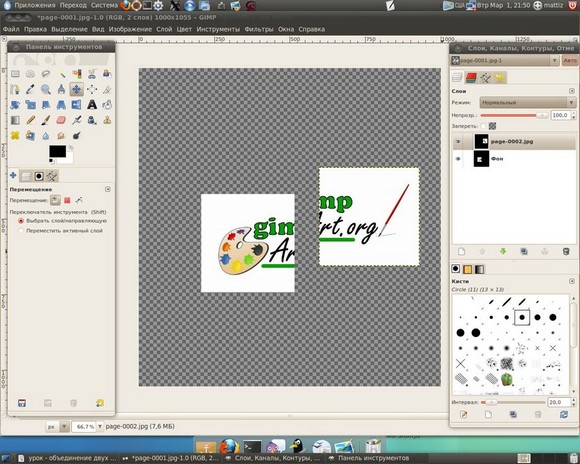
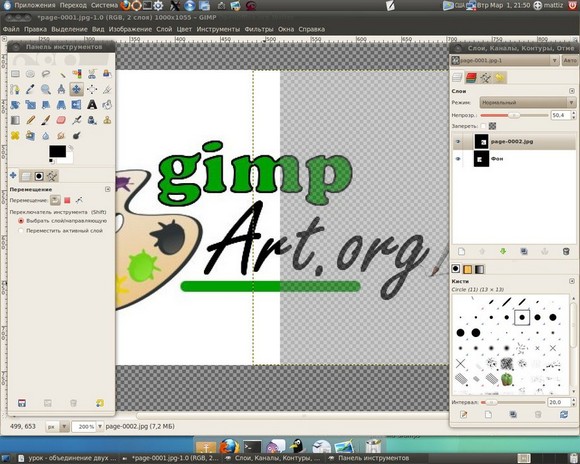
Step 3 Select the top layer in the layer stack and reduce its opacity to 50%. In this way, we will ensure the visibility of the superimposition of the second layer on the first and achieve a better match between the elements in the image. In our case, it is necessary to get the matches of the captions on the photo, which we do with the help of the “Move” tool 
Step 4 Right-click on the active top layer and from the drop-down menu, click "Merge with Previous". 
Step 5Using the tool "Image - Auto Crop Image" crop our photo.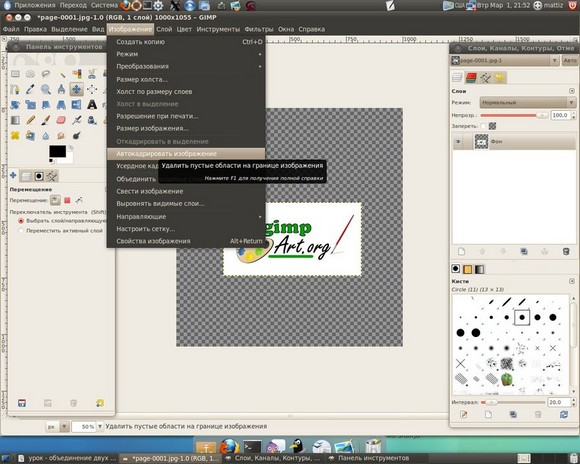
Thus, in a simple lesson in Gimp, we learned how to quickly merge 2 photos into one.
Remember, this is only an algorithm of possible actions that you will need to repeat when editing your images.  And for dessert, a video tutorial:
Thank you for your attention. Leave your comments below, vote for the article and to stay up to date with the latest GIMP tutorials.
Good day to all, my dear readers! As always, Dmitry Kostin is with you, everything is unchanged here). I'm looking, many are interested in how to combine two photos into one in Photoshop. It just happens that people want to make a comparison, for example, BEFORE and AFTER, or something else.
You probably saw that when people post their weight loss achievements, they also post BEFORE and AFTER photos combined into one. By the way, I did the same when I wrote . In general, today I will show how this can be easily done. So snap your fingers and let's go!
I wanted to tell you the fastest way, but I decided that I shouldn’t repeat myself, since I already talked about it in a lesson about. It will turn out that you will have one photo in another. Let's focus on other ways.
Joining two images
In this example, I decided to merge photos in the style of "Before and After". Don't tell me that these people are not similar. They are two different people.) In general, open two photos in photoshop, and then in order. I took photos of two people: thin and embossed.
- First, let's make the images the same height. To do this, being on each photo separately, go to the "Image" menu - "Image Size". Look at the number of pixels by height. It turned out that the skinny one has 680 pixels, and the pumped up one has 1329.

- In this case, it is better to reduce the size of the swapped image to 680 pixels in height in order to equate them and not lose quality. Do you know how it's done? If not, then we look at my article about (although everything should be clear anyway). And by the way, remember the horizontal size of the pitching image. I got 487.

- Now go to the skinny photo and go back to the "Image" menu, only this time choose "Canvas Size". Here we will simply increase the working area without increasing the photo itself. So the horizontal size of a skinny photo is 453 pixels. Mentally add 487 pixels (horizontal size of the pitching photo) and get 940. It is this number that we write in the width cell. At the same time, we do not change the height and leave 680.
- Now we need to choose which side these new extra 487 pixels horizontally will appear on. If we leave it as is, then the canvas will increase on both sides by 243 and 244 pixels (487/2). But we want to do a "Before and After", which means the skinny person should be on the left, hence the empty piece of canvas on the right. Then, in the location, click on the left arrow to move the center to the left. you can also choose a background color, but in our case it is not necessary, any will do, since we will close it anyway. Then click OK.

- See? Now we have a huge piece of white background. Now go to the photo of the inflated, take the tool "Move", hold down the left mouse button on the photo and drag it to the tab with the photo of the thin man.

- It's a matter of small. It remains to move the photo directly to the white background. We accurately calculated the width and adjusted the height so that everything should fit exactly.

Here is such a simple and easy way to combine two images).
Merging with a smooth transition
There is another interesting effect when the transition from one photo to another is smooth. Let me do this using the example of two animals: a lion and a saiga.
- Open the lion and saiga image in our editor, but in different tabs.
- Go to the lion layer and select .
- Now select and make sure the transition is from black to white. And now with this gradient draw a line approximately in the middle, as shown in my picture.

- You have a part of the image with a lion should be painted over with a red tint. Fine. This is what we need. Now look at the layers panel and look at our active lion layer. Is he the main one? Those. is there a lock on it? If yes, then click on it with the left mouse button so that it disappears, otherwise we simply will not be able to edit this layer.

- Now remove the quick mask mode by clicking on its icon again. You will have to highlight part of the image with a dotted line. Then press the key DELETE and make sure the content is worth "Content Aware", then press OK. You should remove the right side of the image, and with a smooth transparent transition. Just deselect (just click once with any selection tool, such as a rectangular area).

- Now go to the tab with the saiga (damn, the animal and the name are still funny). It is desirable to compare the height (in pixels) of these two images, as in the previous example. Now we take the "Move" tool and drag the poor saiga straight to the lion.

- And now the trick (just kidding, of course this is not a trick). We hold the layer with the saiga on the layers panel (poor animal, we are holding it again) with the left mouse button, after which we drag it down so that it is below the lion.

- See what happened? The king of beasts and the antelope are combined into a single photo. Cool! You can move the antelope a little using "Move". We look. A smooth transition succeeded. It worked out quite well in my opinion. Cute and unobtrusive.

Well, in general, something like that.
Of course it's photoshop. And there are still many ways to combine several photos into one. But I think that for a start, these methods will be quite enough for you. Moreover, in the last version, we did not just link 2 pictures into one, but made a simple collage, i.e. use several different images in one.
By the way, if you want to make amazing collages, then I highly recommend you to watch great course on the subject. Numerous examples have been thoroughly considered. From a few simple images, you will learn how to make simply masterpieces, so go ahead!
Sincerely, Dmitry Kostin.
 Biography Spectra Wondergeist
 Boruto: Next Generation Naruto - family ties
 Statuses about life with the meaning of VK, FB, OK, beautiful, smart, wise, short, sad, sincere
 State unitary enterprises
 Economy of Italy Issued in Italy
 Conglomerate definition. What is a conglomerate? See the meaning of Conglomerate in other dictionaries
 See what "conglomerate" is in other dictionaries