A program for recovering old photos. Restoration of old and damaged photos Restoration of old photos in Photoshop
In this tutorial, you will learn one of the ways to restore old photographs.
Before proceeding with the restoration, it is necessary to draw up an approximate work plan in order to do everything consistently and not rush from one to another. The following sequence of actions is recommended:
1
... Only work with a copy of the scanned image.
2.
Crop the image. Be careful not to touch on important details.
3.
Determine the main problem areas for retouching, perform the necessary operations. This is the longest and most laborious stage.
4.
We remove noise and other unwanted plaque. Do not try to remove all the grain of the film and take a semblance of a digital photograph! After all, during restoration it is important to preserve the spirit of that time.
5.
We adjust brightness, contrast, saturation. In color photographs, we adjust the color balance, especially pay attention to the correct skin color.
6.
Sharpening the image.
So let's get down to the process. Here's our original photo.
Step 1. The restoration is usually started by correcting relatively large areas. The best way to do this is to use the tool Patch(Patch tool). The figures show an approximate sequence of actions. Large areas in the background are corrected first, then smaller ones.


Step 2. After retouching large defects, let's move on to small ones. For this we use tools Healing Brush(Healing Brush), Spot Healing Brush(Spot Healing Brush) and Stamp(Clone Stamp). Feel free to experiment with these tools.
Tool Point restoring It is advisable to use a brush to remove only very small point defects. For larger areas, it is better to use a regular Healing Brush and Stamp.
The screenshot below shows the areas in which the specified tools were used: in red - Healing Brush, green - Stamp... I would like to draw your attention to the fact that when working with the Patch and Healing Brush tools, there are unwanted effects when working on the edges of the image, especially if they are white. To avoid this, first simply paint over these areas with the closest color with a brush, and then work with the restoration tools.

Here's what you should get at this stage.

Step 3. Now we will work with more serious damage. To reconstruct the image of the man's left eye, we use the image of his right eye. An extreme case is specially taken here. If there are other photographs of this person, then it is better to take the missing parts of the image from them, so it will be more correct.
So, select the area around the right eye and copy it to a new layer by clicking CTRL +J... Next, click CTRL +T to apply a free transform.


Step 4. Right-click inside the frame and select Flip horizontally(Flip Horizontal).

Step 5. In order to properly place the reflected copy of the eye, decrease the opacity of the layer and align the eye relative to the original image. Then press ENTER and return the Opacity to 100%.

Step 6. Add a layer mask by clicking on the icon marked with a green circle at the bottom of the layers palette.

Step 7. Press D to reset colors, then select a tool Brush(Brush). Mask off the extra areas with a black brush. Remember that white reveals and black hides. Use a brush with soft edges for soft, inconspicuous transitions.
Tip: Hold your finger over the X key to quickly switch between black and white. If you hide the excess somewhere, paint over this area with white. If you want to see only the mask, click on its thumbnail in the layers palette while holding ALT.


Step 8. Now we restore the image of the left ear in the same way. To fine-tune the shape, use the tool Deformation(Warp).


A small area of the hairline on the left side of the face is also restored. Let me remind you that each operation must be performed on a new layer. This should become the main rule of work.

Step 9. After recovering all large areas, let's go back to the tool Stamp and fix all the shortcomings. You need to do this on a new transparent layer by checking the box Sample of all layers.

You can merge layers if needed.

Here's what you should get.

Step 10. Select all layers. Combine the layers into a group by clicking CTRL +G... Then create a new layer above this group by clicking ATL +SHIFT +CTRL +E, and call it Noise.

Step 11. Now we reduce the noise using the filter " Reduce noise "(Reduce noise).
An important point: the greatest suppression of noise should be done in the blue channel, since it contains the largest amount of it. Preservation of details for this channel should preferably be set to 0%.


Step 12. After suppressing noise, you need to restore the sharpness of the image. There are many different ways to do this, including several tutorials on our website:
This tutorial uses the filter sharpening method. Colour contrast(High Pass), but personally I prefer the mask method as it is the most manageable. I will not dwell on the sharpening technique, those who wish can familiarize themselves with them from the above lessons. I would like to add that if you plan to print a recovered photo, you should sharpen the image a little more, as printers will blur the image slightly. This is a pretty important point.


Step 13. It is often necessary to sharpen only in certain areas. To do this, you need to create a layer mask, as we already did, and paint over the unnecessary areas.

Step 14. Create a new adjustment layer Curves... Let's give the curve an S-shape to increase the contrast.

Step 15... Now let's compare the results.
Old, rusty from time to time photos, have always aroused genuine interest not only among fans of historical values. After all, they capture the moments of the life of our ancestors. And, although, in the historical and cultural aspect, it is these originals, crumpled and half-erased, that have the greatest value, it is quite difficult to get a full picture of who (what) is captured in the picture in some cases.
All kinds of software are called to help the modern researcher, which allows to restore the image as much as possible without loss of information content. So, for example, the capabilities of only one Photoshop editor already allow you to approach this issue creatively, correcting not only all kinds of damage to a photo card, but also restoring an approximate color gamut corresponding to a specific situation.
First, you need to scan the existing rarity and save the resulting jpeg file.
Having opened the original image in the working window of the editor, we will estimate the complexity of the upcoming work. The fact is that the file in question has minor damage (fold lines, partial abrasions and a torn edge). We pay attention to the faded (weakened) photo layer last, since the obligatory color correction will help get rid of the sepia tint.
If part of the face is missing on the portrait photo, then it makes sense to look for some more images of this person. Only in this case, you can count on a reliable final picture.
All attempts to complete the missing (eye, ear, for example) parts of the face by sequential selection, copying and reflection (editing / transformation / reflection) of the selected area in no way contribute to obtaining a believable portrait.
Without going into the physiological features of the human structure, it is worth noting that symmetrical faces do not exist.
So the file is open.
(click to enlarge)
The next step (without fail) will be software transcoding to another (LAB) image mode. This measure is necessary because channel separation in LAB is built on a different principle than in RGB. And in our case, such a division into an independent brightness channel and two independent (red-green and blue-yellow) color channels from each other, allows you to reduce the brightness of the kinks without touching the color palette at all.
Transcoding of an image into LAB occurs after selecting the appropriate mode in the submenu of the "mode" line of the "image" tab.

(click to enlarge)
Leave it visible and select the "brightness" channel. Since the main color axes remained hidden, in the working window of the program the image is displayed without a combination of RGB colors, only white and possible shades of gray.
To remove cracks and scratches, we use the "stamp" tool,

(click to enlarge)
defining (left-clicking with the alt key pressed), as the initial position for copying, the point above the break, on the border of the frame and the image. To avoid abrupt transitions, the "pressure" value should not exceed 50%. Leaving the working brush of the tool along the fold line, we get rid of the unwanted defect. In the same way, remove the rest of the scratches and small cracks from the scanned photograph.

(click to enlarge)
We get rid of the dull-white stripe, which fell on both babies, using the "dimmer" tool (exposure no more than 15%).

(click to enlarge)
returning visibility to the rest of the channels, we immediately see the difference between the image and the frame (intentionally left without adjustment).

(click to enlarge)
By the way we already know, we return to RGB mode and with the help of the “blur” tool, with an intensity of no more than 20%, we get rid of pixelation and specific grain on faces.

(click to enlarge)
The next variation of this tool is "sharpness". Allows, with a short press on the left mouse button, to select the eyes and lips

(click to enlarge)
After correcting the texture of the picture, through the "image" tab, we translate it into a simplified black and white palette.

(click to enlarge)
Correct the exposure, giving the picture the necessary sharpness at the borders of black and white colors.

(click to enlarge)
Frankly "overwhelmed" dark tones, at the bottom of the photo, a torn edge and useless frames - remove it by cropping the image with the "crop" tool. In fact, the restoration of the rare source can be considered complete.

(click to enlarge)
Additional processing that allows you to colorize a black and white picture is also not difficult, but it will take much more time.
To do this, you need under the "Selection" tab to enable editing in quick mask mode and select the "Brush" tool. Shade, for example, an open area of the skin, excluding the eyes and jewelry.

(click to enlarge)
Uncheck editing under the quick mask and invert the resulting selection. Coloring the selected area can be done in several ways, among the most common - using a photo filter (the "image" tab, submenu of the "correction" line)

(click to enlarge)
and using (under the selection) an adjustment layer with color orientation (in this case, the "overlap" mode is required).

(click to enlarge)
Selections are created for each part of the image that is supposed to differ even in halftones. And gradually the whole photograph is colored.

(click to enlarge)
Restoring a print, even one made from color film, is a fairly simple process and is performed by automatic correction tools in Photoshop.
The proposed image clearly shows a color mismatch (most likely due to an incorrectly selected film).

(click to enlarge)
The section of the "image" tab, including autotone, auto-contrast and automatic color correction, is able to correct the proposed image in the shortest possible time.
Cropping will give the image a complete look.

(click to enlarge)
The lesson was prepared for you by Marina Kolesova.
Today we will be mastering the method of restoring old shabby photographs in Photoshop. There are many different examples on the Internet of how to do this. I want to bring to your attention the most, as it seems to me, simple and understandable. Of course, it is quite laborious and will take some time, but for beginners in Photoshop, it is ideal. You don't need a bunch of tools, different masks and layer blending modes that get confused in your head. All you need is the Stamp tool and your patience. In addition, during this lesson, beginners will make friends with this wonderful tool and will further use it in their work.
Let's start studying the lesson.
An old photograph has been lying around in my home archive for a long time, it's time to take it up.
First of all, go to the Image - Mode - RGB tab. If the mode is different, then put a tick on RGB. 
Remove the lock from the layer. Double-click the left mouse button on the lock and select OK in the drop-down window. 
To be on the safe side, let's copy the layer. Then we stand on the copy and enlarge the view. We start with the edges of the photo to practice on. 
Take the Clone Stamp tool and check the settings. Since we are working in the very corner, do not be afraid to set the opacity and pressure to the maximum. We will stamp with a round brush, select its diameter in advance. Activate the Stamp tool, hold down the Alt key, a window appears on the screen as in the scope. We put it on the area that we want to copy, click with the mouse. Then release the Alt key, the sight disappears and move the circle to the place that we want to paint over, click the mouse. We see how a circle appeared on the damaged area. So let's practice at the corners. The more often we use the Alt key, the more carefully the required area will be painted over.

After practicing at the corners, we move on to another area, but we do not touch the face yet. Since the strip that needs to be masked is small, change the size of the brush - decrease the diameter. And again, aim at the area that you want to copy, hold down the Alt key, click the mouse, release the key, go to the area that you want to paint over, click the mouse. 
Reduce the view periodically and look at what happens. 
To compare, we extinguish the peephole on the copy layer we are working on. You can immediately see what is painted over and where. 
In places in the area of the eye, you need to greatly increase the image. Since it is already difficult to do this with the engine, we click on the right triangle. With its help, we enlarge the image a little. 
We select targets for the sight both from the top of the seam and from the bottom of the seam. In such areas, it is especially important not to rush and aim more often and take areas for cloning. 
When we clone the pupil, we decrease the hardness of the brush. 
When cloning lips, take a sample from the lips. 
When cloning the pupil, it is possible and necessary to take samples from different sides of the pupil. 
Try to aim not very close to the area you want to paint over, so as not to get too much. 
When we clone the stripes on the suit, we step from different sides to the scratch. Bow from below, then go to the top and clone from above. Then again we go to the bottom and so we paint over the area towards. To get a transition from a white stripe to a black background, try to take in the scope the area that is in the middle and includes both the white and black stripes. Adjust this with the diameter of the brush, you can change it more often. 
With the final touch, paint over the white strip, just to paint over. 
All the same, no matter how you paint over the background, it will not be even. Therefore, we are taking other measures. Use the Straight Lasso Tool to select the baby's shape. 
Right-click inside the selection and select Feather. 
We take a small radius of shading. Since the photo is old, we don't need very clear boundaries. 
Copy the selection to a new layer. Apply for this the keys Ctrl + J. 
Create a new layer by clicking on the second from the right icon in the layers panel and place it under the layer with the selected baby figure. We extinguish the eyes on the two lower layers. 
Next go - Run Fill. To get where to take a color sample with an eyedropper, let's make the layer on which we worked with a Stamp visible (turn on the eye on it by clicking on it). Check that we are on a transparent layer. 
Now use the Eyedropper tool to fill the layer with color. 
We see that the background has become monochromatic. To diversify it a little, let's make it a little structural. Apply the Unlimited-2 filter, download it from here. 
In the filter window, select the canvas. 
Apply the Sharpening filter to the baby's image. Let's check that we are standing on the layer with the baby. 
Extinguish the eyes on the two lower layers and on the Layers tab select - Merge Visible. 
After that I saved the file in JPEG format, made a frame from the tutorial How to make a frame with ragged edges. I instructed the program to slightly correct the image. On the Image tab, I selected Auto Tone and Dynamic Contrast. 
Now you can compare the result. 
With this method, beginners may well undertake the restoration of old photos. As you can see, this method is very clear, the main thing is patience. We will succeed in everything!
This tutorial is all about restoring an old torn photo. Restoring old family photos is something that you can do for your relatives and make them cry, and of course, it is a service that you can make money from. Let's take a look at a typical photo recovery process.
When choosing a photo for this tutorial, I ran into a lack of material that I could use publicly. The photo I am using is a family photo scanned and sent to me at a terrible resolution. In the end, I decided that this kind of image would be suitable for my tutorial. The end result shows that you can handle even poorly scanned images and get relatively good results.
Of course, this can limit the size of the print, but the most important thing in this lesson is to walk you through all the steps of the workflow. There are a few important steps you can just keep in mind, but never be afraid to be creative and use your own solutions. These are the steps:
1. Make a copy of the original;
2. Resize the image and crop those areas that you will not work with;
3. Repair damaged areas;
4. Get rid of noise or other unwanted patterns;
5. Adjust the light and shadow (in color photos you will also have to do the adjustment of the skin color);
6. Adjust brightness and contrast;
7. Increase the sharpness.
First step
Finally, let's get down to the lesson. In the first step, I have already decided on the size and cropped the image. Next, the recovery process begins. With photos like this, I always start with the Patch tool and use it quite roughly and massively. Next, I refine the details with the Patch, the Healing tool, and the Clone Stamp Tool. We will deal with this in more detail in the next step. 
Second step
The Patch works in a similar way to the Marquee Tool. You select an area around the one you want to correct, then click on the center of your selection, hold down the mouse button, drag the selection to another area with similar problems and release it. Make sure you line up your selection before releasing it. Let's move on to the next step and align accordingly. 
Third step
See how the shade alignment of the curtains against the background is done. Make all large areas in the image in the same way. This tool does not always work correctly, but it saves time, and starting with it is a good way to start photo recovery. 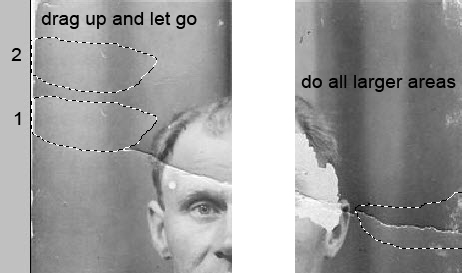
Fourth step
After you are done with all the large areas, switch to the Healing Brush Tool (shown in red in the picture) and the Clone Brush. Feel free to experiment with these tools. If you want an efficient restoration process, it would be a good idea to get the most out of these three tools.
Note that the Spot Healing Brush is a tool you can use too, and as its name suggests, it interacts with dots. It works by simply clicking on the dots you want to remove, and I often use it in photographs where there are a lot of dots spoiling the image. In general, the work process should start with this particular tool, and only then switch to the Healing Brush. However, in our case, there is no particular need for this.
As you can see in the image below, I used a clone stamp on the borders of the image. The Healing Brush and Patch in this case can create some completely unnecessary artifacts. Just try it and you will see what I mean. Again, switch between tools, experiment until you get the desired result.
Thirteenth step
Once all the main parts of the image are in place, I go back to the Clone tool and process any borders that need editing with it. All this I do on a separate layer, the layer of retouching. To better control the process, you can lower the opacity of the clone tool. Just drag and drop an area, manipulate it, and don't lose sight of the Ctrl / Command + Z keys. 
Fourteenth step
Often when retouching, you use different layers for different parts of the image. If you don't want to work with countless layers, then simply glue the layers when you're ready to stop retouching. I usually process small parts on different layers and glue them into one touch-up layer, but I never glue the base layers.
It is best not to glue the layers together unless you are sure you did it right. It's always good to be able to go back and redo something. 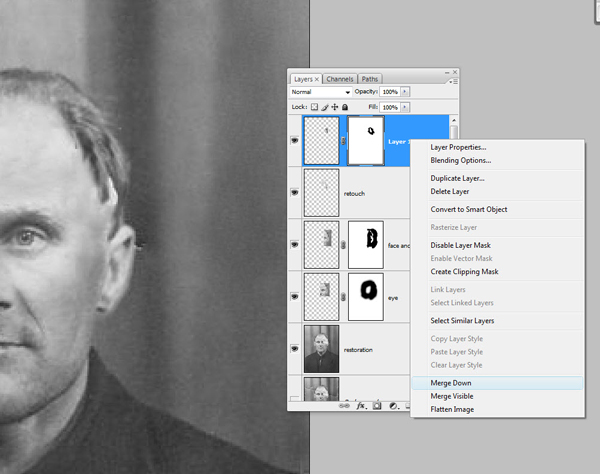
Fifteenth step
The restoration work can be considered complete. 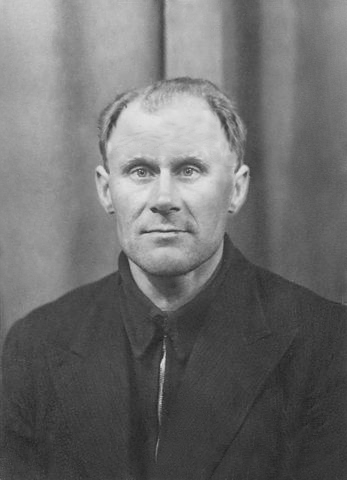
Sixteenth step
The next thing I will do is group the layers. Select all layers and press Ctrl / Command + G. Now I create a new layer with this group Ctrl / Command + Shift + Alt + E and name it Noise. We will use this layer for noise reduction. Before we start doing this, I would like to mention one thing that I may not have said at the very beginning.
As you can see in the screenshot, I left the original file in the background layer of my PSD file and turned it off. When working, it is convenient to store the source in a PSD file and start with the copy to layer command (Ctrl / Command + J). This gives us an image that we will work with next.
Note: When you hold down Alt and click on the eye thumbnail in front of a layer, then you turn this layer on and turn off all the others. Convenient for quick comparison. 
Seventeenth step
We will now try to lower the noise level. There are many ways to deal with noise, but here I am using the Reduce Noice filter from the Noice tab. In this tutorial, I overdid it a bit with noise reduction, and if my memory serves me, then my strength values were 8 units, and something like 20 units for details.
I used another little trick - in the Advanced Dialoge, I maximized the detail and brightness of the blue channel. I also processed the red channel - I strengthened some of the details. This allows you to preserve the original image without too much blurring. This technique was suggested to me by Taz Tally and is just as good for removing scan defects or any other defects. 
Translation: © Lilis, Obscurantism, Vladimir Kotelnikov, Ready.
Old photographs help us travel back to a time when there were no DSLRs, wide-angle lenses and people were kinder, and the era was more romantic.
Such pictures most often have low contrast and faded colors, moreover, often, with careless handling, creases and other defects appear in the photo.
When restoring an old photograph, we face several tasks. The first is to get rid of defects. The second is to increase the contrast. The third is to enhance the clarity of details.
Source material for this lesson:

As you can see, all possible flaws in the picture are present.
In order to better see them all, you need to desaturate the photo by pressing the key combination CTRL + SHIFT + U.
We will eliminate defects with two tools.
For small areas we will use "Healing Brush", and we will retouch the large ones "Patch".

Choosing a tool Healing Brush and holding down the key ALT click on the area next to the defect that has a similar shade (in this case, brightness), and then transfer the resulting sample to the defect and click again. Thus, we eliminate all minor defects in the image.

The work is quite painstaking, so be patient.

The patch works as follows: we outline the problem area with the cursor and drag the selection to the area where there are no defects.

Remove defects from the background with a patch.

As you can see, there is still quite a lot of noise and dirt left in the photo.
Create a copy of the top layer and go to the menu "Filter - Blur - Surface Blur".

We set up the filter approximately as in the screenshot. It is important to eliminate noise on the face and shirt.

Then we clamp ALT and click on the mask icon in the layers palette.


With this brush, gently traverse the face and collar of the hero's shirt.

If you need to eliminate minor defects in the background, then the best solution would be to completely replace it.
Create an imprint of the layers ( CTRL + SHIFT + ALT + E) and create a copy of the resulting layer.
Select the background with any tool (Pen, Lasso). For the best understanding of how to select and cut out an object, it is imperative. The information contained in it will allow you to easily separate the hero from the background, and I will not drag out the lesson.
So, let's select the background.

Then press SHIFT + F5 and choose a color.

Click everywhere OK and deselect ( CTRL + D).

Improving the contrast and clarity of the image
To increase the contrast, use an adjustment layer. "Levels".

In the layer settings window, drag the outer sliders to the middle, achieving the desired effect. You can also play around with the middle slider.


We will increase the clarity of the image using a filter. "Colour contrast".

Create a print of all layers again, create a copy of this layer and apply the filter. We set it up so that the main details appear and click OK.

Change the blending mode to "Overlapping", then create a black mask for this layer (see above), take the same brush and go through the key areas of the image.

The only thing left to do is to crop and tint the photo.
Choosing a tool "Frame" and cut off unnecessary parts. When finished, click OK.


 Toucans Where does the toucan live on which continent
 Enlarging the image without losing quality
 Presentation of electroscope conductors and dielectrics electric field
 Discharge from the hospital Gifts and souvenirs upon discharge from the hospital
 Why Polaroid Sunglasses?
 Polaroids - what are these glasses and what do they eat with
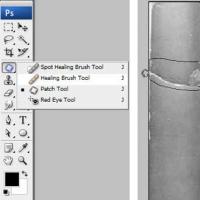 Restoration of old and damaged photos Restoration of old photos in Photoshop