Restoration of old photos in Photoshop tutorials. Retouching an old photo. Restoration of missing areas
Good day to all, my dear friends and readers of my blog. Of course, everyone wants their photos to look good and beautiful, but unfortunately this does not always work. Therefore, today I would like to tell you how to improve the quality of a photo in Photoshop, and with completely simple methods that absolutely anyone can handle.
Of course, it's best to immediately look at some complete training course on improving the quality of photos in Photoshop. And I would recommend looking these video tutorials, since this course is specifically tuned to make photographs much better and of better quality than they were originally obtained. But if you do not want to study these issues too much, then you can look at some of the basics that I offered you in this article.
Levels
If you see that you have got a dull, darkish or blown out image, then you can try, or play with the levels. Let's take a look at how levels work.

Enter the menu "Image" - "Correction" - "Levels", or press the key combination CTRL + L... A window with levels will open, something that looks like a graph will be displayed.
The first thing you need to pay attention to is whether there are gaps around the edges or not. As we can see, in our case there is an empty area on the right side, and on the left side it is not empty, it is also quite small. Then we move the right slider to the area where the void ends. And on the left side, move the slider a little to the right.

As a result, we can already observe that the image has become much better.
Sharpness
Sharpness is naturally an important factor in improving the quality of a photo, since it is important for us that the image looks clearer. You can read mine, but in my case I will choose "Filters" - Sharpening — "Smart Sharpen".
After that you can play with the effect and radius sliders. Here I decided to put the effect on 50 percent, and the radius 1 ... It may be different for you.

And as we can see, the image quality has improved again.
Noise removal
When there are various noises in the photo (most often these bad pixels appear due to poor lighting or shooting from a mobile phone), then this is certainly unpleasant. But Photoshop can help you reduce the intensity of the noise, which will make your photo look better.
To do this, you need to go to "Filter" - "Noise" - "Dust and scratches"... There are only two parameters here. And it is with them that we have to play around. The "Radius" parameter adds a little blur, but it usually does not spoil the photo, but smooths out unnecessary noise. Try setting the parameter to 1 or 2 and see the result. Isohelium, on the other hand, can be left alone, or add a maximum of a few units.

The only thing, in some cases, removing noise from the full image may not quite help. This path can make the photo appear more blurry. And in order to reduce our losses and build an optimal balance between grain and blur, we need to work with each channel separately.
In order to activate the channels, you will need to click on the tab of the same name in the layers panel. If this tab is not there, then go to the "Window" menu and select "Channels" there. A special tab will immediately appear in the layers panel. So go straight to it.
Here you will see 4 channels: 1 common (RGB), and the other three refer to each color separately. The trick is that the general noise in the photo can be reflected for the most part only on one channel. That is why we will take a look at our situation. Press the key combinations in sequence CTRL + 3, CTRL + 4, CTRL + 5.

Look carefully, there is a channel here that contains more noise than the other channels. I personally did not find such a channel, but it happens quite often. But if the blue channel was the most mismatched, then I would leave only it active and go to the "Filter" - "Noise" - "Dust and scratches"... And here I will do the same as above, i.e. twist the sliders.

Next you can click on CTRL + 2 to make all channels visible and see how our result will look. As you can see, due to the change in one channel, the picture began to look better, but if this is applied in a general merge, it will still turn out worse.
If you see a little blur, then you can tweak it with the same sharpening. The picture may not be perfectly clean, but at least it will look better than initially.
Exposition
Another pretty good feature for image correction. With help, we can also pay attention to brightness, light, contrast, etc. Again, you just need to enter the menu "Image" - "Correction" - "Exposure".
3 sliders will appear in front of you. It is they who allow you to change your photo, improving its quality and display. I won't explain what each slider is responsible for. See for yourself and see what changes. I think you will find a place where the photo will look great.

Juiciness
This is just a great feature, and as you already understood, it is responsible for the richness and saturation of the image. Let's see how this feature works. To do this, again go to the "Image" - "Correction" menu, only now we select the "Vividness" item.
Here, as you already understood, you will control the richness and saturation of the image. So get the flag in hand and start moving the sliders. By moving them a certain distance, we can see that the image has become really brighter and more colorful.

Of course, this is just a minimal fraction of what can actually be done with images in Photoshop. To talk about all the possibilities, you will have to write many long articles or even release your own course. I’m rather showing you the possibilities of work, then even if you get a poor quality photo, all is not lost, and with the help of our editor, something can be corrected.
But here I meant working with ordinary images, and not photographs of our grandparents, who are already old, crumpled, scratched, worn out, etc. (in the sense of photography, not grandparents). I’ll better tell you how to improve the quality of an old photo in another article, since we will have a separate conversation about this and completely different tools.
But now you know how to improve the quality of photos in Photoshop in the simplest ways that do not require any supernatural knowledge.

But if you want to get to know Photoshop well, all its tools, tricks and functions, but I highly recommend you check out this wonderful video course, thanks to which you will learn to "swim" in Photoshop, like a fish in water. Everything is told clearly and on the shelves. The course is just bombing.
Well, this is where I end my lesson today. I hope you liked it, so do not forget to subscribe to my blog updates, as well as share the article with your friends on social networks. I am waiting for you again at my place. Good luck to you. Bye Bye!
Best regards, Dmitry Kostin.
P.S.
The first five people to comment on this article will receive 4 points each in mine. Good luck!
The lesson was prepared for you by Marina Kolesova.
Today we will be mastering the method of restoring old shabby photographs in Photoshop. There are many different examples on the Internet of how to do this. I want to bring to your attention the most, as it seems to me, simple and understandable. Of course, it is quite laborious and will take some time, but for beginners in Photoshop, it is ideal. You don't need a bunch of tools, different masks and layer blending modes that get confused in your head. All you need is the Stamp tool and your patience. In addition, during this lesson, beginners will make friends with this wonderful tool and will further use it in their work.
Let's start studying the lesson.
An old photograph has been lying around in my home archive for a long time, it's time to take it up.
First of all, go to the Image - Mode - RGB tab. If the mode is different, then put a tick on RGB. 
Remove the lock from the layer. Double-click the left mouse button on the lock and select OK in the drop-down window. 
To be on the safe side, let's copy the layer. Then we stand on the copy and enlarge the view. We start with the edges of the photo to practice on. 
Take the Clone Stamp tool and check the settings. Since we are working in the very corner, do not be afraid to set the opacity and pressure to the maximum. We will stamp with a round brush, select its diameter in advance. Activate the Stamp tool, hold down the Alt key, a window appears on the screen as in the scope. We put it on the area that we want to copy, click with the mouse. Then release the Alt key, the sight disappears and move the circle to the place that we want to paint over, click the mouse. We see how a circle appeared on the damaged area. So let's practice at the corners. The more often we use the Alt key, the more carefully the required area will be painted over.

After practicing at the corners, we move on to another area, but we do not touch the face yet. Since the strip that needs to be masked is small, change the size of the brush - decrease the diameter. And again, aim at the area that you want to copy, hold down the Alt key, click the mouse, release the key, go to the area that you want to paint over, click the mouse. 
Reduce the view periodically and look at what happens. 
To compare, we extinguish the peephole on the copy layer we are working on. You can immediately see what is painted over and where. 
In places in the area of the eye, you need to greatly increase the image. Since it is already difficult to do this with the engine, we click on the right triangle. With its help, we enlarge the image a little. 
We select targets for the sight both from the top of the seam and from the bottom of the seam. In such areas, it is especially important not to rush and aim more often and take areas for cloning. 
When we clone the pupil, we decrease the hardness of the brush. 
When cloning lips, take a sample from the lips. 
When cloning the pupil, it is possible and necessary to take samples from different sides of the pupil. 
Try to aim not very close to the area you want to paint over, so as not to get too much. 
When we clone the stripes on the suit, we step from different sides to the scratch. Bow from below, then go to the top and clone from above. Then again we go to the bottom and so we paint over the area towards. To get a transition from a white stripe to a black background, try to take in the scope the area that is in the middle and includes both the white and black stripes. Adjust this with the diameter of the brush, you can change it more often. 
With the final touch, paint over the white strip, just to paint over. 
All the same, no matter how you paint over the background, it will not be even. Therefore, we are taking other measures. Use the Straight Lasso Tool to select the baby's shape. 
Right-click inside the selection and select Feather. 
We take a small radius of shading. Since the photo is old, we don't need very clear boundaries. 
Copy the selection to a new layer. Apply for this the keys Ctrl + J. 
Create a new layer by clicking on the second from the right icon in the layers panel and place it under the layer with the selected baby figure. We extinguish the eyes on the two lower layers. 
Next go - Run Fill. To get where to take a color sample with an eyedropper, let's make the layer on which we worked with a Stamp visible (turn on the eye on it by clicking on it). Check that we are on a transparent layer. 
Now use the Eyedropper tool to fill the layer with color. 
We see that the background has become monochromatic. To diversify it a little, let's make it a little structural. Apply the Unlimited-2 filter, download it from here. 
In the filter window, select the canvas. 
Apply the Sharpening filter to the baby's image. Let's check that we are standing on the layer with the baby. 
Extinguish the eyes on the two lower layers and on the Layers tab select - Merge Visible. 
After that I saved the file in JPEG format, made a frame from the tutorial How to make a frame with ragged edges. I instructed the program to slightly correct the image. On the Image tab, I selected Auto Tone and Dynamic Contrast. 
Now you can compare the result. 
With this method, beginners may well undertake the restoration of old photos. As you can see, this method is very clear, the main thing is patience. We will succeed in everything!
How to professionally restore such a photo?
In this lesson, we will study in detail how to restore an old torn photo. I am sure that your family archive or your clients have such photos. Therefore, the skills of a photo restorer will definitely come in handy for you.
Introduction
Choosing material for this lesson, I ran into a problem - I didn't have a damaged photo at hand. In the end, they sent it to me. After scanning and at terrible resolution. But it was perfect to show that good results can be achieved with scanned photos of poor resolution. Keep the print size small in this case.
I will guide you through all the stages of recovery. Some of them just need to be remembered and repeated, however, this does not mean that you do not need to be creative in your work and not look for other options.
These are the steps:
1. Make a copy of the original
2. Change the resolution and crop areas that you will not work with
3. Restore the required areas of the image
4. Remove noise and unwanted elements
5. Equalize the light / shadow level
6. Equalize brightness and contrast
7. Adjust the sharpness
Step 1
Let's start right away with restoring the photo. Because you can crop the image and set the resolution yourself. First I use Patch Tool for rough preliminary work with large areas. Then I switch between Patch, Healing Brush (Healing Tool) and Clone Tool... Next, I will explain the choice of one or another instrument.
Step 2
The patch works the same as Marquee Tool... Circle the area you want to fix. Then click in the middle of the selected area and, keeping the button pressed, move the selection to a similar part of the photo. Make sure to align the selected area before starting. Then proceed to the next step.
Step 3
Watch the alignment of the shades in the background. Note how Patch saves time. Therefore, it is with this tool that you need to start restoring photos.
Step 4
After processing all large areas of the photo, change the tool to Healing Brush(I marked it in red in the picture below) and Stamp(marked in green). Feel free to experiment with these tools as you work. Especially if you want to dig deeper into the subject of photo recovery than the basic level.
Keep in mind that minor imperfections of the photo - traces, scratches, dots are quickly and conveniently removed Spot Healing Brush... In the course of work, I changed according to the situation Spot Healing Brush to the usual Healing Brush and back.
As you can see from the photo below, I used Stamp around the edges of the picture. Healing Brush and Patch usually leave unwanted effects around the edges of the image. Try it and see for yourself. Once again, change the tools as you see fit. And experiment freely with them to achieve the desired result.
Step 5
So we are done with the first part of the restoration.
Step 6
Moving on to serious image defects. Use the right eye to replace the missing left. To do this, use a rough selection for the eye, and press Ctrl + J to copy the selected area to a new layer.
Step 7
Press Ctrl + T to select Free Transform.
Step 8
Right-click on the selection and select Flip Horizontal.
Step 9
You have dragged the selection to where the eye is supposed to be. But you probably want to align it and reduce the opacity. And also remove the clutter under a new layer. Align the eye, and then press Enter or click on the area that I highlighted with a green circle (see photo below) in order to apply the changes. Then increase the Opacity of the Base to 100%.
Step 10
Now select the layer, click on the mask button (which looks like a green circle at the bottom) in order to confirm the mask.
Step 11
Now we will paint with black on the mask in order to hide the areas that we do not need. When using masks, keep in mind the rule: white reveals, black hides. If you need a soft transition, use a gray one. You can lower the opacity of the brush until the strokes only remove what is not needed, creating the desired level of transparency between the layers.
Hint: keep your finger on X, to quickly switch between black and white - you will have to do this often. A D key will make the foreground and background black and white if their colors are different. If you only need a mask to smooth an area, hold down the Alt key and click the mask.
Step 12
Let's do the same with the ear as with the eye. you can use free transformation depending on the photo you're working on. In the case of the ear, I used warp. And also slightly corrected the hairstyle line by rotating and changing the scale. At the same time, he cloned where it was necessary.
Step 13
After you have put the large parts of the image in place, go back to the stamp and retouch all the edges. I put the retouched layer on top of my own. You may also want to lower the opacity of the stamp for better control over the cloning process. While doing this, keep your fingers on Ctrl + Z throughout the entire process.
Step 14
Often during retouching you have to use different layers for different parts. To get rid of unnecessary layers, use merge function... I usually do some work on multiple layers and then merge into a draft layer. But I never do this with base layers.
Don't merge if you think you've missed something! Leave yourself the opportunity to go back to the retouched layer and make adjustments.
Step 15
We are done with the restoration.
Step 16
Group up all the layers. To do this, press Ctrl + G. Now create a new layer from this group using the command Ctrl + Shift + Alt + E and rename it to "noise". This is a layer for getting rid of unnecessary noise in the workspace.
There is something else that I may not have mentioned. As you can see, the original file serves as a background layer, which I eventually turn off. I always keep the original PSDs and can always go back to them with Ctrl + J. Basically, I make an extra copy to work with, and then switch to the background.
Prompt: If you hold down the Alt key while clicking on the eye that is on the background layer, then you activate this layer, and turn off the rest. Another press will bring everything back. This is useful for quickly comparing differences.
Step 17
Now we will remove noise from the image. There are several ways to do this, but I use for this Filter> Noise> Reduce Noise... I slightly changed the noise reduction settings - set the strength to 8 and detail to 20.
Another hint: go to the extended view and turn the strength to maximum in the blue channel and the detail to 0. In the red channel do the same with strength and slightly increase the detail. This way, the red channel will contain more detail without excessive blurring.
Step 18
After reducing the noise, let's move on to sharpness. Fine-tuning the sharpness is a topic for another article. Therefore, now we are using the function Sharpening (High Pass). To do this, try the settings below.
For this tutorial, I have increased the variables too much. Not the way you would like it to be in black and white photography. For example, sharpen the edges. There are a few more technical details to keep in mind.
Once you've gotten enough sharpness for printing, you'll want to sharpen the monitor screen. Remember - printers blur the image slightly during printing. Applying Sharpening, set the blend mode to Overlay or Soft light. I usually sharpen a little more than required. And then I adjust the opacity level.
Prompt: often you only need to sharpen some parts of the image. In the example below, I created a mask and painted everything except the face, so only the face remained sharp. This technique is often used for the eyes.
This technique works well in combination with curves, which can be used to lighten or darken areas. If you only want to lighten the eyes, you can create a separate layer for the curves. Press Ctrl + I to invert the mask, making it black, and brighten only the eyes. It's easier than painting over everything you don't need.
Step 19
This is the last step. Here I have adjusted the contrast using an S-curve. I didn't include this step in my original file. But you can apply it before sharpening. I myself often use the command Ctrl + Shift + Alt + E to create a new layer below the previous ones. I did this here as well.
I placed the curves layer above the noise layer and then merged all the layers below into one. After that I adjusted the sharpness using the filter. Sharpening keeping the curves layer intact. Then I decided to go back and work on the previous two steps.
Conclusion
Here I have described the process of restoring an old torn photo. Keep in mind that each step can be worked much deeper. Always experiment and think about what else you can add to make the job easier and get the best results.
Photographs on paper have an unpleasant tendency to fade, fade, become covered with small cracks and scratches over time. Almost every person in the house has old black and white photographs from the family archive, damaged by time. However, they are dear to the heart and can be restored if you use a computer and appropriate software.
There are many methods of photo recovery using modern technologies. Let's consider one of the methods - photo recovery using Adobe Photoshop. In any of them, the use of the following tools can be noted: Clone Stamp Tool, Healing Brush Tool and Patch Tool. What you need: A computer with the appropriate software and a scanner to scan images. Here is the simplest and most common way to restore an image:
1. Scanning Photos
The photo must be scanned with high quality. Be sure to wipe fingerprints and old dust off your photo before scanning.
In the scanner settings, you need to set the highest resolution - at least 300 - 600 dpi. Lower resolution will not allow the recovered photo to be printed.
Scanning black and white photographs should be done in “color” (RGB) mode rather than black and white, as color mode allows more detail to be retained. When scanning in grayscale mode, the result may be poorer and more noisy.
2. Image analysis and cropping
In the process of scanning and transferring a photograph from a damaged paper carrier to a digital form, a lot of small cracks, scratches and dust particles appear, which are sometimes completely invisible in the original photograph. After scanning, it is important to analyze the image in terms of whether it is necessary to remove dust, which areas of the photo need to be restored, and which can serve as donors for the lost areas.
3. Removing scratches and dust
To remove dust, a Dust & Scratches filter is used, followed by applying a layer mask and restoring areas undamaged by dust. Dust is always more visible in the shadows and, accordingly, it will be much easier to remove it automatically there. When removing dust, work at close to 100 percent for a clean, recovered photograph afterwards that will not produce any scratches or dust particles that go unnoticed when printed.
To eliminate cracks, you need to switch to the Lab Color mode, where you can correct the image both in relief and in color. Cracks and scratches are removed from the photo using the Clone Stamp Tool. You can also use the Healing Brush Tool for this purpose. Take extra care when using these tools to remove scratches and cracks from faces in your photograph.
Hair, clothing, and a few other details are often the only areas in an old photograph that are crisp and detailed. Therefore, when working with them, you should also be extremely careful. If necessary, you can additionally remove bags under the eyes, wrinkles and other imperfections in the photo with the same tools Clone Stamp Tool and Healing Brush Tool.
4. Restoration of missing areas

Some areas of an old photo may be so damaged that they will have to be repaired using other, similar areas in the image. To restore missing or damaged areas, you need to use the Clone Stamp Tool. Here you only need to select a section in the photo from which you can copy some of the pixels and, thus, restore the damaged area with their help. The cursor is placed on this area, after which you need to left-click by pressing the Alt key. Next, you need to move the cursor to the damaged area of the photo and click again with the left mouse button. You may need to create a new layer to correct every major detail in your photo.
In order to close large damage, it is better to use the Patch Tool, which provides for the creation of a kind of patch, which you can cover the damaged fragment of the image. To restore symmetrical details of the face, use the Flip Horizontal function of the Transform group to flip the copied portion horizontally. Then use the Warp command to transform the fragment to complement the photo. True, here it must be borne in mind that a person's face is very rarely symmetrical, as a result of which a face restored in this way may look unrealistic. So, you will probably have to perform additional correction and feathering of the restored fragment.
5. Color correction

Finally, download Adobe Photoshop. And the first task is to make black and white color, and make it play again with the original colors that have lost color. To do this, it is enough to use the keyboard shortcut Ctrl + L to bring up the Levels dialog menu. First, you can use the Auto button and see the final color correction result. If you are not satisfied with the result, you will have to manually correct the tone.
Working with Levels, the white and black point sliders will need to be moved to those points in the image where the histogram displays the beginning of areas with dark and light pixels. To increase the contrast and color saturation of the photo, you will also need to use the Match Color menu. Here you can increase the intensity of the color using the Color Intensity slider, while you will need to check the Neutralize checkbox to neutralize the resulting halftones.
6. Minor fixes, clarity improvement and general photo correction

If there are shaded areas in the photo, then they can be removed using the Shadow / Highlight option. To correct dark and light areas, it is necessary to select the correct settings so as not to lose detail in the image and "kill" the contrast. To achieve a really high-quality result, it is recommended to use Curves, with which you can additionally work out the dark and light areas of the photo.
Use the Unsharp Mask tool to improve the clarity of your photo. Don't get too hung up on removing noise when recovering photos. The grain in old photographs looks quite impressive, adding a peculiar spirit of the times to the image.
Finally, you can try to make the photo more interesting and colorful by further adjusting the contrast and color saturation of the image using the Hue / Saturation option, which is invoked by the Ctrl + U keyboard shortcut.
From April 12, 2015 to early June, there were many posts based on these photos. Dmitry himself got carried away with this process, bought a good scanner that allows him to digitize images from any media in a very high resolution and started restoration. Moreover, his approach differs from most restorers and retouchers from Photoshop. The main goal is to recreate the original image, not a quick result. The examples below fully illustrate what has been said.
Personally, I have my own selfish interest in Dmitry's venture - suddenly something local history from the family bins will emerge!))) If someone deems it appropriate to distribute this post, we will be very grateful!)))
Dmitry leads a group on Odnoklassniki https://ok.ru/profile/570398517042, connect!)))
Original taken from g_decor
in Restoration of old and damaged photographs.
We have a new type of service for the restoration of old and damaged photographs, color and black-and-white negatives, slides and archival photographic documents. The quality of the copy is significantly superior to the quality of the original material.
Time is doing its job: photographs on paper and film deteriorate over time, begin to fade, fade, become covered with small cracks and scratches. You can return them to their previous appearance using photo restoration.
Modern restoration methods allow extensive work on image correction:
1. Remove scratches, cracks, bruises, creases, dust and small interferences.
2. Increase the sharpness up to a certain limit on fuzzy and blurry photographs.
3. "Glue" torn photographs, while the place of "gluing" parts of the photo becomes invisible.
4. Restore the lost parts of the image.
5. Adjust the brightness, contrast of the image, perform color correction.
6. Change, if necessary, the background to a uniform one, to highlight a specific object or person in a group photo.
It should be noted that the concepts of retouching and restoration are different from each other and have different tasks.
In the case of retouching, you need to give the most beautiful photo, hide the flaws and show the image more effective than it really is. Similar photographs can be seen in glossy magazines. The effect of a certain artificiality appears. There is an element of fiction in every photo; this kind of work is basically connected with the ability to use graphic programs and is purely technical.
In the case of restoration, the main thing is the impeccable preservation of the information of the original image, its historical accuracy. This is much more difficult to achieve. It is necessary to remove only the interference that interferes with the perception of the original. In the case of restoration, it is not enough to masterfully own a graphic editor, it is necessary to have the skills of an artist. A person without training and some experience of such work is not able to achieve a good result. The restoration of each photo requires a lot of time, painstaking work and care.
It is possible to scan historical photographs in extremely high resolution, allowing you to see the smallest details of the source without losing quality.
Here are some more examples of photos, "before" and "after" their restoration. Take a look.
Save your family archive for posterity. Only those who remember their "roots" have a future.
I would be grateful for the dissemination of information. Contact phone: 89139788415
Original post and comments on
 Toucans Where does the toucan live on which continent
 Enlarging the image without losing quality
 Presentation of electroscope conductors and dielectrics electric field
 Discharge from the hospital Gifts and souvenirs upon discharge from the hospital
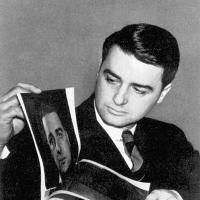 Why Polaroid Sunglasses?
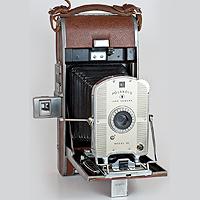 Polaroids - what are these glasses and what do they eat with
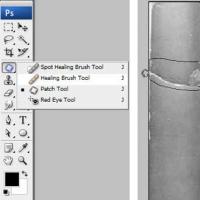 Restoration of old and damaged photos Restoration of old photos in Photoshop