Retouching old photos in Photoshop tutorials. Enlarge the image without losing quality. Minor fixes, clarity improvements and general photo corrections
Old, rusty from time to time photos, have always aroused genuine interest not only among fans of historical values. After all, they capture the moments of the life of our ancestors. And, although, in the historical and cultural aspect, it is these originals, crumpled and half-erased, that have the greatest value, it is quite difficult to get a full-fledged idea of who (what) is captured in the picture in some cases.
All kinds of software are called to help the modern researcher, which allows to restore the image as much as possible without loss of information content. So, for example, the capabilities of only one Photoshop editor already allow you to approach this issue creatively, correcting not only all kinds of damage to the photo, but also restoring the approximate color gamut corresponding to a specific situation.
First, you need to scan the existing rarity and save the resulting jpeg file.
Having opened the original image in the working window of the editor, we will estimate the complexity of the upcoming work. The fact is that the file in question has minor damage (fold lines, partial abrasions and a torn edge). We pay attention to the faded (weakened) photo layer last, since the obligatory color correction will help get rid of the sepia tint.
If part of the face is missing on the portrait photo, then it makes sense to look for some more images of this person. Only in this case, you can count on a reliable final picture.
All attempts to complete the missing (eye, ear, for example) parts of the face by sequential selection, copying and reflection (editing / transformation / reflection) of the selected area in no way contribute to obtaining a believable portrait.
Without going into the physiological features of the human structure, it is worth noting that symmetrical faces do not exist.
So the file is open.
(click to enlarge)
The next step (without fail) will be software transcoding to another (LAB) image mode. This measure is necessary because channel separation in LAB is built on a different principle than in RGB. And in our case, such a division into an independent brightness channel and two independent (red-green and blue-yellow) color channels from each other, allows you to reduce the brightness of the kinks without touching the color palette at all.
Transcoding of an image into LAB occurs after selecting the appropriate mode in the submenu of the "mode" line of the "image" tab.

(click to enlarge)
Leave it visible and select the "brightness" channel. Since the main color axes remained hidden, in the working window of the program the image is displayed without a combination of RGB colors, only white and possible shades of gray.
To remove cracks and scratches, we use the "stamp" tool,

(click to enlarge)
defining (left-clicking with the alt key pressed), as the initial position for copying, the point above the break, on the border of the frame and the image. To avoid abrupt transitions, the "pressure" value should not exceed 50%. Leaving the working brush of the tool along the fold line, we get rid of the unwanted defect. In the same way, remove the rest of the scratches and small cracks from the scanned photograph.

(click to enlarge)
We get rid of the dull-white stripe, which fell on both babies, using the "dimmer" tool (exposure no more than 15%).

(click to enlarge)
returning visibility to the rest of the channels, we immediately see the difference between the image and the frame (intentionally left without adjustment).

(click to enlarge)
By the way we already know, we return to RGB mode and with the help of the “blur” tool, with an intensity of no more than 20%, we get rid of pixelation and specific grain on faces.

(click to enlarge)
The next variation of this tool is "sharpness". Allows, with a short press on the left mouse button, to select the eyes and lips

(click to enlarge)
After correcting the texture of the picture, through the "image" tab, we translate it into a simplified black and white palette.

(click to enlarge)
Correct the exposure, giving the picture the necessary sharpness at the borders of black and white colors.

(click to enlarge)
Frankly "overwhelmed" dark tones, at the bottom of the photo, a torn edge and useless frames - remove it by cropping the image with the "crop" tool. In fact, the restoration of the rare source can be considered complete.

(click to enlarge)
Additional processing that allows you to colorize a black and white picture is also not difficult, but it will take much more time.
To do this, you need under the "Selection" tab to enable editing in quick mask mode and select the "Brush" tool. Shade, for example, an open area of the skin, excluding the eyes and jewelry.

(click to enlarge)
Uncheck editing under the quick mask and invert the resulting selection. Coloring the selected area can be done in several ways, among the most common - using a photo filter (the "image" tab, submenu of the "correction" line)

(click to enlarge)
and using (under the selection) an adjustment layer with color orientation (in this case, the "overlap" mode is required).

(click to enlarge)
Selections are created for each part of the image that is supposed to differ even in halftones. And gradually the whole photograph is colored.

(click to enlarge)
Restoring a print, even one made from color film, is a fairly simple process and is performed by automatic correction tools in Photoshop.
The proposed image clearly shows a color mismatch (most likely due to an incorrectly selected film).

(click to enlarge)
The section of the "image" tab, including autotone, auto-contrast and automatic color correction, is able to correct the proposed image in the shortest possible time.
Cropping will give the image a complete look.

(click to enlarge)
From April 12, 2015 to early June, there were many posts based on these photos. Dmitry himself got carried away with this process, bought a good scanner that allows him to digitize images from any media in a very high resolution and started restoration. Moreover, his approach differs from most restorers and retouchers from Photoshop. The main goal is to recreate the original image, not a quick result. The examples below fully illustrate what has been said.
Personally, I have my own selfish interest in Dmitry's venture - suddenly something local history from the family bins will emerge!))) If someone deems it appropriate to distribute this post, we will be very grateful!)))
Dmitry leads a group on Odnoklassniki https://ok.ru/profile/570398517042, connect!)))
Original taken from g_decor
in Restoration of old and damaged photographs.
We have a new type of service for the restoration of old and damaged photographs, color and black-and-white negatives, slides and archival photographic documents. The quality of the copy is significantly superior to the quality of the original material.
Time is doing its job: photographs on paper and film deteriorate over time, begin to fade, fade, become covered with small cracks and scratches. You can return them to their previous appearance using photo restoration.
Modern restoration methods allow extensive work on image correction:
1. Remove scratches, cracks, bruises, creases, dust and small interferences.
2. Increase the sharpness up to a certain limit on fuzzy and blurry photographs.
3. "Glue" torn photographs, while the place of "gluing" parts of the photo becomes invisible.
4. Restore the lost parts of the image.
5. Adjust the brightness, contrast of the image, perform color correction.
6. Change, if necessary, the background to a uniform one, to highlight a specific object or person in a group photo.
It should be noted that the concepts of retouching and restoration are different from each other and have different tasks.
In the case of retouching, you need to give the most beautiful photo, hide the flaws and show the image more effective than it really is. Similar photographs can be seen in glossy magazines. The effect of a certain artificiality appears. There is an element of fiction in every photo; this kind of work is basically connected with the ability to use graphic programs and is purely technical.
In the case of restoration, the main thing is the impeccable preservation of the information of the original image, its historical accuracy. This is much more difficult to achieve. It is necessary to remove only the interference that interferes with the perception of the original. In the case of restoration, it is not enough to masterfully own a graphic editor, it is necessary to have the skills of an artist. A person without training and some experience of such work is not able to achieve a good result. The restoration of each photo requires a lot of time, painstaking work and care.
It is possible to scan historical photographs in extremely high resolution, allowing you to see the smallest details of the source without losing quality.
Here are some more examples of photos, "before" and "after" their restoration. Take a look.
Save your family archive for posterity. Only those who remember their "roots" have a future.
I would be grateful for the dissemination of information. Contact phone: 89139788415
Original post and comments on
In this tutorial, you will learn one of the ways to restore old photographs.
Before proceeding with the restoration, it is necessary to draw up an approximate work plan in order to do everything consistently and not rush from one to another. The following sequence of actions is recommended:
1
... Only work with a copy of the scanned image.
2.
Crop the image. Be careful not to touch on important details.
3.
Determine the main problem areas for retouching, perform the necessary operations. This is the longest and most laborious stage.
4.
We remove noise and other unwanted plaque. Do not try to remove all the grain of the film and take a semblance of a digital photograph! After all, during restoration it is important to preserve the spirit of that time.
5.
We adjust brightness, contrast, saturation. In color photographs, we adjust the color balance, especially pay attention to the correct skin color.
6.
Sharpening the image.
So let's get down to the process. Here's our original photo.
Step 1. The restoration is usually started by correcting relatively large areas. The best way to do this is to use the tool Patch(Patch tool). The figures show an approximate sequence of actions. Large areas in the background are corrected first, then smaller ones.


Step 2. After retouching large defects, let's move on to small ones. For this we use tools Healing Brush(Healing Brush), Spot Healing Brush(Spot Healing Brush) and Stamp(Clone Stamp). Feel free to experiment with these tools.
Tool Point restoring It is advisable to use a brush to remove only very small point defects. For larger areas, it is better to use a regular Healing Brush and Stamp.
The screenshot below shows the areas in which the specified tools were used: in red - Healing Brush, green - Stamp... I would like to draw your attention to the fact that when working with the Patch and Healing Brush tools, there are unwanted effects when working on the edges of the image, especially if they are white. To avoid this, first simply paint over these areas with the closest color with a brush, and then work with the restoration tools.

Here's what you should get at this stage.

Step 3. Now we will work with more serious damage. To reconstruct the image of the man's left eye, we use the image of his right eye. An extreme case is specially taken here. If there are other photographs of this person, then it is better to take the missing parts of the image from them, so it will be more correct.
So, select the area around the right eye and copy it to a new layer by clicking CTRL +J... Next, click CTRL +T to apply a free transform.


Step 4. Right-click inside the frame and select Flip horizontally(Flip Horizontal).

Step 5. In order to properly place the reflected copy of the eye, decrease the opacity of the layer and align the eye relative to the original image. Then press ENTER and return the Opacity to 100%.

Step 6. Add a layer mask by clicking on the icon marked with a green circle at the bottom of the layers palette.

Step 7. Press D to reset colors, then select a tool Brush(Brush). Mask off the extra areas with a black brush. Remember that white reveals and black hides. Use a brush with soft edges for soft, inconspicuous transitions.
Tip: Hold your finger over the X key to quickly switch between black and white. If you hide the excess somewhere, paint over this area with white. If you want to see only the mask, click on its thumbnail in the layers palette while holding ALT.


Step 8. Now we restore the image of the left ear in the same way. To fine-tune the shape, use the tool Deformation(Warp).


A small area of the hairline on the left side of the face is also restored. Let me remind you that each operation must be performed on a new layer. This should become the main rule of work.

Step 9. After recovering all large areas, let's go back to the tool Stamp and fix all the shortcomings. You need to do this on a new transparent layer by checking the box Sample of all layers.

You can merge layers if needed.

Here's what you should get.

Step 10. Select all layers. Combine the layers into a group by clicking CTRL +G... Then create a new layer above this group by clicking ATL +SHIFT +CTRL +E, and call it Noise.

Step 11. Now we reduce the noise using the filter " Reduce noise "(Reduce noise).
An important point: the greatest suppression of noise should be done in the blue channel, since it contains the largest amount of it. Preservation of details for this channel should preferably be set to 0%.


Step 12. After suppressing noise, you need to restore the sharpness of the image. There are many different ways to do this, including several tutorials on our website:
This tutorial uses the filter sharpening method. Colour contrast(High Pass), but personally I prefer the mask method as it is the most manageable. I will not dwell on the sharpening technique, those who wish can familiarize themselves with them from the above lessons. I would like to add that if you plan to print a recovered photo, you should sharpen the image a little more, as printers will blur the image slightly. This is a pretty important point.


Step 13. It is often necessary to sharpen only in certain areas. To do this, you need to create a layer mask, as we already did, and paint over the unnecessary areas.

Step 14. Create a new adjustment layer Curves... Let's give the curve an S-shape to increase the contrast.

Step 15... Now let's compare the results.
How often, when looking at photos on a computer, we threw out cool frames because they turned out to be too small in size and of poor quality. But with the help of special programs, almost any image can be saved!
Improving image quality is a very voluminous topic. To improve the quality of photos in Photoshop, you can apply color correction, sharpening, retouching and many other operations. All of them require certain skills and possession of special techniques.
But there are also less complicated methods when you just need to enlarge the image without losing quality. Below we will look at an example of how to improve the quality of a photo if you need to enlarge a photo without losing quality.
How to enlarge a photo without losing quality
Everyone has come across a small, low quality image. In such images, at magnification, the pixels are strongly visible, the points from which the raster image is built.

Enlarging the image by stretching it free transforming will only worsen the situation.
For this tutorial, you will be working in Photoshop CC 2017. But first, we'll look at the method for other, older versions of Photoshop. And then we'll show you how Photoshop CC 2017 can do the whole procedure automatically.
Open up the image in Photoshop. Now we will gradually increase it in several passes. It should be noted right away that you can enlarge the photo and raise the quality, but with a limitation in size.
Press the keyboard shortcut Alt + Ctrl + I... We will open a window "Image size"... It is necessary that between Width and Height a paperclip was pressed. Then the width and height will change proportionally.

Enlarge the image twice, 20% each time. To do this, in the drop-down list opposite "Widths" change pixels to percentages (Pixel / Percent), and the numerical value from 100% to 120% and click Ok... Then we call the image size window again ( Alt + Ctrl + I) and increase by 20%.

We have increased the image size from 950x632 pixels to 1368x910 pixels.

For a visual comparison, let's approximate the original image (950x632 pixels) and the resulting one (1368x910 pixels).

We enlarged the image by almost one and a half times and even improved the quality. As you can see, pixelation is less noticeable if you zoom in on the image.
It remains to refine the result. Apply a filter "Smart Sharpen" to the resulting image.
We go in: Filters / Sharpen / Smart Sharpen... Moving the sliders, we select the appropriate sharpness. If you click and hold the left mouse button on the image in the small preview window, you can see the picture before applying the effect. The difference is palpable. Especially noticeable is the smooth color transition (without cubes) on the lenses of the glasses. We have completely removed the noise by moving the slider all the way to the right. The radius of sharpness was taken at 0.3 pixels, the effect was applied at 79%.

Let's compare the results again.
Left - the original image, in the center - after enlarging the size, on the right - with the "Smart Sharpness".

After application "Smart Sharpness" the noise in the photo is gone, the image is clearer.
Here is our result.

Now let's enlarge the photo and improve its quality using automatic tools in Photoshop 2017.
Open the image in Photoshop, press the keyboard shortcut Alt + Ctrl + I... We will open a window Image Size... Pay attention to the point "Fit To" / Dimensions... Expand this list. In it you will see presets for image enlargement / reduction without loss of quality. Let's use automatic selection (the second item in the list). In the window that opens, select the item "Good" and press Ok... It is not worth choosing the best, because the original image is of too low quality, and there is no point in enlarging it so much.

Please note that if we managed to select to enlarge the image from 950x632 pixels and a resolution of 96 pixels / inch to 1368x910 pixels with the same resolution, then the program increased to 1969x1310 pixels with a resolution of 199 pixels / inch.

Let's apply Smart Sharpness.

Now you yourself are convinced that you can enlarge a picture without losing quality, and even improve the quality of a photo.
It should be noted that this method can be useful not only for enlarging and improving small photos. For example, you need to provide a photo for an Internet resource or for printing in a publishing house. At the same time, your photo is of excellent quality and large size, but the publishing house needs an even larger size. By applying the described method of enlarging the picture and improving its quality, you will get excellent results. After all, photos of large sizes with good quality will go through this procedure much easier.
The procedure is extremely simple. Don't give up on small pictures. Give them a second chance.
Today we will consider with you one of the most interesting topics in processing photos with Photoshop - photo retouching. Retouching is generally a very exciting experience. It's damn interesting and pleasant when, it would seem, from a completely unusable, spoiled photograph, something real and tangible is obtained, the past era, people and destinies are manifested.
Just recently, one of my acquaintances asked to restore an old family photograph he found almost a century ago. Her condition, you understand, was very far from perfect. Once again, we have to be convinced of the advantage of digital over the film, at least in terms of the safety of photographic materials ...
So let's start p photo touch-up... The first step is to scan our "old lady". As a rule, almost all old photographs have “scars” on their bodies - fractures, lack of fragments (for example, lost corners when torn from albums), simply fading and much more. This work had all of the above "advantages". Photo scanned at 600 dpi. In principle, 300 dpi is quite enough for such work when printing, but for retouching it is desirable to have a higher resolution in order to reduce distortion. The output file is in TIFF format and is highly desirable 12 or 16 bits. The contrast during scanning needs to be reduced, then, in the process of processing the photo, we will restore it. It is desirable to scan in RGB mode, even if the photo is black and white. Then choose one of the three channels with the least damage, removing the rest. Typically, the noisiest channel is usually blue. This gives us the original monochrome image. Since the file size for a monochrome image is significantly smaller, this significantly speeds up processing. I highlight two approaches to retouching complex photographs.

First, we do the simplest operations, gradually moving on to the most problematic areas. At the same time (especially if you do this rarely, from time to time), you "fill your hand" in simple operations, approaching difficult areas with a lot of experience. And as the simple retouching progresses, the photo begins to improve before our eyes, which is very inspiring for further work. Or we start with the most difficult (more suitable for very experienced users), leaving the little thing "for later."

Let us dwell on the first option p photo enhancement... Let's try to draw up for ourselves some rough work plan for retouching, so as not to run around the photo from corner to corner in search of defects. Since there is nowhere to frame our work further, it is necessary to restore the edges of our canvas, remove creases and large scratches, try to restore a man's "torn off" leg, retouch a woman's face (the most difficult thing), clean up the remaining little detail, general exposure correction and final toning are also needed.

Of course, you can use different photo manipulation techniques to restore canvas edges. In this case, I did the following. As you remember, we scanned a photo with a very low contrast, this will come in handy now. The inside cover of the scanner is usually backed with black. If this is not the case, then cover the photo with a black sheet of paper and, if possible, press it tightly against the glass to smooth out the creases.
Now the black level in your work will correspond exactly to the scanner substrate when scanning, as you can see in the photo above. Make a copy of the layer (Ctrl + J), then right-click (pen) select Color Range and select our black outline, where there was no photo. At the same time, use the Fuzziness slider to define the selection range. Then, having selected a painting tool, for example a brush, press the B key, pressing the Alt key, select the tone of the painting tool on the painting itself with an eyedropper. First, select a tone in the floor area (lighter) and paint over the selected black area opposite the floor. Then choose a medium tone for the rest of the edge (darker) and paint over the rest of the selected black area. Why do we need such complexity - for the correct operation of our miracle tool Patch (patch).


Select the tool with the J key. This function contains three tools: Patch, Healing Brush and Replace Color, which can be switched with the Shift + J keys. Why is this photo editing tool so good. It allows you to replace the texture of the selected area while maintaining its brightness and color components. I will show this using an example of an enlarged fragment of the floor near a woman's leg.
Select with the pen the area that we are going to "treat", this will be the edge of the photo, which we painted over with a tone taken as a sample from the border area of the picture. The main thing is not to rush, following the rule - less is more. Since we need to restore the texture of the floor, we move the selected area with the stylus to the area from which we will take the texture sample, observing the alignment of the sample in relation to the selected area (in this case, along the gap between the boards). After aligning, raise the pen (release the left mouse button). The result is amazing - no traces of stitching the fragments. We process the entire area in a similar way. It should be added that the tool has several modes of operation. Source - in this mode we select the area that we are treating. Destination (target) - in this mode we select the area that we are treating (texture sample). When the Transpa-rent (transparency) checkbox is selected, the texture sample affects the transparency of the fragment being replaced (it is used quite rarely). The most optimal and convenient, I think, is the Source mode.


The photo processing result shown below was obtained in eight steps. If we had not aligned our missing edge of the photo with the previous operations of selection and shading with the photo itself, then the brightness of the replaced fragment would change from the main one to black. That is, our photo would have a blurry black border, which is unacceptable. The more accurately you match the tone on the missing edges, the better the final result will be. To get back to some of the “fateful” retouching steps, I highly recommend taking a Snapshot of those steps. After that, you can safely clear the History palette to free up RAM if you don't have enough of it.


We work in the same way with the entire edge. The work is painstaking, but the result is worth it! Kinks and large scratches are removed in the same way with the Patch and Stamp tool. Small dots and scratches are easier and faster to remove with the Healing Brush tool. The work of the tool is absolutely similar to the previous one and is very similar to the work of the Stamp tool, which you are familiar with. The only difference is that the Healing Brush takes only the texture from the sample, and the brightness and color from the "repaired" area. Some features of its application should be taken into account. The Patch and Healing Brush tools have some blurring of the edges relative to the selection outline, so they cannot be applied at the edges of sharp brightness transitions - the result of photo processing will not be very successful.
For example, attempts to remove lesions near a woman's head using Patch lead to blurring the boundaries and disrupting the uniformity of the tone of the fragment being replaced. To prevent such results when processing photographs on problem areas of sharp tonal transitions, you can first use the Stamp tool with an adjustable hardness of the borders (for more accurate blending). It is used to separate (expand) the boundaries of transitions if the fragment to be replaced is large enough. If the fragment is small, then you can simply paint over it with the Stamp tool, and then apply Patch to the same place for alignment.


As you can see, the result p photo enhancement completely different. If you clearly understand how these tools work, then you are guaranteed success!
The next stage of processing the photo is to "make" the man's missing leg (oh, if only it was possible in life ...). Before this crucial operation, you need to straighten the background in place of the missing leg, then it will be more difficult to do it. We do this in the same way with the Patch tool. Now select his right leg almost to the knee (slightly higher than the missing part and with an allowance around the perimeter). Next, execute the Feather command with a radius of about 10 pixels. Copy Ctrl + C and paste on a new layer with Ctrl + V. Hold down the Ctrl key (or, more conveniently, the bottom button of our wonderful Wacom pen), drag the new leg into place, flipping it horizontally so that it becomes the left! Next, use levels (but not the transparency of the layer) to adjust the brightness and contrast of the leg so that the transition point becomes invisible. It turned out like this.
Then, with an eraser, with a transparency of 50%, with light pen strokes, we erase our allowance along the contour of the new leg to the background and in the places of the folds on the trousers. You can feel like a wizard.
Now we take on the most difficult and delicate task in processing a photograph - the restoration of a woman's face. Here everything is somewhat more complicated, but not hopeless. The most difficult thing is to restore the eyes and nose area. Then we will make the forehead with the usual tools. You can try to "just" draw the eyes, but I am clearly not an artist, so we will not try. You can only finish drawing small details, but no more. It remains to borrow the eyes elsewhere, no matter how blasphemous it may sound.
Having carefully studied all the characters in the photograph, I found that her daughter's eyes, in principle, are very similar. This means that our daughter will be a "donor". Turn on the lasso with the L key, select the area of the eyes and nose on the daughter's face (again with a slight allowance), feather about 10 pixels, copy, paste on a new layer and drag the fragment to a new place. First you need to compare the distance between the eyes with the original. Naturally, in a child it is somewhat less. Therefore, we transform the fragment to the desired size. For accuracy, turn on the grid (Ctrl + "). Then we put our eyes in place.
It remains to slightly work with the eraser on the eyebrows and the eyes can be considered finished. The most seemingly difficult operation in photo processing was given to us quite easily. Naturally, if there is no "donor" in the original image, you can use another suitable photograph. Everything is at the mercy of your imagination, the main thing is not to give in to difficulties. Then we act according to the old scenario: "no noise, no dust ...", that is, we eliminate the remaining minor insignificant defects.

After we have eliminated all (well, almost all) of the image defects, we need to bring it into a good form: raise the contrast, tone it up.
First, let's bring its histogram back to normal using a Levels adjustment layer. In order to produce toning (if necessary), the image must be converted to RGB mode. After that, in the adjustment layer Hue / Saturation, carry out toning. The opacity of this layer can be varied by changing the strength of the toning. We will turn to the issue of toning in more detail in one of the following issues of the magazine.

The result that you see below took about two hours of working time. I will say right away that my friend was very pleased with the result! .. and brought in a bunch of old photographs.
In conclusion, I want to say: treat the features of the past as carefully as possible. Try, if possible, to bring less new to old photos, otherwise you will get a "remake". We have now deliberately considered a rather difficult situation when we had to restore the missing elements. But, thus, we only once again studied the capabilities of Photoshop tools in photo processing. Before undertaking such work, especially if you are not doing it for yourself, be sure to discuss with the customer the possible consequences of such a deep restoration. Sometimes it is better to leave some moments as they are, rather than distort or add on your own - after all, this is history!
 Toucans Where does the toucan live on which continent
 Enlarging the image without losing quality
 Presentation of electroscope conductors and dielectrics electric field
 Discharge from the hospital Gifts and souvenirs upon discharge from the hospital
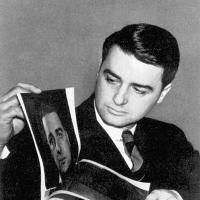 Why Polaroid Sunglasses?
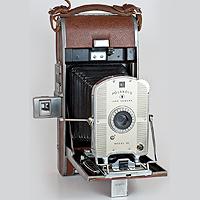 Polaroids - what are these glasses and what do they eat with
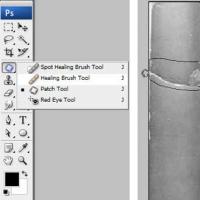 Restoration of old and damaged photos Restoration of old photos in Photoshop