What you can make a brush for painting. How to make your own nail art brushes. Formation of the basis of the future brush
In order to paint a picture, an artist needs a stretched canvas, as well as paints and brushes. The success of his work largely depends on the quality of the latter, therefore, the choice of such tools must be approached responsibly. To choose the right brushes for painting, you need to consider what paints you will have to work with, as well as the possibilities of your budget.
In an effort to choose the right brushes for painting, you need to know what they are, what the brushes are made of and what colors they are intended for. So, for example, to paint with gouache or watercolors, they use squirrel, columns and synthetics. They all have their own quality characteristics:
- The loudspeaker is suitable for all styles of painting, but its price is quite high.
- Squirrel is ideal for watercolors, and synthetics are ideal for acrylic painting.
- The pony brush is a good alternative to the column and squirrel brushes.
- A brush made from pork hair is more suitable for oil paints.
- The badger brush is used for soft paints.
- Sable in its quality has the properties of a column and a squirrel, but such bristles can be used to paint large works and miniatures.
- Synthetics are unusable brushes for watercolors, they are more often used for acrylics.
Any brush is made of a handle, a hair bun and a cap. The quality of this drawing tool determines whether it will be convenient for the artist to work. In turn, its durability in use depends on the quality of all components of the brush.
To choose the right brush sizes and the tool itself, you need to focus on the following points:
- the material from which the brush is made - a good quality brush is convenient to use;
- the handle of the brush should be smooth;
- its length should be comfortable for the user.
The base of the brush should cover the handle as tightly as possible, fixing the hair bundle motionlessly. There should be no seam on it so that the tool is comfortable to hold in the hand. The most important part of the product is the hair bun, which differs in material. The synthetic brush for painting is inferior in quality than natural brushes. Such drawing tools are classified by number.

Artists know how to choose brushes and what kinds of brushes are available on the market. The correct choice is also influenced by the size of the brush, as well as by what colors a specialist in artistic creation plans to paint. Thin brushes are suitable for one, round brushes are for another.
A brush with good hair has the following qualities:
- her hairs are elastic;
- when wet, they do not lose their shape;
- do not fall out during work;
- the glue with which they are held does not go beyond the holder.
All of these characteristics need to be considered in order to choose a good brush.
In the video: how to choose the right brushes for painting.
Types of brushes and their purpose
To choose the right brush, focus on the bristles from which the tuft is assembled. You also need to know which brushes are best for watercolors, gouache or oil paints:
- Squirrel wool brushes. Ideal for watercolor painting. Thin and soft brushes allow you to control the flow of paint, so they are convenient to paint over small details of the design. To make a high-quality squirrel hair brush, the bristles are first degreased, sorted by length, unsuitable hairs are removed and straightened.

- Designed for watercolor paint, the artist can not only use them comfortably, but also save on price. To choose a paintbrush for children, look at their painting skills.

- Sable wool brush. It is the most expensive tool used by professional artists. The choice of such brushes makes it possible to draw thin lines, they can be painted with gouache and watercolors.

- Pony wool tassels. Quite resilient and soft, suitable for ink painting. However, for those who are going to paint with gouache, this is also a worthy option. These bristles make it easy to apply paint strokes.

- Nylon tassels. Recommended for acrylic paint, they come in different shapes, it all depends on the specifics of the artist's work. A sales assistant at an art store will help you make the right choice for a newbie.

Natural brushes are characterized by the fact that the bunch in them is made of animal hair. Made from natural material that is much better than synthetics, these brushes will last much longer.

Suitable brushes for working with oil
For artists who paint with oil paints, it is recommended to purchase the following brushes:
- bristle, characterized by special elasticity and quickly absorbing paint;
- mongoose brushes, medium in softness;
- badger hair brushes that are suitable for mixing oil and acrylic;
- synthetic nylon brush, which is practically not inferior in quality to natural ones.
Synthetics are valued inexpensively, so they paint with such brushes at school on landscape paper. Thanks to the light nylon hairs, children can clearly see the color of the paint on the bristles. It is convenient to outline the contours and boundaries between colors with a thin brush, and with a thick one - to paint large areas of the picture.
Paint by number tools
Brushes by numbers are included in the kit, which is sold with paints under the numbers. Painting by numbers is a modern art form, when a non-professional artist has the chance to create a canvas of a famous celebrity.
Made from elastic nylon fiber, brushes by numbers are great for this kind of creativity.

To choose good brushes for painting by numbers, you need to consider that they are divided by purpose, hair quality and shape. This choice also depends on the paint that the artist uses. The nylon (synthetic) brush is perfect for painting with oil paints. Flat brushes are often used in shape, and everyone chooses the sizes individually. The artist needs those brushes that seem to be an extension of his hand.

What are the forms of brushes
All brushes for gouache, watercolors and oil paints may also differ in the shape of the bristles:
- Round brushes. These products are suitable for painting with gouache paint, allowing you to paint over small details of the drawing.

- Flat brushes. They are more elastic, therefore they are used for painting areas of paintings with close-up images, for example, earth, sky, grass. Their capsule is compressed at the end, forming a flat tuft of hair. Artists use them to sketch cityscapes. The shape of the brush in its outlines resembles a cat's yak.

- Flutes brushes. Their shape is wide enough to apply broad strokes to the canvas. They are used mainly in watercolors, sometimes with oil paints.

- These brushes are round and very long in shape, they are needed to apply fine lines. They have found their way into graphics.

- In all their characteristics, they resemble font ones, differing only in short hair.

- Fan brushes. They are one of the varieties of flat brushes. They got this name due to their shape in the form of a fan. Their use allows you to soften the color stretch and contrast of the contours.

The final result of the artist's work depends on the correctly chosen tool. But for an experienced painter, such a choice is not a problem. And it is not difficult to purchase all these goods in a specialized art store.
Tips from professional artists (2 videos)
Guys, we put our soul into the site. Thank you for
that you discover this beauty. Thanks for the inspiration and the goosebumps.
Join us at Facebook and In contact with
All children love to draw. But sometimes the child does not turn out the way he wants. Or maybe he doesn't know enough ways to express himself? Then you can inspire him to experiment with different techniques, among which there will definitely be a favorite. After that, your child will probably want to invent something new.
site collected the most interesting techniques for you.
Dot patterns
First, draw the simplest squiggle. Then, using a cotton swab and paints (gouache or acrylic), we make intricate patterns as the soul lies down. It is better to pre-mix the paints and slightly dilute with water on a palette.
Frottage
This technique is familiar and beloved by many since childhood. We put an object with a slightly protruding relief under a sheet of paper and paint over it with pastel, crayon or an unsharpened pencil.
Foam rubber prints
Having dipped a sponge in thick gouache, the child can paint landscapes, bouquets of flowers, lilac branches or animals.
Blotography
One option is to drip paint onto a sheet and tilt it in different directions to get an image. Second: the child dips a brush in paint, then places a blot on a sheet of paper and folds the sheet in half so that the blot is imprinted on the second half of the sheet. Then he unfolds the sheet and tries to understand who or what the drawing looks like.
Hand and foot prints
It's simple: you need to dip your foot or palm in paint and make a print on paper. And then use your imagination and add a couple of details.
Paint patterns
For such an application, you need to apply a thick layer of paint on paper. Then, with the opposite end of the brush, scratch the patterns - various lines and curls on the still wet paint. When dry, cut out the desired shapes and stick on a thick sheet.
Fingerprints
The name speaks for itself. You need to paint your finger with a thin layer and make a print. A couple of strokes with a felt-tip pen - and you're done!
Monotype
On a flat smooth surface (for example, glass), a drawing is applied with paint. Then a sheet of paper is applied, and the print is ready. To make it more blurred, the sheet of paper must first be wetted. When everything is dry, you can add details and outlines if you like.
Scratchboard
The highlight of the work is that the drawing needs to be scratched. A sheet of cardboard is densely shaded with spots of multi-colored oil pastels. Then black gouache must be mixed with soap on a palette and painted over the entire sketch. When the paint is completely dry, scratch the drawing with a toothpick.
Air paints
To prepare the paint, you need to mix a tablespoon of "self-rising" flour, a few drops of food coloring and a tablespoon of salt. Add a little water until the consistency of thick sour cream and mix well. The paint can be placed in a pastry syringe or in a small bag. Tie tight and notch corner. We draw on paper or plain cardboard. We place the finished drawing in the microwave for 10-30 seconds at the maximum setting.
"Marble" paper
Paint over a sheet of paper with yellow acrylic paint. When it is completely dry, paint over again with diluted pink paint and immediately cover with cling film. The film needs to be crumpled and assembled into folds, since it is they who will create the desired pattern for us. We wait until it dries completely and remove the film.
Painting with water
Draw a simple shape in watercolor and fill it with water. Until it's dry, we put colored blots on it so that they mix with each other and form such smooth transitions.
Vegetable and Fruit Prints
The vegetable or fruit must be cut in half. Then you can cut some kind of pattern on it or leave it as it is. We dip in paint and make prints on paper. For prints, you can use an apple, potato, carrot, or celery.
Leaf prints
The principle is the same. We smear the leaves with paint and make prints on paper.
Drawings with salt
If you sprinkle salt on a still wet watercolor painting, it will soak in the paint and, when dry, will create a grainy effect.
In modern conditions, making a brush with your own hands is usually carried out using bristles and animal hair. You can make such brushes with your own hands and get a quality tool for painting or painting. Depending on the area of use, brushes can be made round or flat. In addition, the pile can be shortened or elongated.
 Making a brush with your own hands will not be difficult.
 The most common and high-quality are the tail hair brushes of such animals:
- badger;
- speaker;
- proteins;
- gerbils.
Given the high cost of animal hair tools, which were listed above, in homemade brushes, this material can be replaced with wool and hair of other animals. In particular, in recent years, tools made of mink, arctic fox and fox wool have become increasingly common. In addition, waste from the activities of fur factories can be used as a material. Also, the pile can be made from camel, sheep or long-haired dog wool, as well as from human hair.
Manufacturing technology
The first step in manufacturing is the preparation of animal bristles or hair. In addition, a brush holder and grip material must be prepared. However, the first step is to start with the choice of material for the bristle tuft.
Material selection
When choosing a material, you need to focus on what kind of work you plan to use the brush for. So, for painting with watercolors or oils, some materials are suitable, and for delicate painting works - others. At the same time, there are areas of use that require the use of a certain material. For example, for ink painting, most craftsmen prefer to use camel wool products.
 Trimming wool for future brush bristles
 Consider the main characteristics of the most common homemade brushes, depending on the material used:
- Gerbil brushes are usually made flat with a long or short hair surface. They have soft and elastic hair. Therefore, such tools are mainly used for fine painting or painting with oil paints or watercolors. In addition, brushes with a sandy pile can be used to glaze varnish.
- Badger products are round or flat. They are somewhat tougher than the previous version, and therefore they are mainly used for working with oil paints.
- Core-bristled brushes can be flat or round. They are highly elastic and resilient. They are mainly used for delicate work, as well as for wet glazing.
- Squirrel tassels can only be round. They are extremely soft and elastic, therefore they are mainly used for painting on porcelain or paper.
Hair preparation
It is advisable to start harvesting at the beginning of autumn, when the animals molt. Individual unsuitable hairs are removed from the collected bundle and trimmed. Next, the trimmed part is placed in a glass for alignment. The resulting bundle of hair should be combed out with a sharp-toothed comb.
Carefully combed pile must be tied up and degreased in clean gasoline. To do this, the bunch is stored in a closed jar for several days, after which it is boiled in a tanning solution to make the hairs non-hygroscopic.
 Carefully combed pile is tied up and degreased
 The next step is hardening, the conditions of which depend on the type of hair. Typically, hair is kept at 150 degrees for about an hour. For hardening, the bundle is placed on a metal mesh or suspended so that the hairs are well warmed up with air of the required temperature.
Knitting brushes
A pile that has been hardened is suitable for knitting a brush. For this, a certain number of hairs are taken and lowered into a tin or plastic mold with a tapered bottom. This form must be prepared in advance. After you have put the required number of hairs into the mold, you can make a blank for the brush by tapping on this mold. Then the bunch of hair is removed and tied, after which the non-working surface is varnished. It is inserted into a metal capsule or clip.
The capsule can be made either from thin metal strips, joining their edges with an overlap with soldering. In addition, this can also be seamless, which is considered a more acceptable option.
It is recommended that the primer be made of brass or tinplate, as these materials are durable and resistant to corrosion. Its size will depend on the desired brush number. Also, at this stage, do not forget about such an important element as a brush stand.
 The brush holder is equally important
 Handle making
After you have managed to make a pile, you should start making a pen. It is best to carve it from the following types of wood:
- Pine;
- alder;
- Birch.
After grinding, the handle is covered with a colorless varnish or painted with a single color paint. Next, the bundle inserted into the capsule is poured from the wide end with synthetic glue or other waterproof compound. This must be done so that the glue reaches the end of the pile in the capsule.
After everything is dry, the bristle tuft capsule should be connected to the wooden handle. For strength, it is recommended to additionally crimp the capsule with a wooden handle. The finished handle should be varnished.
Choice of pile length
Select the length of the bristles coming out of the primer. The length of the released hair should depend on its elasticity. This is of fundamental importance, because if you release the bristles too long, the brush will look disheveled. Otherwise, insufficiently released pile will not collect enough paint.
After you have decided on the length, the finished brush must be moistened with water and combed until the bristles are as even as possible.
Conclusion
Thus, making a brush with your own hands is a completely affordable procedure. It consists of several stages, one of which is the choice of material. Hair and bristles are selected in this case, taking into account the purpose of the brush and financial capabilities.
Those who are fond of decorative painting (especially Petrikov painting) cannot do without this magic brush. It practically cannot be replaced by any other. The properties of cat hair are truly unique: it is very elastic (as soon as the pressure on it stops, the brush returns to its original position, that is, it does not lose its shape, does not deform); it is very durable (with proper handling, the brush will last 3-4 years with its most intensive use); with its help, you can make incredibly thin and delicate painting, displaying such airy lines, which are not easy to do with the most sharpened pencil.
See how the famous artist of Petrikovskaya painting Pelageya Glushchenko mastered this instrument masterly. All the work below (flowers, buds, stems and blades of grass) was done exclusively with a brush made of cat hair ("cat" as they say in Petrikovka).

I had to make my not the first brush without fail and urgently, since the old one was lost, and I was ordered to paint for a gift to the head of the bank (woman). The terms were very short - 3 days.
My yard cat Snowball (I place his portrait below) has become a "victim of art". But seriously, there can be no harm to the cat from cutting 3-4 small tufts of wool.
I spread a newspaper on the table. the husband (in working gloves, just in case) held the cat by the front and hind legs (the cat was lying on its back). I forgot to say that a cat or a cat should be the most common - short-haired. Having clasped the fur on my stomach with three fingers, under the paws (as much as I could grab), I carefully cut off the tuft of wool with scissors so as not to injure the animal. I folded 3-4 cut bundles in one direction, so as not to confuse the ends of the villi. By this time, the cat was released and fed. In my opinion, he did not understand anything, but most importantly he was satisfied with the result.

Pressing the ends of the cut hairs with my finger, I tried to use a needle to select the fluff from the side of the cut (at the base of the hairs). The photo shows how a brush made of 3 bundles of wool has significantly "lost weight".

Next is the most important stage (it is clearly shown in the photo in the book by V.A. Ruzhitsky and A.O. The point of the operation performed is to level the ends of the hairs as much as possible.
So, several times I stretched the bundle of wool in different directions, and then superimposed the resulting halves again one on top of the other so that the ends of the entire bundle were at the same level. This should be done until the ends of the hairs in the bundle form an even (relatively) line. It is almost impossible to make it absolutely even, but it is necessary to get as close as possible to this. The quality of the brush and the pleasure that it will give you in the process of work will depend on this.

As a holder for a brush, you can take any stick, for example, from an old brush, even a thick ballpoint pen will do.

The cone-shaped tip of the holder should be greased with thick glue, for example, PVA, then put it in the middle of the prepared bundle of wool and carefully wrap this bundle around the holder. Then, taking a long strong thread, wrap it tightly around the holder, fixing the ends of the thread with a double knot. The thread must be smeared with glue on top again, let it dry, you can even varnish it on top for strength. But I do not do this (you can get varnish on the working part of the brush, but this is not desirable).
A dry brush prepared in this way has the shape of a kvachik or a broom.

But as soon as you wet the brush in water, it will transform into a drop shape. How to work with a cat brush is a separate topic. I tried to write about this in my teaching aid "The Art of Petrikovskaya painting".

And the ordered work turned out like this (see the photo not very successful below). This is a repetition of my composition "Kazkovy Ptah", but in a different color scheme - cold. The brush turned out to be very successful, thanks to Snow!

I am placing fragments of work that have been photographed more successfully than the general view. The size of the entire work is 30x40. All fine lines, blades of grass, revitalization of flowers and leaves are done by the cat. In the process of painting, while the brush is new, individual villi can be removed (pulled out), which climb out and interfere, but it is strictly forbidden to cut the brush.

Another piece of work is a lilac flower.
Hello dear beads!
Brushes keep their popularity for more than one season. They can be found everywhere: in cars, on curtains, on bags, and of course in jewelry.
Today I will show you:
- How to make DIY thread brushes.
This master class is suitable for beginners who are just starting to work with brushes, as well as for experienced craftsmen as an introduction.
Perhaps some of you will learn a little trick and bookmark it!
So let's go.
The time for making one such brush is about 40 minutes.
It depends on your speed of work.
In order to make tassels from threads, we need such materials.
Materials:
- A thread for brushes (I have a Doli thread, made in India) - 1 reel.
- Sewing thread to match the thread for the tassel.
- An unnecessary plastic card or business card (we will wind the thread around it).
- Sharp scissors.
Master class on creating tassels from threads.
Step 1.
To begin with, take a string for a brush and wind it on a plastic card in width (along the longer part). Look at the photo.
How much to reel?
Here you are not limited, make to your taste. The brush in this master class is 300 turns.

After winding, secure the end of the thread with tape or an awning so that the threads do not come apart.

Step 2.
Now we need to fix the threads. To do this, we will knit a thread for a brush in the center with a sewing knitted thread.
Why knitted thread?
The knitted thread is rougher, if I may say so about it. It does not slip like brush thread. And therefore it will hold the main strings tightly.

Step 3.
We turn the card over and bend it in the opposite direction. So that the arc is on the other side.
And carefully, in the center, cut the strings with sharp scissors.

Here's what you should get. Do not be alarmed that the strings are so shaggy. They will be corrected in subsequent steps.

Step 4.
Now we will fix the thread again. To do this, you can already use the thread for the brushes. Or you can use the same sewing thread.
There is not much difference at this stage.

Step 5.
But still my preference is a couple. We will pick up a brush on an awl or a long needle or knitting needle (which you have), and hold it for 5-10 minutes (depending on the thread) over boiling water.
Many craftswomen hold brushes over a boiling kettle, but there is not enough space for me there, so I like to straighten the brushes over a saucepan.

Here is the brush that should line up.
But! Look at the ends of the threads, they are not straight. Let's level them up.

Step 6.
Let's take the most ordinary paper. I took an A4 sheet and cut a small piece.
Now straighten the strings and wrap them in paper. This is how it is shown in the photo.

Step 7.
And carefully cut off everything that sticks out from under the paper. This will align the length of the brush.

We remove the paper and voila !!!
The thread brush is ready! As you can see, this is not difficult, but the result is very beautiful.
You can use such a brush as you wish: make a pendant or sautoir out of it, earrings or a keychain, or whatever your imagination is good for.

Today I showed you, dear ones, how to make a brush from threads with your own hands!
If you liked my master class, share it soon!
Write in the comments what thread for brushes do you use? And which one do you like best? And I will learn something useful from you.
And I will end on this. I went to make brushes! It is addictive. Until new master classes! Bye Bye!
 How many kilometers is the Moscow Moscow Ring Road in a circle?
 Where did the Moscow sparrows disappear: the conclusion of ornithologists Why did the sparrows disappear?
 How to make money on homemade toys?
 Coloring polymer clay in different ways
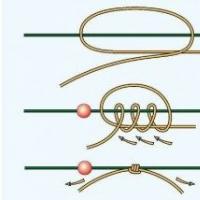 Self-tightening knot: types, methods of knitting
 How to find clients for a beginner interior designer Where to find orders for design
 International children's creative competition "Colorful colors of autumn. Important organizational points