Binding your book
Binding your book
A book downloaded from the Internet, which is expected to be used frequently, such as a textbook or reference book, is convenient to print.
It makes sense to print an interesting novel that you also want to keep on your shelf. When going on vacation, you can not buy consumer detectives, but print several works.
It is desirable to print the novel written by you.
Printer name and some word processing skills Printing a downloaded text or your novel as a stack of paper is not difficult at all, and I will not offer anything new here.
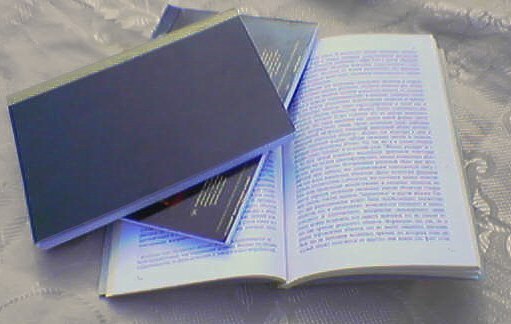
But a stack of paper covered in block letters is not yet a book. For a stack of paper to become a book, it must be bound.
I am sure that the author who wrote the novel will want to hold a bound volume in his hands. At least for your own pleasure, in order to feel the weight of your creation.
Publishing companies now offer many options for binding, both traditional and with glue and all sorts of rings, spirals, clips, etc.
I prefer to do binding using the simplest technology using staples.
Below I will tell you how to do it using a minimum of tools and materials.
You will need: a cardboard candy box, 3 paper clips, a sharp knife, scissors, pliers, a gypsy needle, a piece of construction tape.
1) First of all, I print out all the text in A5 format on white offset paper with a density of 70 g / m 2. Such paper costs less than office weight of 80 g/m 2 , and the paper weight of the book is the same as that of a regular book.
When printing from Word, you should set the page parameters to A5, margins on the left 2.5 cm, on the right 1.5 cm. Margins at the top and bottom at the discretion of the author. Don't forget to set the "mirror margins" option and the "outside" pagination. Formatting and decoration of the text at the discretion of the author.
2) A5 paper is usually not sold and you will have to cut standard sheets. 2-3 sheets of A4 paper are folded in half and cut with a sharp knife. It is convenient to use a sharp construction knife here. When printing, you should load the paper into the printer so that the cut edge is later on the side of the binding.
2) Now you should find a single-layer and beautiful cardboard for the cover. Cardboard from various kinds of packaging boxes is well suited. For example, from chocolates or shoes. The cardboard for such packages already has coloring and original drawings, and therefore your book will be easy to find on the shelf.
3) Cut out two covers according to the size of the printed sheets. Here it is necessary to pay attention to the following. In order for the book to open well in the future, it is necessary to foresee an inflection along the binding in advance. Therefore, try to cut the cover in such a way as to use the existing folds of the cardboard box. The fold should be about 1 cm from the edge on the binding side.
4) Now we need brackets. It is convenient to make brackets from metal paper clips by bending them with pliers. You will need 3 paper clips ~ 1 cm wide and 3-5 mm taller than the thickness of your book.
5) Now the most difficult operation. Making holes in a stack of paper. Use one sheet of paper as a template and mark the position of the staple holes. The holes should be ~5mm from the edge. Now knocking down a stack of paper about 10 sheets thick, and pressing it tightly against the table, punch holes with a gypsy needle, tapping it with pliers or a hammer. Don't forget to put a thick magazine underneath so you don't damage the table. When the stack of paper and covers are punched, it remains to collect everything together, insert the paper clips and bend the ends of the paper clips.
The operation of punching holes requires accuracy and precision, otherwise distortions may occur and the edges of the book will turn out to be uneven. In principle, this is not scary and you can cut off bumps or even the entire edge using a sharp knife and a metal ruler. But this is a more complex operation, and therefore it is better to avoid it.
6) It remains to make the final touch. On the end of the book, you need to stick a strip of building or other beautiful adhesive tape. The book is ready.
I promised to describe the most accessible way, without the use of special tools. But if you have a drill or a construction stapler, then you can simplify the work. An electric drill allows you to drill through an entire stack of paper with one setting. To do this, you need to take a drill with a diameter of 1.6 - 2 mm. When drilling, do not try to immediately drill through the entire thickness, otherwise the drill may get stuck tightly and the drill will tear the paper. Drill a little at a time, pulling out the drill a few times and clearing it of paper.
A construction stapler can staple a stack of paper up to 150 pages thick.
In this way, you can also sew sheets of A4 format. I had a chance to stitch a book of A4 format with a volume of 250 sheets. It turned out great. But books in A5 format are more convenient to store on a shelf.
I should note that this method of binding is also used by professionals. Only they have special machines, including those for trimming the edges. Often in small publishing companies you will be made the same binding using colored cardboard for the cover with a density of 120 -160 g / m 2, stitching the stack with a construction stapler and gluing a strip of colored paper to the spine. Therefore, you can order a binding and not follow my advice.
The advantages of this method of binding are that it is accessible to anyone who is able to at least evenly drive nails.
I described the simplest, in my opinion, book binding technology. Of course, the proposed method also has its drawbacks. In particular, there is no discussion at all about how to hold the stack of printed sheets together and prevent them from spreading while drilling or punching holes.
When drilling, it is enough to knock down the stack and press it against the table with a ruler and holding it with one hand, with the other hand, use a drill to drill holes. If you are a man, and your hands grow from where they should, then everything will work out for you.
Otherwise, have an assistant hold the stack while you fight the drill.
When punching holes with a needle, such efforts are not necessary, but still a stack of paper strives to crawl across the table. Any attempts to press it with a volume of an encyclopedia lead to the fact that the stack is still not even.
However, a simple device for fixing the stack of paper can be provided.
Take two wooden rulers 25 or 30 cm long and tie the ends of the rulers with an elastic band from underpants. Similarly, prepare the second same ring, but do not put it on the rulers yet. You put a stack of paper between the rulers, and compresses it by putting on the second rubber ring. Now that the stack is compressed, you can either drill holes or punch holes with a needle.
If the future book is thick (more than 100 sheets), then the rulers will bend in an arc. In this case, you can suggest inserting some kind of gasket between the ends of the rulers, for example, from scraps of cardboard. Wooden rulers are stiffer than plastic ones and are therefore preferred.
When punching, act in this way. Squeezing the stack with rulers and marking the places for future holes with a pencil. Place the needle and hit it with a hammer or pliers 2-3 times in the intended places, estimating that as a result the needle has penetrated at least 10 sheets of paper. Then carefully separate the rulers on one side and remove the punched sheets, put them aside. He squeezes the stack again. Further, following the traces of the needle, it punches the next portion of the paper.
It is clear that this method is aimed at those who do not have an electric drill in the household.
Second way
After the publication of this material, a response appeared from a colleague in SI, who proposed a slightly different method of fastening sheets (see comments).
The essence of the method is that a stack of paper is pre-tightened with threads through special slots, and then everything is glued with PVA terminals. The slots are sawn with a hacksaw for metal with a fine tooth, and preferably with a so-called slotted hacksaw.
For binding using this method, you will need: "harsh" threads or any other strong threads, a hacksaw, a clamp, one or two wooden planks (thick plywood), PVA glue.
The blank of the future book is squeezed between two wooden planks with the help of a clamp, or with the help of one plank and clamp it is pressed against the edge of the table (which is not a pity to scratch). At the end, on the side of the binding, grooves are cut with a hacksaw to a depth of approximately 2-4 mm. The grooves are cut not perpendicularly, but at an angle, obliquely. Then, without removing the workpiece from the clamp, threads are wound into the grooves, laying them in the grooves, and thickly smeared with PVA glue. When the glue dries a little, you can also stick a strip of colored paper on top, which will cover the disgrace of the thread binding. This is all. It remains only to wait for the glue to dry.
If, as a result of these operations, the binding has become very fluffy, then until the glue is completely dry, the binding section itself can be pulled off with a clamp. To prevent all this from sticking to the tree, you can lay a plastic film.
Add-ons
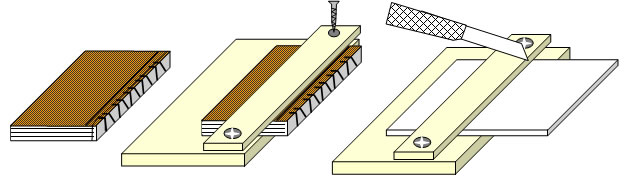
Not everyone in the household has a clamp. Often the clamp can be replaced with an antediluvian meat grinder. There was a clamp for screwing the meat grinder to the table.
I applied another way. I made a clamp from a board and a plank that can be pulled together with screws (Fig.). I took a thick planed board a little larger than the size of the book and a planed plank. I drilled two holes in the plank and drilled four holes in the board. All holes are pairwise coaxial. Now the bar and board can be pulled together with screws or self-tapping screws, squeezing a stack of paper between them. The holes in the bar are slightly larger in diameter than the diameter of the screws used, and the holes in the board are slightly smaller so that the screw is screwed in tightly.
Four holes in the board are made to expand the functionality of this clamp.
When binding, the edge of the board and planks match. However, you can screw the bar back from the edge of the board by about 2-3 cm. Then this device can be used to cut A4 paper into A5. To do this, a stack of A4 paper of 10-50 sheets is inserted under the bar. A sheet of paper folded in half is superimposed on top, which serves as a template. Everything together fits exactly under the edge of the bar, which is used as a ruler. The screws are tightened. Next, the stack is cut with a sharp construction knife (Fig.)
Similarly, you can trim the edges of your book after binding.
It is difficult to say which of the two methods is better. The first method requires less time and the book is ready immediately. The second method requires waiting for the glue to dry. On the other hand, a book with a glued cover opens up better. However, it is not known how reliable your binding will turn out. In this regard, the brackets guarantee a secure fastening.
Suggest new ideas.
In my opinion, it is convenient to print and bind the first version of the future masterpiece in order to read it, as the reader will read it. Having noticed mistakes and blunders, it is easy to unbend the paper clips, remove the unsuccessful fragment and insert a new one in its place. If you wish, you can give your book to a friend to read. After all, not everyone has the time and desire to read your works on Samizdat. Finally, you can give your volume to just a good person.
 Ready-made business plan with calculations using the example of a web studio
 Registration of an internal memorandum: sample document and drafting rules
 Break even. Formula. Example of model calculation in Excel. Advantages and disadvantages
 Advance report is ... Advance report: sample filling
 How to stitch documents with threads by hand?
 Disciplinary sanction for non-fulfillment of official duties
 Binding your book