Why is the router working but not distributing wifi. Why does the router not distribute the Internet via WiFi and how to fix it ?! The router stopped working, does not distribute the Internet
You wanted to enjoy surfing the web on the world wide web, turn on your computer or laptop and wonder why the Internet does not work? Any user can experience such an unpleasant situation. For some reason, your router does not send out a Wi-Fi signal and you find yourself cut off from the endless world of information and entertainment. Why did this happen and what can be done to quickly fix the problem?
There are several reasons for stopping access to the wireless network. They can be conditionally divided into two large groups: hardware, for example, a breakdown of a network device and software, for example, a failure in the router settings. With a physical malfunction of the equipment, it is best to contact a repair specialist, and with a hang or incorrect operation of the router, we will try to figure it out on our own. There is nothing very complicated about this. And remember to make sure your ISP is not currently doing any repairs or maintenance on its servers and lines before troubleshooting. Also make sure that the wireless module is turned on on your device (computer, tablet, laptop, netbook, smartphone).
The router, by virtue of its main purpose, operates continuously for a long period of time and therefore can simply hang. A simple reboot of the device very often helps to fully restore the normal operation of the router, including the distribution of Wi-Fi for local network subscribers. You can read about how to properly reboot your router in another material on our resource. The procedure is similar for equipment from different manufacturers.
It is possible that you or someone else who has access to the configuration of the router has mistakenly disabled the distribution of the wireless signal or these parameters have failed. So, we need to get into the web interface of the router and use the function we need so much. The sequence of manipulations for this is similar for different network devices with slight differences in the names of the parameters and interface. For an illustrative example, let's take a TP-Link router.


Method 3: Rollback the router configuration to the factory default
It often happens that the user himself is tricky and confused in the configuration settings of the router. In addition, a software failure of the router occurs. Here you can apply a reset of all the settings of the network equipment to the factory settings, that is, they are flashed by default at the manufacturer's factory. In the initial configuration of the router, the distribution of the wireless signal is initially enabled. You can learn how to roll back to factory settings using a TP-Link device as an example from another quick guide on our website.
Method 4: flashing the router
As a last resort, you can reflash your router. Maybe the old firmware started to work incorrectly or is out of date, creating a process conflict and hardware incompatibility. All router manufacturers periodically update the firmware for their devices, fixing identified bugs and adding new features and capabilities. Visit manufacturer websites for firmware updates. You can find out in detail the possible algorithm for flashing the router, again, using the TP-Link as an example, by following the link below.
As we have seen, there are ways to independently restore the distribution of Wi-Fi from the router. Try taking your time to put them into practice. And in case of failure, with a high degree of probability, your router, unfortunately, needs to be repaired or replaced.
It is difficult for a modern person to imagine life without access to the World Wide Web. The days when there was only one computer in the family are long over. Now people use tablets, smartphones, laptops that are equipped with a WiFi module. A wired router without wireless network support has already become irrelevant. He is not able to provide the Internet for all available gadgets. How to be? Of course, replace it with a WiFi device.
Previously, routers were quite expensive. Setting them up required special knowledge. Now everything has changed dramatically. Router manufacturers have tried to make their devices not only accessible to every customer, but also as simple as possible. Customers who have purchased devices from brands such as ZyXel, Asus, D-Link and others can be convinced of this. In their assortment, a number of both budget models and expensive ones are presented.
However, even though the configuration of routers is simplified as much as possible, sometimes users encounter problems. For example, no WiFi signal. There are many reasons for this malfunction. Therefore, let's figure out together how to set up a WiFi router from TP-Link and other brands, as well as fix problems with a wireless network on our own.
Wireless Network Symptoms
As soon as the user first encounters a malfunction of the router, he begins to look for the reasons in the device itself. However, in rare cases, it is it that fails. Typically, the problem is with the settings. Moreover, it is important to note that it is necessary to check them not only on a router, but also on a gadget that cannot connect to an access point. Most of all, users are worried about why the router does not distribute the Internet via WiFi.
What symptoms might indicate a malfunction?
- There is no signal.
- Long connection time.
- Low speed of the Internet transmitted by the router.
- Frequent network failures and reconnections to WiFi.
If you find such signs, you will need to check the correct connection and settings of the devices.

Search for the culprit
When you cannot figure out why the router does not distribute the Internet via WiFi, but at the same time connects to the network, you need to find out what or who is to blame. For this, a number of specific actions are carried out:
- Provider cable. Its performance is checked in the following way: connect it directly to the computer and make all the necessary settings. If there are no problems with the Internet, then the reason should be looked for in the router.
- Wireless network settings. After checking the cable and connection, you can conclude that the device itself is functioning correctly. The problem may be with the wireless configuration. There are devices that are equipped with a WiFi on / off function.
- Checking devices. There are times when the malfunction lies directly in the device that connects to the network. In order to make sure that it works, you just need to connect from another gadget.

Why does the router not distribute the Internet over WiFi? Causes
If, with an active connection, the user cannot access the global network, then the reason for this is the mistakes made when setting up the router.
- Incorrect entry / definition of the IP address.
- The transmission channel is not configured correctly.
- Invalid DNS value.
The first two mistakes are made by users themselves when creating a wireless network. And this is the reason that the TP-Link WiFi router does not distribute the Internet. The same issues apply to other brands of routers. For the last error, several factors can affect the value, such as a virus on the device.
To fix this problem, it is not necessary to contact qualified programmers. All the user needs is a cable that allows you to directly connect to the Internet, a PC or laptop and, of course, the router itself.

How to set up TP-Link WiFi router?
Devices from this manufacturer are in high demand among domestic buyers. Therefore, it will be fair to start with him. Entering the settings is standard - entering the address into the browser line. After authorization, you need to find the WAN item in the Network tab. It will ask you to select the type of connection. You can get it from your provider. The computer has the current values of the gateway, subnet mask, provided that the Internet cable is directly connected to the device. In some models, it is available to activate automatic detection. After that, you can proceed to the WiFi network settings. To do this, you need to find the Wireless tab. In it, the user selects the Wireless Settings item. On the page that opens, you will need to enter the name of the network. Be sure to select a region for correct operation. It is recommended to set Auto in the line with the transmission channel. Then click Save.
Now you can start securing your network. How to change password on TP-Link WiFi router? All settings are located in the Wireless Security item. Entering it, the user is prompted to select the type of encryption. Most programmers advise using WPA / WPA2. After activating it, you can enter a custom key. After that, be sure to save and reboot the router. If necessary, the network access key (password) is changed in the same way.

Asus routers: setting up a wireless network
In addition to the two models described above, Asus routers are popular in Russia. They are easily and quickly configured using a special program. Ideal for the novice user. In modern models, the firmware has an intuitive interface. All tabs are presented in Russian.
How to change password on Asus WiFi router if you don't remember it? Very easy. It is enough to connect the device directly to the PC using a cable. Then do a full reset. The router will reboot and the user will be able to enter all the data.
Setting up a network on a D-Link router
Why does the router not distribute the Internet over WiFi? In order to answer this question, you need to go to the "Network" tab. In the WAN item, check the correctness of the selected connection type. It is important to note that there are some providers that work with binding to MAC addresses.
Most devices with newer firmware have an automatic wireless configuration function. To do this, go to the "Quick Setup" item and activate the "Wireless Network Settings Wizard". Save the results obtained at the end. There might also be a WiFi tab. It is enough to select "Enable" in it.

Setting up a WiFi network on ZyXel routers
In the assortment of this brand, it is easy to find an excellent WiFi router for an apartment. According to many users, these devices are characterized by reliability and high signal quality. However, sometimes there may be problems with the wireless network. The reasons and solutions have already been described above. But in order for the user to know exactly where to correct the error in the settings, the instructions below should be followed step by step.
- Login to settings - 192.168.1.1.
- In the interface that opens, select the "Internet" tab and check the type of connection.
- Go to "WiFi network". There, check the parameters of the network standard, channels.
It is important to pay attention to the selected signal strength.
When setting up a Tp-Link router for the first time, there is such a problem: everything is done correctly, but your device does not distribute the Internet or Wi-Fi.
Let's try to deal with the most common situations:
- We turned on the router, but the Wi-Fi network does not appear and does not appear on devices connected to the router.
- There is a Wi-Fi network, but it is impossible to access the Internet. In this case, the network on the computer is displayed as "No Internet access", or "Limited".
These problems periodically occur on any devices, but if your router is not Tp-Link, read article.
Wi-Fi network may not work for various reasons. Most often, however, they are related to hardware problems. Therefore, use multiple devices to test the connection. If the Internet does not work, usually during the configuration mistakes were made when entering the parameters for connecting to the provider.
Consider a case where there is no Wi-Fi connection. Let's say you recently purchased a router and are setting it up for the first time, you left a standard name for the Wi-Fi network (for example, "TP-LINK_9415E8"). As a result, it will be difficult to find your network among others. To get rid of this problem, go to the router settings and enter a new network name. How to do this correctly is explained in the instructions for setting up the router,.
Then find the button on the router body that turns on the Wi-Fi network. As shown in the figure, for Tp-Link routers, this button is usually located here; when pressed, it is recessed into the case.
To find out if a Wi-Fi connection is established, check your device's Tp-Link settings.
When the wireless network is not available, we connect to the router via cable, then go to the settings. Enter the address in the browser or and go to the desired page. There we will indicate the username - admin and the password for entering the network - admin. If something doesn't work, read the step by step and carefully.
In the configuration mode, go to the "Wireless mode" tab ( Wireless), and check if there is a check mark next to the item "Enable wireless broadcasting" ( Enable Wireless Router Radio), which is responsible for enabling Wi-Fi. If not, put it on to connect the wireless network.

In addition, you need to check how well the removable antennas are attached to the router, as well as what the Wi-Fi indicator shows.
Why does the Internet via Tp-Link not work?
A situation often arises: the router was configured successfully, all equipment is connected to Wi-Fi through it, and the Internet for some reason does not work. When the router is connected via a network cable, but there is no Internet access, to fix this problem you need to:
- check and correct information for the Internet provider in the settings;
- check if the cable is correctly connected to the WAN connector of the router.
Usually on the computer in the settings it is found connection status "Without Internet access" or "Limited" (for Windows 8 and Windows 10). You can read how to fix this problem here. On TVs, various mobile devices (smartphones and tablets), you cannot run programs that use Internet access, enter any site.
What problems may arise when connecting to the Internet during the first setup of the router, you can read in the article: when setting up the router, it writes "No Internet access", or "Limited" and there is no Internet connection.
What if you can't access the Internet?
If you have one of the Tp-Link routers, you need to check:
- the provider's network cable is correctly connected to the router;
- the correct settings for your connection type.
- Connect a network cable to the blue connector of the router (it was carried out by the wizard when connecting to the Internet) or a cable from an ADSL modem. The figure shows how to properly connect the cable to the WAN connector.

When you connect a network cable to the router, you can usually get online. If this does not happen, there may be a problem with the equipment with the provider, or you need to pay for using the Internet.
- If you connected the equipment correctly, but it is impossible to access the Internet, we will check if you made a mistake when setting up the equipment. Let's go into the configuration mode, go to the "Network - WAN" tab ( Network - WAN), in it we will select the type of connection corresponding to your Internet connection. Then, in the window that opens, fill in all the fields.

If you need to share the Internet with multiple gadgets, but don't have a router at hand, you can do without one. This instruction will help you turn your computer into a router for distributing the Internet through an access point (Wi-Fi network) or an Ethernet wire.
1. How to distribute the Internet from a computer using the "Mobile hotspot" function (Windows 10 only)
1. Find the Mobile Hotspot menu: select Start → Settings (gear) → Network and Internet → Mobile Hotspot.
2. In the "Internet Connection Sharing" field, select the type of connection that connects the current computer to the Internet. This can be a Wi-Fi (or 3G) or Ethernet wireless connection.
3. Click "Change" and in the next window specify the name and password for the new wireless network through which the computer will distribute.

4. At the top of the page, enable the "Allow other devices to use my internet connection" option.
After that, you can distribute the Internet through the created Wi-Fi network. It is enough to connect the necessary devices to it using the password created in the third step. And you can turn off the distribution of the Internet in the same place where the wireless connection is turned off - in the "Network" window on the taskbar.
1. Start the command line. To do this, enter "Command" in the search for the system, right-click on the found element and select "Run as administrator".
2. To create a new distribution network, type netsh wlan set hostednetwork mode = allow ssid = Stacy key = 4419E1z # at the prompt and press Enter. Instead of Stacy, you can enter any other network name, and instead of 4419E1z # - any other password.
3. To activate the created access point, enter the command netsh wlan start hostednetwork and press Enter again. If the commands worked, you will see the following text.

4. Now allow other users to access the Internet through the created network. First, open Windows Control Panel and select Network and Sharing Center.
5. Then right-click on the icon for connecting your computer to the Internet, select "Properties" → "Access" and check the boxes next to the permission requests. In the "Home network connection" field, select the wireless connection created in the second step of the instructions.

After that, you can connect other devices to the Wi-Fi network configured in this way using the specified password. To disable the hotspot, type netsh wlan stop hostednetwork at a command prompt. To re-enable it, use netsh wlan start hostednetwork.
If the Internet does not work on the connected devices, open the Device Manager menu through the Control Panel, expand the Network Adapters item and check that all devices from this list are turned on. If you find inactive among them, enable them using the context menu.
If you encounter other problems, try reinstalling the network adapter drivers manually by downloading them from the manufacturer's website, or automatically using the Driver Booster program or a service. The latter will do everything for you.
If you don't want to mess with the command line, you can use a special utility to quickly set up a wireless access point. With the free Connectify Hotspot software, you'll be up and running in minutes.
- Download and install Connectify Hotspot.
- Run the program and follow the prompts on the screen. The Russian interface language can be selected in the settings. The utility will ask you to set the type of computer connection to the Internet and the parameters of the new wireless network. After that, it remains to click on the start button to activate the access point.

When you're done, you can distribute the internet to other devices over Wi-Fi. You can manage the wireless network right in the program window.
Connectify Hotspot also has a paid version with additional features. For example, it allows you to distribute not only fixed Internet via Wi-Fi, but also 3G and 4G. Hotspot Pro costs $ 35.
- Connect the Ethernet ports of both devices with a cable.
- On the computer from which you want to share the Internet, open the "Control Panel" and go to the "Network and Sharing Center" → "Change adapter settings". The names may vary from version to Windows.
- In the window that opens, select two connections using the Ctrl key. The first one should be responsible for connecting your computer to the Internet. The second is for connecting a second computer to this one. Right-click on any of the two connections and select "Configure Bridge".

In a few seconds, a new connection should appear with the name "Network Bridge", and the status "Connected, Connected" should be displayed next to the used connections. If everything goes well, the Internet will work on the second computer. But this may not happen immediately, but after 10-15 minutes.

In macOS, it's pretty easy to set up Internet sharing both via cable and via. You do not need additional programs for this.
- Expand the Apple menu and go to System Preferences → Sharing.
- Check the "Shared Internet" box on the left pane and specify the type of connection between the current computer and the Internet in the "Shared connection" list on the right side of the window. For example, if it is connected to the Network via a cable, choose Ethernet.
- In the For Computers Using box, select a method for sharing the Internet with other devices. For example, if you want to distribute the Internet without wires, choose Wi-Fi, if by cable, then Ethernet.

If you selected Wi-Fi, uncheck the Internet Sharing box, click Wi-Fi Settings and set the hotspot name and password, then check the Internet Sharing box again.
After making these settings, you can connect other devices to the computer using the selected method.
A lot of comments and questions are collected by articles on setting up the distribution of Wi-Fi from laptops. When the Internet is connected to the laptop, we launch the distribution of the Internet via Wi-Fi in Windows and connect our devices to it: phones, tablets, and other laptops. Our laptop replaces a Wi-Fi router. You can run Wi-Fi sharing in Windows 7, Windows 8, and Windows 10. In Windows XP, this is not possible.
I have already prepared instructions for setting up hotspot on Windows 10 (using the command line, or the Switch Virtual Router program) and on Windows 7. See these articles:
So, many people manage to launch Wi-Fi distribution without any problems. But, there are cases when after setting up Wi-Fi distribution on a laptop, the network itself appears, devices connect to it, but the Internet does not work. On phones and tablets, the pages in the browser simply do not open, and programs that need access to the Internet do not work. If you connect other computers to your laptop via Wi-Fi, then when such a problem appears in Windows, the Internet connection status "No Internet access" will appear. Or, to a limited extent, if you have Windows 8, or Windows 10.
The problem is clear: The laptop distributes the Wi-Fi network, the devices connect to it, but the Internet does not work, "Without access to the Internet." Now we will try to figure out why such a problem may appear, and we will try to solve it. We will consider the case when it is possible to create a network, but there is no Internet access. There is simply another problem when the virtual Wi-Fi network itself on a laptop does not start at all, but this is already a topic for another article.
Why does the Internet over Wi-Fi not work when sharing from a laptop?
Let's start with the most popular reason why the Internet, the distribution of which is configured in Windows, may not work.
1 We open the general access to the Internet. In each article on setting up a hotspot, I wrote about a very important point - opening the general access to the Internet for a running Wi-Fi network. It is because of the sharing settings that the Internet most often does not work. The created network appears, we connect to it without any problems, but the connection through which the Internet is connected to your laptop does not allow using the Internet connection.
Therefore, in the properties of your internet connection (most likely, this is a regular network cable connection, or via a 3G / 4G modem), you need to enable Internet sharing for the connection we created. In the articles, links to which I gave above, this information is. But, let's figure it out again, how to open the general access to the Internet. In both Windows 7 and Windows 10, this is done in much the same way. I'll show you using Windows 7 as an example.
Click on the Internet connection icon with the right mouse button, and select the Network and Sharing Center item.

We open Change adapter settings.

Right-click on the adapter through which your laptop is connected to the Internet. We choose Properties.

Go to the Access tab, check the box next to "Allow other network users to use this computer's Internet connection" and select the network we created from the list. Most likely, it will have the name " Wireless network connection"with some number at the end. Click Ok.

After these steps, the Internet should work. If it does not work, then try restarting the laptop again and restarting the Wi-Fi distribution.
2 Disable antivirus and firewall. Antiviruses very often block the connection of your device to a laptop. In such cases, an error like "Failed to connect" appears, all the time getting an IP address ", or an endless connection to Wi-Fi.
But it may be that because of the antivirus, or the installed firewall on your laptop, from which you distribute the Internet, there will be no Internet access. Therefore, you just need to try disabling your antivirus. For a while. Only the built-in firewall can be disabled. Different antiviruses do it differently.
3 Check if other devices are working. It may be that the problem is not in the laptop that distributes the Internet, but in the device that you are trying to connect to the Internet. If possible, just take another device and connect to the network you created. See if there will be internet access there.
If the problem appears when connecting a laptop with Windows 7 installed, then you can still read the instructions for. If you have Windows 10, and the status is "Limited", then look.
4 Features of Internet connection. It is clear that in order to distribute the Internet from a laptop, it must be connected to the Internet. It is this connection that it distributes to your other devices. So, if there is no Internet access, then this may be due to the peculiarities of your Internet connection. Especially, this can be when connected via a 3G / 4G modem.
I have no way to test the operation of a virtual Wi-Fi network, with different Internet connections. Therefore, if you are having trouble converting your laptop into a Wi-Fi router, it may be due to your internet connection.
6 Update: In the comments, Zhenya shared another solution that helped him fix the problem with the lack of Internet when distributing Wi-Fi from a computer.
On the "Access" tab, where we open the general access to the Internet connection, you need to click on the "Settings" button, and in a new window put a check mark next to "DNS server".

Click Ok and see the result. The Internet on the devices that you connected to the laptop should appear. If not, try restarting your computer again and restarting the distribution.
7 Update: another tip from the comments. If your computer is on a home network, try logging out of it. This should help, and your laptop will start sharing the internet to other devices.
If you solved this problem in some other way, then you can tell us about it in the comments, we will be grateful. Well, ask your questions, we will try to help!
8 Another solution shared by Mikhail in the comments, and this method helped many.
We go to the devices of your Internet connection (as I showed above in the article), and uncheck the box "Allow other network users to use ...". Click Ok. Next, open the properties of this connection again, and put a tick next to "Allow other network users to use ..." and select our connection from the list (wireless network connection with a digit at the end)... Click Ok. The Internet on the devices should work.
 Scenario "March 8" junior group
 Scenario of a game program for junior schoolchildren
 Flowers from Zhostovo: painting on metal
 How to type Roman numerals in Word
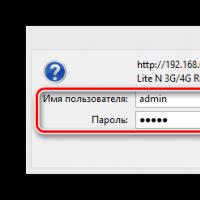 Why does the router not distribute the Internet via WiFi and how to fix it?
 SAP program what is it
 Electronic money and payment systems