Do-it-yourself earthenware without a potter's wheel. Clay crafts. How and what is made of clay. Features of different types of clay
Video content called "" was posted by the author "SKILLED HANDS" for 2 years. ago, it has already been viewed 588 times. 5 liked the video and 0 disliked.
Description:
Surprisingly beautifully, a person makes a jug from a piece of clay with his own hands. This is Ukrainian folk art that is passed down from generation to generation. Just look in the video as he spins the potter's wheel with his feet. This is an amazingly beautiful ancient Ukrainian craft that you will not see anywhere else in the world. ================================= =============================
Make money on Youtube -
Watch other videos on the SKILLED HANDS channel:
★ A beautiful and original candlestick with your own hands from eggs. -
★ How to make a slime with your own hands. Blue slime made from glue and sodium tetraborate. -
★ Simple and fun life hack. How to squeeze lemon juice -
★ How to Make a Fidget Fidget Spinner with 3 Blades, Bearings and a Hot Glue Gun. -
★ How to make a Fidget Fidget spinner from 3 caps and 5 penny coins on a bearing.
★ Crazy life hack. Hot glue envelope-
★ DIY room decor from birch, willow twigs and a hot glue gun -
★ How to make a Hand Fidget Fidget Spinner from pencils, 2 nuts and a glue gun in 2 minutes. -
★ DIY Decor. A wreath of cones on the wall. Nice and stylish. -
- All videos of the "SKILLED ROOKS" channel -
==============================================================
Skillful Hands channel playlists:
★ Weird and beautiful videos -
★ DIY room decorating ideas -
★ Hand-made DIY things - goo.gl/AyocKZ
★ Cooking slimes. Hand Gum Recipes -
★ How to do it yourself -
★ Life hacks for home -
★ Crazy and Useless Life Hacks -
★ DIY - DIY by yourself -
★ Fidget Spinner -
★ Life hacks -
- All playlists of the SKILLED ROOMS channel -
==============================================================
Subscribe to the "SKILLED ROOKS" channel -
Make money on Youtube -
==============================================================
On our channel you will see many useful life hacks for life, using which you can greatly simplify your life. Life hacks for school will help improve grades, teach how to hide cribs and will be useful for girls and boys, teenagers, as well as adults who want to return to school. Summer Life Hacks, filmed to have a good summer vacation. Here you will find many DIY ideas. Diy decor, let you choose cool ideas for home. You just have to repeat it with your own hands and decorate your apartment. DIY room ideas will make the room unique and delight your guests. Also on our channel you will find ideas on how to decorate a children's room so that your kids like it. Many decorative decor ideas will not leave you indifferent. Our channel has a large collection of videos about slimes. You will see several recipes for making hand gum. We have a lot of beautiful videos with a hot glue gun. Subscribe to the channel: Video source youtube.com/watch?v=O-pd84ncDJM
This video material about sculpting can be viewed online, as well as downloaded absolutely free of charge and without registration in almost any video format: mp4, x-flv, 3gpp and so on. You just need to click on the "Download" button at the top of the site and move the slider to the right. In addition, you can watch other educational video about modeling from plasticine, salt dough, clay and so on from the author SKILLED HANDS, which are also posted on our website, as well as other similar educational videos about modeling, crafts, materials, art and the like. If you need a mobile version of this video, then our site has a modern responsive design and is suitable for any mobile devices: tablets, smartphones, phones and so on.
Don't forget to bookmark educational and educational videos for kids and adults! To come back to viewing.
Making a clay vase with your own hands is an amazingly pleasant experience. Following a simple instruction, you can get an excellent result on the first try, causing well-deserved pride.
Features of different types of clay
The first part of the job is choosing the right material. That is, one of the varieties of pottery clay for modeling. Variations of this raw material in the store differ from each other in color, firing temperature, size of fractions, and the presence of additives.
You can often see in the description such a point as "the content of the chamotte". Chamotte is fired and then finely ground clay. Added to pottery raw materials, it serves to increase its strength characteristics. That is, a chamotte clay vase will turn out to be more reliable and durable.

What you need to work
A good master is seen even before he starts working; by his instruments. They are carefully and wisely selected, laid out so that it is convenient to use them. To sculpt clay vases, the list of necessary items is as follows:
- Potter's wheel;
- container with water;
- a sponge for collecting excess liquid;
- special stack;
- fishing line or strong thread for cutting the finished product from the potter's wheel.
By the way, there will be a dry towel or rag.
The choice of form - what kind of vases are
Before you start making a clay vase, you can study existing examples. Greek amphoras and dinos, simple Russian pots and jugs, elegant multicolored Chinese designs - all of them can serve as a source of inspiration.
However, it is not necessary to think over the form in advance. Improvisation in the process of work is also a very interesting and promising way. Thus, truly unique, unrepeatable products are obtained.
Getting started: step-by-step instruction for making a vase on a potter's wheel.

How to mold a clay vase
There are several main stages along this path:
- Clay preparation
The working raw material must be thoroughly washed so that it is homogeneous, without air bubbles inside. If necessary, add water if the clay is too dry. Working with the material at this stage is like kneading dough. As a result, you should get a neat dense.
Important! For tall forms, such as a vase, use a denser clay. When preparing working raw materials, do not add too much water, so that it does not turn out to be too liquid.
- Centering clay on a potter's wheel
Place the resulting clay ball in the center on the potter's wheel and start the mechanism at maximum speed. Then moisten the workpiece, hands and engage in leveling the mass.
To do this, place your right hand so that the palm, perpendicular to the potter's wheel, touches the clay. With your left fingers, first press down the workpiece from above to flatten it. Then, move the pressure to the bottom of the clay piece and lift it up.
It is necessary to flatten and again raise the working mass until it is exactly in the center of the disc. A beginner potter will need about 5 minutes to do this, the master, of course, will do it faster.

- Bottom formation
Usually, for the first time before this stage, it is not completely clear how you can make a vase out of this clay. It seems to many that they will not succeed - it is difficult to imagine how to create a decorated product from the blank lump lying in front of you.
But right now, at this moment of work, the time for a miracle comes. You begin to shape the outline of the future vessel. And it turns out to be not so difficult!
Use your fingers to make a notch, moving from the top of the clay mass inward to the bottom. Of course, it is not necessary to bring the hole to the surface of the potter's wheel. It is recommended to act with the thumb of one hand and the index of the other, connecting them together.
After that, the speed of the potter's wheel is reduced, and the recess obtained in the workpiece is expanded by smoothly pressing on its walls from the inside. This stage of sculpting a clay vase is called disperse the bottom.
Important! In the process of further work, it will be necessary from time to time to remove the liquid accumulated on the bottom so that it does not get soaked and deformed. To do this, use a sponge.

- Working with a form: basic techniques
The subsequent steps depend on what form of the product you want to get as a result. Here we will give a few basic steps that are the answer to the question of how to make a vase from clay:
- Pulling the vessel up
To do this, place your right hand perpendicular to the disk so that its fingers touch the outer wall of the future vessel. And with your left fingers, lightly press on the inner surface of the groove slightly at an angle, from bottom to top. Drive smoothly to the edge of the workpiece.
- Bending formation
Position your arms in the same way as for pulling the shape up. However, this time, do not bring the movement to the edge by completing it earlier. Thus, you get a vessel that at first gradually expands, but then, towards the neck, narrows again.

- Aligning the outside of the vase
When a vase is molded from clay with your fingers, irregularities remain on its surface, it looks rough. Some people like this texture, but if you want a smooth shape, use a stack. Move it slowly vertically from the bottom of the product to its top.
All of the above techniques for sculpting a clay vase will become intuitive when you get down to business. It won't be a problem for you to combine them, and even try something else right away - the clay itself tells you what to do with it.
Important! To make movements in the process of work more accurate, you need to have support for your hands. For example, you can put your elbows on your knees.

- Separating the vase from the potter's wheel
After finishing the sculpting process, stop the potter's wheel and cut the resulting product from the disc with a fishing line or rigid thread. Previously, horsehair was used for this, but modern world dictates its terms.
With clean, dry hands, remove the finished vase from the circle.
- Burning
The final stage is carried out in a special oven. Heat the pottery gradually, increasing the temperature by about 100C per hour. The maximum value to which the process must be brought is usually indicated on the clay packaging. This indicator is approximately 950C.
After 8 hours of firing at the maximum temperature, its value must be gradually reduced as well, until it reaches 40C. Then the product can be removed.

Although ceramic tableware looks aesthetically pleasing without processing, you can additionally decorate it with painting or glazing. Do not forget that after this the product must be re-fired.
An original and beautiful home decoration is ready! If it seems to you that you need more experience and practice, then you definitely need to go to study, and the Bell Pottery School conducts courses and master classes in pottery for ceramists of various levels of training.
How to make clay products without a potter's wheel, you will find out in this interesting and comprehensive article.
You, of course, have seen clay products on store shelves many times. Maybe you were interested in the question: how are clay products made? If so, you will find it helpful to read this article.
Ways to make clay products without a potter's wheel
The first thing you will need to make clay items is the raw materials for making these very items. It should be noted that not everything that resembles clay is clay at all.
How to test clay
You can check the clay as follows: the clay must be rolled into a very thin strip (sausage), let the thickness of the clay sausage not exceed three millimeters. If the sausage has not fallen apart, then this is the real clay that can be used to make products.
Another way
And there is one more way. In this method, the clay is tested for taste. There is no need to be intimidated by this, as all the old masters did. If biting off a piece of clay, you do not feel an unpleasant taste, if there is no squeak on your teeth, then this is also what you need.
- Clay tested in these ways must be subjected to another test. The piece of clay must be dried and calcined over a fire.
- If the clay has not spilled, and its structure has become rough and uniform, then this clay is ideal for making all kinds of products from it.
Now that the clay is selected, you need to prepare it. Have you seen how the dough is kneaded? In the same way, you need to knead the clay. It is necessary to knead for a long time and thoroughly.
How to prepare clay
In the process of kneading, air comes out of the clay and the mass becomes homogeneous. This is necessary for the manufacture of quality cookware. If it is difficult for you to knead, then you can add a little water to the clay, the process will be easier. It is also possible to knead the clay with your feet, it is much easier to do this.
- If you have a potter's wheel - very good, but if not, then you can do without it. Clay products can be made simply by hand, without resorting to mechanics. But it is worth noting that if you still use a potter's wheel, then take a very soft clay.
- The most in a simple way the manufacture of clay products without the use of mechanical means is the rolling of clay strips. It is imperative to roll out on a flat surface, which must be covered with a damp cloth. The strips are rolled out to five to seven millimeters. This option is ideal if you decide to make a shallow plate.
How to make clay jugs
For the manufacture of boilers and jugs, you need to make clay strands of 0.5-0.7 millimeters. The harnesses are twisted into spirals. If you want to make a product that will have a flat bottom, then make it using the above method and cut the bottom to the desired size.
- When the bottom is ready, the first harness is laid on it along the entire perimeter. This is done with the right hand, and pressure is made with the left so that the bundle sticks to the bottom.
- Then the next tourniquet is applied, and so on. Do not forget to constantly wet the product during the sculpting process. This is necessary so that the clay does not dry out and the clay strands stick well to each other. The product can be moistened with a brush.
If you make a product with different diameters, for example, a jug, then the turns are superimposed with slight deviations outward when the diameter expands, and inward, if it goes to narrow. It is only necessary to align and iron the bundles during the sculpting process with damp hands. Then your dishes will be durable.
When, finally, the modeling is finished, the product is wrapped in paper or cloth and a flat surface is laid. Drying of the product takes two days. Be patient a little. The clay must dry well so that it doesn't burst in the fire.
The product is first fired for three hours at a temperature of 300 degrees. Then the temperature rises to five hundred and eighty degrees and remains that way for 15 minutes. Then the temperature is brought to nine hundred degrees and remains so for another 15 minutes. Everything is now ready. Take out the product when it cools down.
IRK.ru launches new project dedicated to interesting and rare professions and hobbies. Here we will talk about such professions or hobbies as, for example, a blacksmith, restorer, watchmaker or jeweler, and many others.
The first participant in our project was potter... Potters and potters appeared before our era. These craftsmen processed clay and turned it into crockery and other household items.
At that time, clay products were a necessary element of everyday life for many peoples. Now it is not so much a craft as a whole art. After all, clay can be used to create both ordinary flower pots and all kinds of interior items.

The process of creating pottery is quite complicated and consists of several stages. At first clay needs to be prepared... It is crushed, flattened, adding a little water to soften, collected in a round ball and kneaded again. As a result, no hard lumps should remain in the clay.

Now you can work with the material further. A piece of clay is placed on the potter's wheel and firmly squeezed by hands from all sides.

In this case, the position of the future product needs center... If the master feels that his hands are moving unevenly in a circle, shaking, it means that the clay is not in the center of the circle, and the product will not work.

After starts molding... Gradually, the potter evens out the clay mass, gives it the shape of a cylinder.


Then he can narrow it to the top or in other places, and in some other places, on the contrary, expand - depending on what the master wants to get in the end.

If the cylinder turns out to be even, then its further stretching and formation into a pot shape will be simple - any shape can be created from a cylinder.


It happens that the product is simply destroyed during operation. There may be various reasons for this. This often happens if the clay is too liquid. Then it must still be dried and start all over again.

When the master has achieved the desired shape, he removes the excess clay with strings or wires, also the product is leveled with a knife or wooden spatulas.

Several methods are used to decorate finished products. These are embossing (indentation of parts of objects), engraving (drawing with pointed sticks), glazing (coating with glaze).


From clay, you can create, for example, such pots covered with glaze and supplemented with volumetric fantasy elements, as well as vases and crafts, for example, for decorating aquariums.


 Clay can be purchased ready-made or in powder form in specialty stores or art stores. But in extreme cases, you can do it yourself, but it's easier to say dig up in your garden or in your career. But usually it contains all sorts of unnecessary impurities, from which it needs to be cleaned.
We put the clay in a basin and fill it with water. When the clay has turned into a slurry, we put it in nylon tights and filter it into another basin.
Wait for the clay to thicken, be sure to stir it.
We put the clay on the gypsum board. When one side of the clay is dry, transfer it to the other. But if you don't have gypsum, put the clay on an oilcloth and leave to dry in the sun. After the clay has thickened, we squeeze the air out of it and put it in a plastic bag.
We take out the clay for sculpting and store it under a damp towel.
We mold clay in the same way as plasticine, only it is bad in it that individual parts are poorly molded with each other. To do this, make the so-called slip is clay in the form of a slurry mass. To connect the parts, it is simply applied to it with a brush.
HOW TO MAKE AN ALPINE SLIDE JUG
A jug - with your own hands. Crafts for giving!
Crafts for the garden acquire special charm and meaning if they are made taking into account the place where they will be located.
There are crafts that can be used to decorate absolutely any corner, but there are some that will look better in a certain place. For example, on an alpine slide, on the banks of a decorative pond or stream, near a fountain or garden waterfall, jugs are often placed.
Of course, buying a pitcher today is not a problem. But, firstly, it is not always possible to find on sale exactly such a jug as you want to see in the composition, and secondly, an expensive piece of art can be quite expensive.
But a jug for an alpine slide, a garden fountain or a pond can be made with your own hands. Not everyone knows pottery, so he will look for a simpler technology. For example, let's make a jug not out of clay, but out of cement.
How to make an original jug shape
You can, of course, "blind" a lump from a cement-sand mortar, smooth its surface to almost perfect evenness, form a neck, dry the product well, and then decorate it as you like.
But the jug is a rather large product, and the solution is a pliable mass. Even if you manage to sculpt what you want, it may deform during drying. Therefore, we are looking for an even simpler option. For example, you can find a rounded stone and plaster it with mortar. And then sculpt the neck and nose - the weight of these parts is small. When the product is dry, you can decorate it. But if you want. For example, decorate a jug with mosaics, then you can do this immediately, while the product is raw.
You can even make a boulder out of cement, but it's light. very helpful stuff.
Another option for creating such a craft for the garden is to use, as a basis, a real, but cheap glass or plastic jug. Even an old broken electric kettle can be adapted - it has a jug-shaped shape.
But how to plaster glass or plastic so that the solution does not slip? Very simple: take a tape adhesive plaster and wrap it around the jug. The container can then be covered with cement without any problems. By the way, instead of cement, you can use a putty for facade work - the effect will be the same.
Jug decor for an alpine slide or pond
Mosaic- a very interesting and grateful kind of decor. You can use shards from old broken dishes, pebbles for her. Basically, if you want to make a masterpiece, you can buy a little mosaic.
Dyeing... If suddenly you want to make a jug for gold, silver or copper, no problem. Carefully prepare the surface: putty, sand, prime and paint with the appropriate paint. To make things easier for yourself, you can use spray paint.
Under the clay... If you want a "real clay" jug, apply a thin layer of clay on the almost frozen cement surface (practically rub it in), leave it to dry, then fix the flaws with sandpaper. Wait until it dries completely, prime and varnish.
You can think of a lot of options for decorating a craft for a garden - a jug. Go for it, be creative, and your alpine slide will be simply charming.
In all the photos there are real clay jugs, so that there is something to be guided by.
 What you need to open a hookah lounge, and how to do it correctly
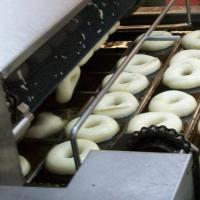 How to start a business and choose donut equipment
 Opening a company in Montenegro Open a company in Montenegro
 The carpentry shop as a business
 How to choose a business direction?
 Sample business plan of a dental office
 Five best business ideas that brought millions What business to open so as not to go bankrupt